# Computer Engineering

Computer Engineering course

# computer engineering

Welcome to the home page for computer engineering at HPA, Spring 2025

Class description:

With the advent of AI, new fields are emerging, and to prepare you for this future, you will need hands-on experience with the tools that run AI, cybersecurity, ethical hacking, and the systems these run on. Starting with building our own computer system, then expanding to include networking, hacking, machine learning, then a deep dive into the tools of AI, you will be prepared for a future we can only imagine. While some computer experience is useful, it is not required, as we will start with hardware and move into software, then into the use of AI for programming and engineering. Where traditional computer science courses focus on programming, we will cover a broader scope, with access to emerging tools and skills.

Prerequisites: 9-12, semester course

<span style="font-weight:bold;">Level check:</span>

- Know what a computer is?
- Code experience?
- Hardware in a computer ID?
- Built a pc before?
- Worked with networking or wireless?

<span></span>

**class expectations**

1. notes taken every class, emailed at end of class
2. weblogs will be available soon to post these
3. bring your own paper, pencil, etc.
4. phones are left outside
5. <span style="font-size:13px;">you have access to expensive stuff and sensitive data, AUP is in effect unless otherwise specified</span>

<div id="bkmrk--4">  
</div>Start with Why:

start with flying drone:

Why? what is going on? at what levels? how so fast? what does it enable? how is this different from robotics? how from the internet? why do we need things to react faster than humans (chernobyl)? Mars delay? what “senses” are in this drone? It “looks” alive, what senses and reactions are biophilic? what levels or systems are in play here? motion/distance sensors, speed/load sensors, comm with pilot, visual feed, GPS, altitude. What is next? predictive, adaptive?

telemetry example: elab

what is measured? who cares? why trends not just a speedometer? what is actionable intelligence? what is the next level (adaptive,  predictive)? what is the range in distance, time and granularity for telemetry? what does the research on Mars delay enable here on earth (concentrators, PLC)? How do these mimic life? (ganglion).

AI example: Tailwind AI server GPT4all

what is on the web? written vs. scanned? since when? is there real time data in there? what is the math behind an LLM? what is indexing and embedding? what is an 8B model? how is this different from search (spotlight)? what is next? Imagine life without google, without spotlight, without command -F. What is a card catalog? where? what did it enable, and what were the limits? in person, curated? Why the big deal, hasn’t this been around already (spellcheck, grammarly, word)? what about instant translation?

Social aspects: is this new? what was social media 100 years ago? what was media in general? who controlled? editors, writers, curators? encyclopedia different how? content, access, news delivery, self contributions

AI in education:

Data vs. knowledge vs. wisdom? do we teach process or product?

Local talent: Sam, Greg, Steve, IT retirees

Internet: binary, starlink-huge if true

[https://www.youtube.com/watch?v=Q089i8RQPB0&amp;t=3s](https://www.youtube.com/watch?v=Q089i8RQPB0&t=3s)

esri mapping

AI: how it works, why is it different?

Quantum computing: how it works, how is it different from classical computing?

Starlink internet, cel phone metaphor, implications

[https://www.youtube.com/watch?v=EOPLN-MVKY4](https://www.youtube.com/watch?v=EOPLN-MVKY4)

<span style="font-weight:bold;">Notes:</span>

Python

C++

SQL

R

Hardware: BASYS3

Vivado

parrot os

sense HAT

hifiberry DAC+

POE HAT

uptime UPS

nodered

rpi

debian/ubuntu

docker

MAMP


## Additional migrated files

Files present in the Apple export but not embedded in a page:

- [Download arduino parts.pdf (application/pdf, 102.9 KB)](https://bookstack.kamuela.org/attachments/263)
- [Download TC 1.0.pdf (application/pdf, 637.9 KB)](https://bookstack.kamuela.org/attachments/266)
- [Download Screenshot 2025-02-02 at 12.41.10 PM.png (image/png, 62.2 KB)](https://bookstack.kamuela.org/attachments/267)
- [Download Screenshot 2025-02-02 at 12.42.37 PM.png (image/png, 50.9 KB)](https://bookstack.kamuela.org/attachments/268)
- [Download arduino-ide\_2.3.4\_macOS\_arm64.dmg.zip (application/zip, 175.5 MB)](https://bookstack.kamuela.org/attachments/273)
- [Download Screenshot 2025-04-14 at 5.33.13 PM.png (image/png, 459.8 KB)](https://bookstack.kamuela.org/attachments/277)
- [Download Screenshot 2025-04-19 at 8.29.20 AM.png (image/png, 633.5 KB)](https://bookstack.kamuela.org/attachments/278)
- [Download Screenshot 2025-04-19 at 8.32.27 AM.png (image/png, 225.3 KB)](https://bookstack.kamuela.org/attachments/279)
- [Download comp-eng terminal fun.pdf (application/pdf, 29.4 KB)](https://bookstack.kamuela.org/attachments/284)
- [Download comp-eng meter unit 2.pdf (application/pdf, 2.4 MB)](https://bookstack.kamuela.org/attachments/305)
- [Download network.png (image/png, 347.8 KB)](https://bookstack.kamuela.org/attachments/308)
- [Download TC 2.0.pdf (application/pdf, 1.5 MB)](https://bookstack.kamuela.org/attachments/310)
- [Download Screenshot 2026-03-25 at 5.56.42 AM.png (image/png, 1.9 MB)](https://bookstack.kamuela.org/attachments/311)
- [Download Screenshot 2026-03-25 at 5.59.10 AM.png (image/png, 2.0 MB)](https://bookstack.kamuela.org/attachments/312)
- [Download Screenshot 2026-04-27 at 3.18.36 PM.png (image/png, 149.1 KB)](https://bookstack.kamuela.org/attachments/313)
- [Download Screenshot 2026-04-29 at 7.21.17 AM.png (image/png, 187.9 KB)](https://bookstack.kamuela.org/attachments/314)
- [Download Screenshot 2026-04-29 at 7.51.47 AM.png (image/png, 1.3 MB)](https://bookstack.kamuela.org/attachments/315)

---

<small>Migrated from Apple Server Wiki. Original page ID: q5v7Q1q0</small>

# VOM meter basics

<span style="font-weight:bold;">VOM/DVM</span>

<span style="font-weight:bold;">Fluke 114:</span>

<figure id="bkmrk-fluke-114-trem.png">![FLUKE 114 TREM.png](https://bookstack.kamuela.org/uploads/images/gallery/2026-09/VYVsK9tXT7gN7hTu-fluke-114-trem-rdpxd2ru.png)<figcaption>FLUKE 114 TREM.png</figcaption></figure><span style="font-weight:bold;">Fluke 101:</span>

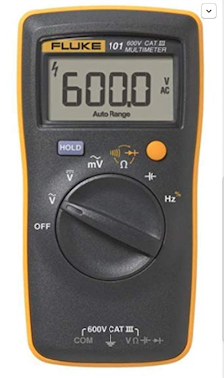
<figure id="bkmrk-6000.png">![6000.png](https://bookstack.kamuela.org/uploads/images/gallery/2026-09/XjBMF4wtqQxfrDKQ-6000-fb6cxamu.png)<figcaption>6000.png</figcaption></figure>

- V~ means AC voltage
- V-- means DC voltage (red +, black -)
- mV means millivolts (caution with this one)
- Ω means ohms
- \|\|\| means sound for continuity (114)
- -\|\|- means capacitor check (101)
- Hz means frequency (101)

<span style="font-weight:bold;">Part one: </span>record your results and email along with diagrams and photos of your work

1. test DC voltage with different batteries
2. how can larger batteries have the same voltage?
3. test AC voltage (V) at several outlets
4. test V also between each AC side and ground
5. which side of the outlet is “hot”? what color is this behind the wall? (look this up)
6. test continuity with the sound tester on metals and plastic
7. what makes good conductors/insulators?
8. test Ω across your body
9. why does this change?
10. measure mV across your body, why does this change?
11. test various electrical devices for resistance: lightbulbs, hot water heaters, appliances (across the cord)
12. 
13. determine the voltage of at least three AC and three DC sources, with explanation of each (solar panel, plugs, power supplies)
14. if available, test the voltage of the 12V battery in a non-EV car
15. start the engine, what does this tell you?
16. turn on the headlights, what happens?

<div id="bkmrk-arduino-parts-part%3A-"><span style="font-weight:bold;">Arduino parts part: Each kit should have these. Count them out into a new bin for your next kit:</span>
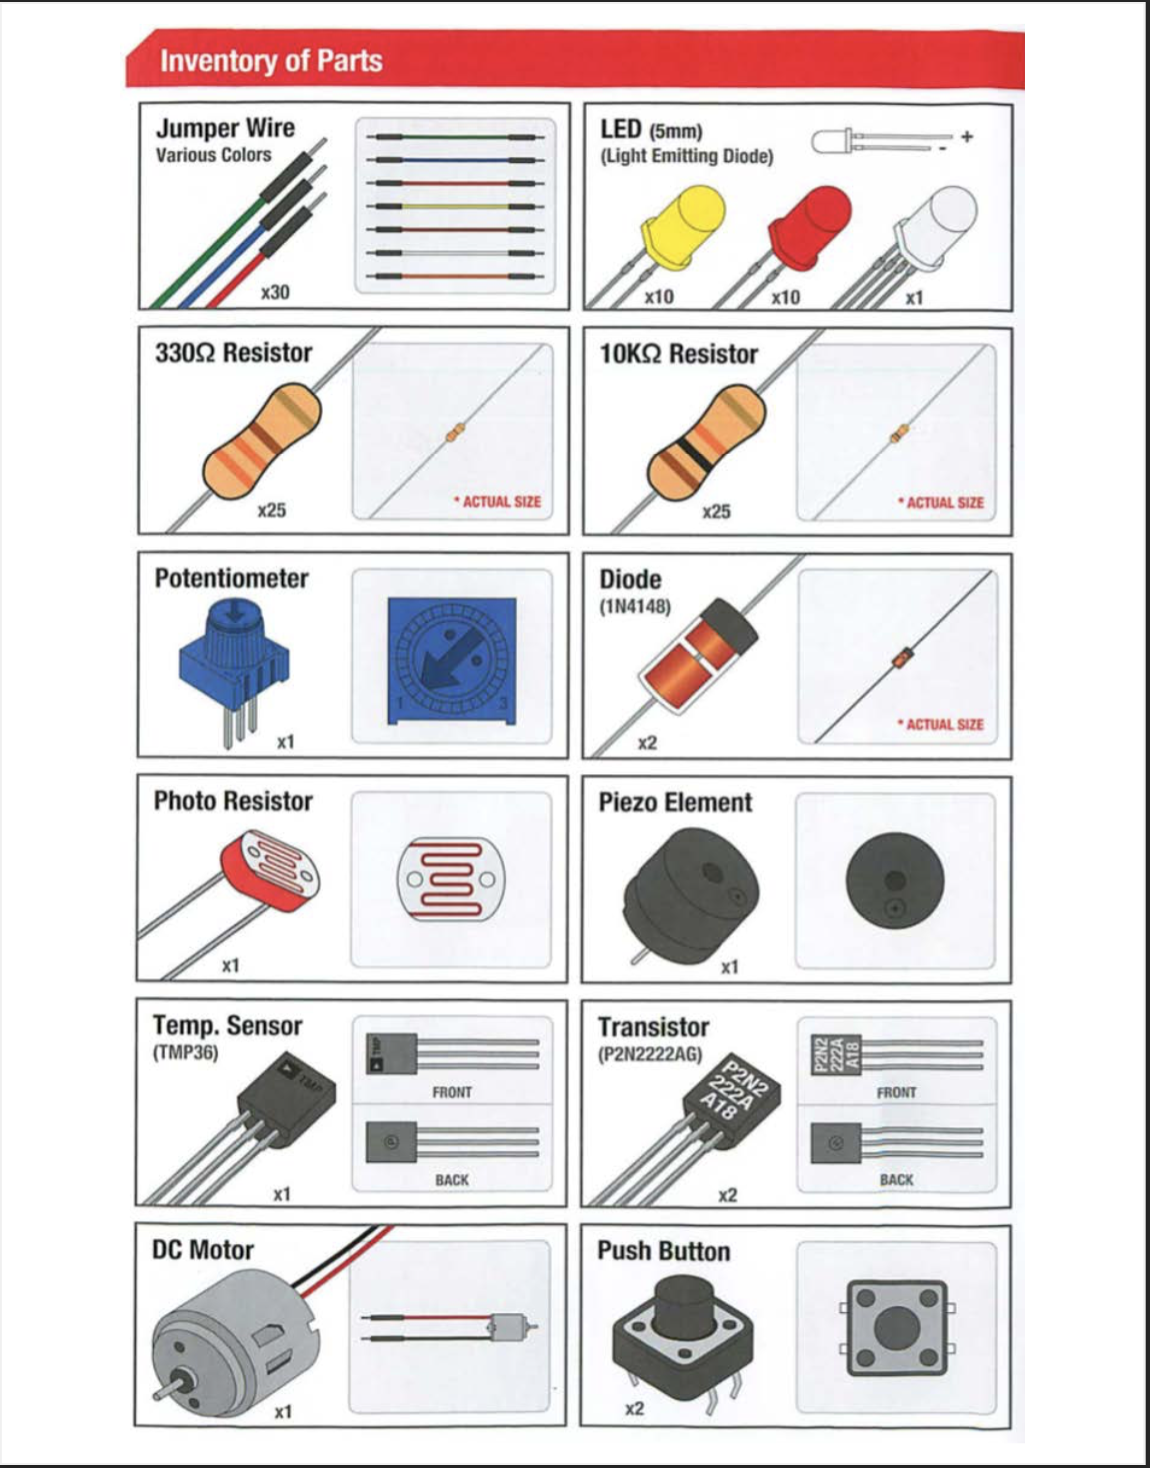
<figure>![Screenshot 2025-01-09 at 6.44.43 AM.png](https://bookstack.kamuela.org/uploads/images/gallery/2026-09/TJngbKCdGzuzXfoj-screenshot-2025-01-09-at-6-44-43-am-vi76xmze.png)<figcaption>Screenshot 2025-01-09 at 6.44.43 AM.png</figcaption></figure>[Download arduino parts.pdf (application/pdf, 102.9 KB)](https://bookstack.kamuela.org/attachments/265)

1. test jumper wires for continuity, and count them out into a new bin
2. test the resistance of an LED forwards and backwards. Why?
3. confirm the resistance of both resistors
4. <span style="font-weight:bold;">Don’t test the diode it will burn out</span>
5. measure the resistance of the potentiometer (volume control) while moving the knob. It has three wires, measure across and from the middle to the ends
6. measure the resistance of the photoresistor in dark and light-explain
7. look up what a piezo element is, and what it does, then find a way to test it
8. <span style="font-weight:bold;">skip the temp sensor and the transistor, you could burn them out with the meters</span>
9. check the motor for both resistance and voltage (only when you spin it)
10. diagnose which terminals on the pushbutton switch do what
11. leave the servo, relay and integrated circuit for later

<div>  
</div><div>Full Arduino manual next:  
[Download arduino.pdf (application/pdf, 6.4 MB)](https://bookstack.kamuela.org/attachments/264)

</div><div>  
</div>  
</div><div id="bkmrk--5">  
</div>  
---

<small>Migrated from Apple Server Wiki. Original page ID: e2B9d9w</small>

# AI primer

- What can you do that AI cannot do?
- What can students do now that they could not pre-AI?
- Not about what AI can do, but what it <span style="font-weight:bold;">cannot</span> do...

<span style="font-weight:bold;">New terms:</span>

- Artificial Intelligence (AI)
- Machine learning (ML)
- Neural networks: “neural nets”
- Artificial general intelligence (AGI)
- Cloud computing
- Quantum computing
- Generative AI: GPT: Generative Pre-trained Transformer
- Large language models (LLM)

<span style="font-weight:bold;">Phase I: Finger counting to AI: how did we get here?</span>

<span style="font-weight:bold;">This summary was created entirely by a human, without AI</span>

1. Fingers: digits, counting to ten (ten fingers, ten toes)
2. Digits to binary 1 or 0, heads or tails
3. Symbols to binary: letters as 1 or 0
4. Binary + logic = computing (and/or, if/then)
5. Cloud computing: computers elsewhere, trading 1/0
6. Quantum computing: no longer 1 or 0, could be any combination, parallel processing, many answers
7. Sequential, linear brains: neural nets: potentiate what is learned, new pathways
8. Neural nets in computing: "scoring" instead of potentiated pathways
9. Machine learning: give it data, tell it a goal, seek that goal (chess, X-rays), recognize patterns, pattern prediction
10. Artificial intelligence: give it huge amounts of data (e.g. the web), notice patterns, large learning models: LLMs (e.g. GPT), repeat patterns seen that match (pattern matching) generative AI like GPT: Generative Pre-trained Transformer
11. Artificial general intelligence: learning to learn: AI + neural nets + machine learning + cloud computing + eventually quantum computing, perhaps equal or exceeding human intelligence

<span style="font-weight:bold;">Generative AI</span> is a subset of machine learning in which systems are trained on massive information sets – often including personal information – to generate content such as text, computer code, images, video, or audio in response to a user prompt. This content is <span style="font-weight:bold;">probabilistic</span>, and may vary even in response to multiple uses of the same or similar prompts...:”

<span style="font-weight:bold;">What these lack:</span>

- Context, humor, irony, spontaneity
- GPT can tell you all about Athens and Sparta, but only a teacher will introduce the simile between China and the US (context).
- AI seems “smart” because it can combine things humans have created on request, seeing possible links (pattern matching), but <span style="font-weight:bold;">only</span> what is requested.
- Artificial general intelligence (AGI) will have the ability to go beyond pattern recognition, not independent thought, but flexibility not seen in AI: teaching a robot to throw a ball is very difficult, even with Machine learning (ML).
- Artificial general intelligence (AGI) will enable this to happen faster, with more data, and with Quantum Computing, much faster than linear brains like ours can match.

TRY IT OUT——

<span style="font-weight:bold;">Examples: GPT4</span>

- <span style="font-size:13px;">Make me a photo of a planet</span>
- Hello, I want to learn how to code in python, how should I start? Give me a breakdown that I can understand
- Explain relativity like I’m: 5 years old,
- Now explain it like I'm a graduate student in physics
- Make me an image that represents chemistry
- Dolphin and human surfing
- SORA. [https://www.youtube.com/watch?v=2fAPgOCjToA](https://www.youtube.com/watch?v=2fAPgOCjToA)
- Otter on a plane: [https://www.oneusefulthing.org/p/prophecies-of-the-flood?utm\_source=substack&amp;utm\_medium=email#media-4977884d-b628-4b1e-b90f-d4f6403b82de](https://www.oneusefulthing.org/p/prophecies-of-the-flood?utm_source=substack&utm_medium=email#media-4977884d-b628-4b1e-b90f-d4f6403b82de)

- Surprise yourself! <span><span style="font-weight:bold;font-style:normal;font-size:13px;font-family:Helvetica, Arial, Geneva, sans-serif;"> </span>[https://openai.com/](https://openai.com/)</span><span></span>

<span style="font-weight:bold;">Phase II: how students see this</span>

1. The “new google”: faster, more direct, simpler to use
2. Drop pdf to read, “Explain to me what this is”
3. GPT4: “make me a photo of a planet”
4. Good for creating drafts, formal emails
5. “Prompt engineering”-learning to ask-Iliad article
6. Paraphraser-changes AI generated text into their “voice”
7. “Show the steps” is commonly used for homework (good/bad)
8. Three phase exploration: problem, answer, solution
9. Create an environment where they can use the tools, and learn
10. Example: testing at Cal Poly vs. HPA
11. Synthesis of process and thinking, not recall
12. AI will enhance this, not prevent it
13. 22 year old mind in college different from 14 year old HPA student
14. Content with <span style="font-weight:bold;">context</span> is important (only teachers can provide this)
15. Test questions: math, science, history examples
16. “show your work”
17. M.D. vs. engineer: recall vs. creation
18. Essay example: general topic, ask for central claim, outline the claim, rewrite in your voice
19. Ideas from GPT, prose from the student
20. Options: embrace AI essays OR separate AI assisted from pure human work

<span style="font-weight:bold;">Possible uses in education:</span>

- Personalized study guides, homework, tutors
- Curated learning: teacher+AI
- Truly differentiated learning (advanced and those needing assistance)

<span style="font-weight:bold;">Educational Issues: </span>

- Only as good as the data fed in: biases (e.g. only white doctors)
- Statistical so there is no “zero probability”=&gt;hallucinations
- College students should go into applied statistics and machine learning (ML)
- Prompt engineering should be required for all students

<span style="font-weight:bold;">HPA response: Magic School</span>

HPA Challenge: lower anxiety and fear among faculty about using AI

1. Simple platform with templates
2. Collaboration with single platform (sharing)
3. Ability to discern early-adopters. advanced users (feed the beast, teams)

TRY IT OUT———  <span>[https://student.magicschool.ai/s/join?joinCode=yqoZ8Q](https://student.magicschool.ai/s/join?joinCode=yqoZ8Q)</span><span></span>

<span style="font-weight:bold;">Phase III: Past present and future</span>

1. what is “generative” AI? When?
2. where it is going: large language model learning
3. text, audio, video (SORA demo)
4. getting smarter: all AP, SAT answers included (free)
5. everything on google docs, amazon scanned books, libraries
6. live images from all security cameras, videos, youtube
7. criteria testing vs. synthesis evaluation?
8. how can we prepare our kids?

<span style="font-weight:bold;">Phase IV: What is possible?</span>

1. Personalized study guides, homework, tutors
2. Curated learning: teacher+AI
3. Local GPT: Tailwind
4. Why a local GPT server?
    1. our documents
    2. guardrails
    3. speed
    4. privacy
    5. green-solar powered!

TRY IT OUT———

<span style="font-weight:bold;">What’s next:</span>

1. RLHF Reinforcement learning with human feedback
2. Self driving vehicles-first large mechanical impact
3. Natural language entropy [https://www.youtube.com/watch?v=5eqRuVp65eY](https://www.youtube.com/watch?v=5eqRuVp65eY)
4. GPT4: o1, o3=AGI? December 2024 (!)

<div id="bkmrk--1">  
</div>  
---

<small>Migrated from Apple Server Wiki. Original page ID: 12E7r4</small>

# Raspberry Pi basics

<span style="font-weight:bold;">Raspberry Pi Debian Buster basics</span>

- <span style="font-weight:bold;">update to bullseye 1.25.22——</span>
- <span style="font-weight:bold;">update to bullseye 9.23.23---</span>
- <span style="font-weight:bold;">update to bullseye 1.14.25—</span>

What you will need:

- computer of some sort with a terminal application
- internet connection on the local area network
- permission from the owners of the computers you are working on
- permission from the system admin (Dr. Bill) to do this, at a specific time and place (so our intrusion detection system does not block you)

<span style="font-weight:bold;">Module 1: first steps (see notes below)</span>

1. download a terminal app
2. you may need to add sudo to the front of any command at this point
3. test the app by using the ping command to 10.14.1.4 one of the elab routers
4. record the ping time in your notes
5. using either <span style="font-weight:bold;">ifconfig</span> or <span style="font-weight:bold;">ip addr show </span>in terminal find your IP address
6. write this on the board
7. ping the other units, record your results

<span style="font-weight:bold;">Module 2: ssh</span>

1. secure shell is a means of securely accessing the command line (“terminal”) of a computer
2. to enable ssh on your rPi, you will need to go to terminal and type <span style="font-weight:bold;">sudo raspi-config</span>
3. find the <span style="font-weight:bold;">interfacing options</span> command
4. select <span style="font-weight:bold;">enable ssh</span>
5. use the command ssh 10.14.253.x or updated address to reach another rPi unit
6. you should be “in” your pi unit now, look at the prompt
7. from that prompt, try the ping command as you did before to the other pi units, record your results

<span style="font-weight:bold;">Module 3: commands</span>

1. from your ssh terminal, type pwd, which shows the path you are now located at, record this
2. try the ls command, this lists the files near you in the current directory
3. try the cd .. command, which should take you up one directory, repeat pwd and notice the difference.
4. cd back to the directory you were first in, likely it is /home/pi

<span style="font-weight:bold;">Module 4: nomachine (if no desktop access)</span>

1. install nomachine on your laptop
2. connect to your pi unit
3. right click to see the directory or file system
4. find the folder “pi”
5. go back to your ssh terminal and type ls in various directories, verify that they show up the same way in the folder window

<span style="font-weight:bold;">Module 5: nano text editor</span>

1. from your ssh window, in the pi directory, type: sudo nano test
2. type some stuff
3. hold control while typing the o key and return
4. hold control while typing the x key and return
5. you have just created a document in the folder, find it on the nomachine window

<span style="font-weight:bold;">Module 6: what’s going on? who?</span>

1. try these commands: top, ps, who, last, history, record your results
2. try these commands: traceroute, ifconfig, record your results

<span style="font-weight:bold;">Module 7: commands, modifiers</span>

1. from your ssh window, try using the secret version of ls: ls -la
2. note that all commands can have modifiers, like ls -la, l means long, a means all files
3. try creating a new file with nano, and name it something with a period in front
4. see if it shows up in the file manager window
5. see if it shows up using ls -la

<span style="font-weight:bold;">Module 8: creating directories</span>

1. using your ssh window, enter the command mkdir followed by some name
2. watch what happens in the file manager window
3. create a text document in this new folder
4. look up the cp, mv and rm commands using man cp and so on

<span style="font-weight:bold;">Module 9: update your computer, install apps</span>

1. using the sudo apt-get update command, update your computer
2. use the sudo apt-get upgrade to upgrade the computer
3. use the sudo apt-get install hardinfo -y to install hardinfo
4. type hardinfo and record your results
5. compare with cat /proc/cpuinfo
6. install the wavemon program the same way, test and record

<span style="font-weight:bold;">Module 10: control x and control z</span>

1. control x means stop
2. control z means halt, no nice manners
3. try this with ifconfig to determine your IP addresses (wired and wireless)

<div id="bkmrk--5">  
</div>  
<div id="bkmrk--8">  
</div>  
---

<small>Migrated from Apple Server Wiki. Original page ID: 81\_5165</small>

# Module 1: terminal commands

[Download TC 1.0.pdf (application/pdf, 637.9 KB)](https://bookstack.kamuela.org/attachments/309)

<span style="font-weight:bold;">Module 1: Terminal first steps</span>

- Using terminal on the raspberry pi:
- Start with ping:
- <span style="font-weight:bold;">ping</span> sends a data packet to a machine on the internet, and tells you how long it takes to return, like sonar
- try pinging 10.14.0.1 Time listed will be in milliseconds, so 1000 ms means one second
- <span style="font-weight:bold;">ping</span> www.apple.com
- Notice different ping times

Stopping stuff:

- <span style="font-weight:bold;">ctrl-c</span> means cancel
- <span style="font-weight:bold;">ctrl-z</span> means halt (stop everything, not gracefully)

<span style="text-decoration:underline;">Tracing around the internet:</span>

<span style="font-weight:bold;"><span style="background-color:rgb(236,238,168);color:rgb(102,102,102);">traceroute</span></span> www.apple.com (note hops and delays)

<span style="text-decoration:underline;">Evil stuff: ping flood attack:</span>

ping flood, only use here as a test

<span style="font-weight:bold;">sudo ping -f</span> (notice that you have to use sudo, which means "superuser do" or treat me like computer god for this)

<span style="text-decoration:underline;">What's going on in your terminal:</span>

- <span style="font-weight:bold;">who</span> also whoami
- <span style="font-weight:bold;">last</span> last command, also the up arrow
- <span style="font-weight:bold;">top </span>lists all processes, useful with kill (see later)
- <span style="font-weight:bold;">history</span>: shows recent commands like this, useful for retracing your steps or seeing who might have been in your machine:  
    
    - 1 ping 10.14.0.1
    - 2 ping www.hpa.edu
    - 3 traceroute
    - 4 traceroute www.hpa.edu
    - 5 ifconfig
    - 6 ping 10.14.252.22
    - 7 sudo ping -f 10.14.252.22
    - 8 last
    - 9 who
    - 10 ping 10.14.252.47
    - 11 history
    - 12 ssh pi@10.14.252.47
    - 13 netstat
    - 14 man netstat
    - 15 man ping
    - 16 history

<span style="text-decoration:underline;">navigation commands:</span>

- <span style="font-weight:bold;">cd</span> change directory, usually followed by a directory name, like "cd var/www/html/"
- <span style="font-weight:bold;">ls</span> list directory, see also ls -l which lists all files in long form. Try also ls -lh \*human long form"
- <span style="font-weight:bold;">ls -la</span> lists even invisible files (the -a flag means "all") You can also hide files by adding . to the beginning
- <span style="font-weight:bold;">pwd</span> print working directory, shows where you are in the file system (directory)

<span style="text-decoration:underline;">Try navigating to the desktop this way:</span>

- <span style="font-weight:bold;">pwd</span> (print working directory, "where am I")
- <span style="font-weight:bold;">ls</span> (shows what is at this level)
- <span style="font-weight:bold;">cd</span> or <span style="font-weight:bold;">cd ..</span> (cd to a directory, cd .. means one level up)
- Here is where your desktop is: /home/pi/Desktop

Shortcut:

<span style="font-weight:bold;">cd /home/pi/Desktop</span>

try ls and see what is there, should be nothing.

<span style="text-decoration:underline;">Creating a directory:</span>

- mkdir creates a directory
- mkdir test
- This should create a folder on your desktop called "test"
- click on this to see a directory browser, go nuts

<span style="text-decoration:underline;">Permissions</span>

- <span style="font-weight:bold;">ls -la </span>will show you permissions in the format drwx, for directory, read, write and execute
- read is 1, write is 2, execute is 4, so all added up 1+2+4 =7
- chmod change "mod" or permissions of file, 777 is everything, see drwx format below and the 421 rule
- You may also find this under <span style="font-weight:bold;">chmod u+x</span> on a file, which means make the file or program executable

<span style="text-decoration:underline;">Manual pages:</span>

- man pages are manual pages, so "man ping" would give you manual pages on the ping command
- less means look into a file (contrast with "more")  
    \
- \* means wild card, so if you want to see all files ending in jpg, you would say \*.jpg

<span style="text-decoration:underline;">Secure shell login:</span>

ssh means secure shell login, like ssh pi@10.14.88.81

<span style="font-weight:bold;">Mac specific commands:</span>

- fsck -yf after command-s startup (single user mode)
- say command after ssh login


---

<small>Migrated from Apple Server Wiki. Original page ID: V1v8j1</small>

# Module 2: wild cards, man pages, deleting files

<span></span>

**Module 2: wild cards, man pages, deleting files**

This is how wild cards work:

Instead of typing out herobrine, you could type

h\*

just make sure that nothing else matches the h part.

Another example:

These files are in a folder called test:

malcolm mary tom

if you type

rm m\*

it will delete mary and malcolm

if you type

rm mal\*

it will delete only malcom

if you type

rm \*

it will remove everything.

You can also use this to delete certain types of files (jpg, txt, mp4)

rm \*.jpg

will remove every jpg file in the folder

Now you try it:

1. open terminal
2. navigate to your desktop (remember, it is called Desktop)
3. create a folder using mkdir called test
4. navigate into that folder
5. create three text files using sudo nano, the first will be called malcolm, then mary, then tom
6. read each one using less or more
7. take a screenshot of this folder from the gui (graphical user interface), command-3 takes a screen shot, command-4 is a screenshot of only what you select.
8. copy this screenshot into your weblog, so you can remember how you did this
9. remove one file at a time using the rm command, take more screenshots

Ok, at this point, you can navigate around, login to remote computers, create and delete text files.

What's next?

Internet...

<span id="bkmrk--3"></span>  

---

<small>Migrated from Apple Server Wiki. Original page ID: k5Z1E8p5</small>

# Module 3: internet

<span style="font-weight:bold;">Module 3: Internet</span>

- <span style="font-size:13px;">Your computer needs 4 things to be able to get onto the internet:</span>
- <span style="font-size:13px;">IP address, example 10.14.8.4</span>
- <span style="font-size:13px;">Subnet mask, example 255.255.0.0</span>
- <span style="font-size:13px;">Gateway/router, example 10.14.0.1</span>
- <span style="font-size:13px;">Domain name server (DNS), example 10.9.250.13</span>

Here's what each one does:

<span style="font-weight:bold;">IP address:</span>

All traffic on the internet or local area network (LAN) is in the form of packets of information, like mail envelopes with a letter inside. Each letter you mail has two important things: the address you want it to go to, and the message inside the envelope.

- <span style="font-size:13px;">TCP/IP is the format of these, which stands for Transmission control protocol and internet protocol.</span>
- <span style="font-size:13px;">The TCP part is the message, and the IP part is the envelope, with an IP address on it.</span>
- <span style="font-size:13px;">Check the IP address of your machine:</span>
- <span style="font-size:13px;">From the GUI: open system preferences, network</span>
- <span style="font-size:13px;">From the terminal: type<span style="background-color:rgb(236,238,168);color:rgb(102,102,102);"> ifconfig</span></span>

<span style="font-weight:bold;">Subnet mask:</span>

- <span style="font-size:13px;">Imagine you want to stay in one of two large 254 room hotels. One has long hallways, and very few floors, the other has many floors, but short hallways.</span>
- <span style="font-size:13px;">If you want to sleep, you don't want many people walking down the hall in front of your room. You want many floors with fewer rooms per floors.</span>
- <span style="font-size:13px;">This is what subnet masking does on a network. Each of the four segments can hold 254 addresses.</span>
- <span style="font-size:13px;">At home, you probably have a network that looks like this:</span>
- <span style="font-size:13px;">IP: 192.168.1.49</span>
- <span style="font-size:13px;">mask: 255.255.255.0</span>
- <span style="font-size:13px;">router: 192.168.1.1</span>
- <span style="font-size:13px;">dns: 192.168.1.1</span>

<span style="font-size:13px;">This means that the last zero can hold up to 254 addresses (from 192.168.1.1 to 192.168.1.254)</span>

- <span style="font-size:13px;">HPA has this sort of mask:</span>
- <span style="font-size:13px;">255.255.0.0</span>
- <span style="font-size:13px;">which means that</span>
- <span style="font-size:13px;">10.14.0.0</span>
- <span style="font-size:13px;">is the elab, which can have 254 x 254 addresses</span>
- <span style="font-size:13px;">It makes for a quieter network, also providing some security as others cannot see you easily.</span>

<span style="font-weight:bold;">Router/gateway:</span>

This is the gateway for all of your traffic, usually the access point at your home. The technical difference between these words is that a router routes traffic between two networks of the same type (like ethernet), while a gateway is between different types of networks (like a cable modem or DSL gateway)

<span style="font-weight:bold;">Domain name server:</span>

- <span style="font-size:13px;">This is the computer on your network or outside that translates names into numbers, like a digital phone book.</span>
- <span style="font-size:13px;">Try this in terminal:</span>

nslookup physics.hpa.edu

1. when you get the address, write it down
2. open a browser
3. go to physics.hpa.edu
4. now go to the numbers you wrote down.
5. Try this with another name, either on campus or off

<span style="font-weight:bold;">Ping and traceroute:</span>

- <span style="font-size:13px;">Imagine you want to find out if a machine is responding (you can block this by using "stealth mode")</span>
- <span style="font-size:13px;">In terminal ping one of the IP addresses in your class</span>
- <span style="font-size:13px;">ping an address out on the internet</span>
- <span style="font-size:13px;">what is the difference?</span>

now try this:

<span style="background-color:rgb(236,238,168);color:rgb(102,102,102);">traceroute www.apple.com</span>

- <span style="font-size:13px;">It should give you a trace of the path your connection took.</span>
- <span style="font-size:13px;">Try this with other addresses on and off campus.</span>

<span style="font-weight:bold;">NSLOOKUP:</span>

- <span style="font-size:13px;">Say you want to find out the name of something, or the IP address from the name.</span>
- <span style="font-size:13px;">try this:</span>
- <span style="font-size:13px;">nslookup</span>
- <span style="font-size:13px;">(you will get a funny &gt; sign)</span>
- <span style="font-size:13px;">type:</span>
- <span style="font-size:13px;">server 10.9.250.13</span>
- <span style="font-size:13px;">type:</span>
- <span style="font-size:13px;">physics.hpa.edu</span>
- <span style="font-size:13px;">what do you get?</span>
- <span style="font-size:13px;">where is this machine?</span>
- <span style="font-size:13px;">Try again using 8.8.8.8 as the server</span>

The best use of this is to find out what OTHER people might call a machine.

- <span style="font-size:13px;">We have several DNS servers at the elab, the main one is at 10.14.1.5</span>
- <span style="font-size:13px;">Others to try:</span>
- <span style="font-size:13px;">4.4.4.4</span>
- <span style="font-size:13px;">8.8.8.8</span>
- <span style="font-size:13px;">10.14.1.2</span>

- <span style="font-size:13px;">you can get out by typing</span>
- <span style="font-size:13px;">exit</span>
- <span style="font-size:13px;">or control-z (halt)</span>


---

<small>Migrated from Apple Server Wiki. Original page ID: a88675h826</small>

# Module 4: web servers

<span style="font-weight:bold;">Module 4: web server and web pages (html)</span>

<span style="font-weight:bold;">see also </span>[https://elab.hpa.edu/cs/TC/TC%205.0%20HTML.pdf](https://elab.hpa.edu/cs/TC/TC%205.0%20HTML.pdf)

<span style="font-weight:bold;">Background:</span>

- html stands for hypertext markup language
- it is a markup language, not really programming like python or C
- it manages how information is presented ("marked up") for viewers
- others include xml and xhtml, both managing data as well as format (more on this soon)

<span style="font-weight:bold;">Installing a web server:</span>

1. On the raspberry pi, run the following commands:
2. <span style="font-weight:bold;">sudo apt-get update</span> (this updates your computer)
3. <span style="font-weight:bold;">sudo apt-get install apache2 -y</span> (this installs apache web server on your computer, answering yes to all prompts)
4. Go your browser and enter 127.0.0.1 (which means "me" on the internet)
5. Now type <span style="font-weight:bold;">ifconfig</span> in your terminal and look for your internet address, which should start with 10.14.x.y
6. Look at this address using your browser

<span style="font-weight:bold;">Setup your web folder, edit a page:</span>

1. On the terminal, navigate to the following directory:
2. <span style="font-weight:bold;">cd /var/www/html/</span>
3. run the <span style="font-weight:bold;">ls</span> command, you should see a file called index.html
4. You can edit this, either by using the nano command (cooler) or later using text editor (simpler)
5. <span style="background-color:rgb(236,238,168);color:rgb(102,102,102);">sudo nano /var/www/html/index.html</span>
6. This is a complex bit of html, so just look for something you recognize from the 127.0.0.1 test and change it
7. nano is a text editor, so ctrl-o means overwrite, and ctrl-x means exit
8. If you are using a text editor, it might not let you save.
9. Back to permissions----
10. type <span style="font-weight:bold;"><span style="background-color:rgb(236,238,168);color:rgb(102,102,102);">chmod 770 /var/www/html</span></span>
11. which makes everything in the html directory read and writable to everyone (including you)
12. the index.html page is the default that every web browser looks for FIRST
13. you can specify other names in your browser to look around
14. listing the files in a directory is very useful, but also dangerous for hackers

<span style="font-weight:bold;">Making a new web page:</span>

1. cd to the /var/www/html directory and look around <span style="background-color:rgb(236,238,168);color:rgb(102,102,102);">(ls -la)</span>
2. Using either nano create a new page:
3. <span style="background-color:rgb(236,238,168);color:rgb(102,102,102);">sudo nano /var/www/html/test.html</span>
4. You'll notice this is blank.
5. Add the following to your new web page:

```
<span style="background-color:rgb(236,238,168);color:rgb(102,102,102);"><html></span><br></br><span style="background-color:rgb(236,238,168);color:rgb(102,102,102);"><head></span><br></br><span style="background-color:rgb(236,238,168);color:rgb(102,102,102);">test</span><br></br><span style="background-color:rgb(236,238,168);color:rgb(102,102,102);"></head></span><br></br><span style="background-color:rgb(236,238,168);color:rgb(102,102,102);"><body></span><br></br><span style="background-color:rgb(236,238,168);color:rgb(102,102,102);">Wow, this is really easy</span><br></br><span style="background-color:rgb(236,238,168);color:rgb(102,102,102);"></body></span><br></br><span style="background-color:rgb(236,238,168);color:rgb(102,102,102);"></html></span>
```

1. remember to overwrite (ctrl-o) and exit (ctrl-x)
2. Now go to your browser and enter [http://127.0.0.1/test.html](http://127.0.0.1/test.html)
3. What do you see?
4. Create your own pages in your html folder and test

<div id="bkmrk-using-a-text-editor-"><span style="font-weight:bold;">Using a text editor to edit and create pages:</span></div><div id="bkmrk-use-the-folder-brows">

1. use the folder browser to navigate to the /var/www/html folder
2. open a text editor and create a page called test2.html
3. add code as you did with the nano editor
4. save and test
5. create a new folder on your web server
6. create a document there with secret content
7. challenge your friends to find this page

</div><div id="bkmrk-remote-web-page-crea"><span style="font-weight:bold;">Remote web page creation:</span></div><div id="bkmrk-ssh-into-10.14.88.81">

1. ssh into 10.14.88.81 (pi-alpha.hpa.edu) as pi/papaya77
2. navigate to the /var/www/html folder
3. create a folder with your name (short version all lowercase, no spaces)
4. create a document in html inside the folder
5. browse from your station to verify your new web site!
6. challenge your friends to read your secret message

</div><div id="bkmrk--10">  
</div><div id="bkmrk-next-steps%3A%C2%A0https%3A%2F%2F"><span style="font-weight:bold;">Next steps: </span>[https://www.w3schools.com/](https://www.w3schools.com/)</div><div id="bkmrk-create-some-pages-us">

1. create some pages using the w3schools tutorials
2. copy this code into your local web server, test
3. copy this code into the pi-alpha server, test

</div>  
---

<small>Migrated from Apple Server Wiki. Original page ID: w2Z0s3H0A</small>

</body></html>

# TC pdf directory

<span id="bkmrk-https%3A%2F%2Felab.hpa.edu">[https://elab.hpa.edu/cs/TC/](https://elab.hpa.edu/cs/TC/)</span><span id="bkmrk-"></span>

---

<small>Migrated from Apple Server Wiki. Original page ID: C319U4u</small>

# Class notes

Wednesday, 1.15.25

Hre's a summary you may want to include in your notes:

<div id="bkmrk-use-the-wifi-icon-to">

- use the wifi icon to get IP address and wifi speed (option)
- use command-space to find terminal
- use <span style="font-weight:bold;">ifconfig</span> to verify your IP address (more on this next)
- <span style="font-weight:bold;">ping</span> to see if others are awake
- <span style="font-weight:bold;">ctrl-c</span> to cancel
- <span style="font-weight:bold;">ctrl-z</span> to halt
- <span style="font-weight:bold;">ssh admin@10.14.254.xyz</span> for secure shell
- <span style="font-weight:bold;">sudo shutdown -r now</span> to reboot
- say some clever stuff to say some clever stuff
- <span style="font-weight:bold;">traceroute</span> to determine path to servers or others
- <span style="font-weight:bold;">sudo</span>: super user do (later you can try su, or "make me root")

<div>Friday, 1.17.25</div></div><div id="bkmrk-home%2Fpi-directory-st">

- home/pi directory structure
- <span style="font-weight:bold;">sudo nano:</span> create a file
- ctrl-o: overwrite
- ctro-x: exit
- <span style="font-weight:bold;">ls:</span> list files (list)
- <span style="font-weight:bold;">ls -la: </span>list even invisible, hidden files (list, long, all)
- <span style="font-weight:bold;">pwd</span>: where am I? (print working directory)
- cd: change directory
- cd .. or cd up: cd up one level
- <span style="font-weight:bold;">nslookup</span>
- file browser
- Herobrine game
- more, less
- install dnsutils: sudo apt install dnsutils -y

<div>Wednesday, 1.22.25</div>

- <span style="font-weight:bold;">note pages on weblog for terminal commands</span>

<div><span style="font-weight:bold;">Challenges:</span></div>

1. challenge #1: find herobrine on your machine
2. challenge #2: create a new folder (<span style="font-weight:bold;">mkdir</span>) inside your Documents folder
3. challenge #3: create a visible and and a hidden file inside this folder
4. challenge #4: create a document inside a folder on the pi-alpha machine
5. challenge #5: find the missing documents in your partner's machine
6. challenge #6: create a folder and a document WITH PERMISSION in your partner's machine
7. challenge #7: edit the file your partner has created on your machine

<div>New commands:</div>

- <span style="font-weight:bold;">mkdir</span>: create a directory
- shortcut: up arrow means repeat last command...
- <span style="font-weight:bold;">ls -la</span> permissions: rwx, 777 format, 4-2-1
- install apps: <span style="font-weight:bold;">sudo apt install hardinfo -y</span>
- <span style="font-weight:bold;">who</span> also whoami
- <span style="font-weight:bold;">last</span> last command, also the up arrow
- <span style="font-weight:bold;">top </span>lists all processes, useful with kill (see later) (ctrl-x to quit)
- <span style="font-weight:bold;">ps</span>: processes
- <span style="font-weight:bold;">ps -ax</span>
- <span style="font-weight:bold;">kill</span>: just what it sounds like
- <span style="font-weight:bold;">grep</span>: ps -ax \| grep chess  (on the mac)
- <span style="font-weight:bold;">history</span>: shows recent commands like this, useful for retracing your steps or seeing who might have been in your machine

<div>Network commands:</div>

- <span style="font-weight:bold;">ifconfig</span>
- <span style="font-weight:bold;">ip addr show</span>
- <span style="font-weight:bold;">sudo raspi-config</span>: enable ssh
- <span style="font-weight:bold;">chmod</span>: change permissions
- <span style="font-weight:bold;">chmod +x:</span> makes something executable
- <span style="font-weight:bold;">cat /proc/cpuinfo</span>
- <span style="font-weight:bold;">traceroute (install)</span>
- <span style="font-weight:bold;">netstat or ss </span>
- <span style="font-weight:bold;">wavemon</span>
- <span style="font-weight:bold;">speedtest-cli </span>(install)
- <span style="font-weight:bold;">nmap -sP 10.14.88.0/24</span>
- <span style="font-weight:bold;">sudo arp-scan 10.14.88.0/24</span>
- <span style="font-weight:bold;">sudo iftop</span>
- DNS part 2: <span style="font-weight:bold;">nslookup</span> servers
- IP addresses, subnet mask, gateways
- cat6 cables, wifi, security, html, www, servers
- nomachine
- Mac network utility
- install apache: <span style="font-weight:bold;">sudo apt install apache2 -y</span>

<div><span style="font-weight:bold;">2.18.25: Wednesday----</span></div><div>Check these pi apps out:</div><div><span style="font-weight:bold;">Geany</span> (inside your programming folder)  
</div><span style="font-weight:bold;">pi-apps</span> (will show up in your accessories folder):</div><div id="bkmrk-wget--qo--https%3A%2F%2Fra">wget -qO- [https://raw.githubusercontent.com/Botspot/pi-apps/master/install](https://raw.githubusercontent.com/Botspot/pi-apps/master/install) &#124; bash</div><div id="bkmrk-install-sublime-text">install sublime text</div><div id="bkmrk-install-angry-ip-sca">install angry IP scanner  
</div><div id="bkmrk-visual-code-%28editor%29"><span style="font-weight:bold;">visual code </span>(editor): sudo apt install code

```
<br></br>
```

</div>---

<small>Migrated from Apple Server Wiki. Original page ID: T8L489p6</small>

# Network scanning

We'll be using the program IPnetmonitor on the mac computers:

[https://www.sustworks.com/site/prod\_ipmx\_overview.html](https://www.sustworks.com/site/prod_ipmx_overview.html)

<figure id="bkmrk-screenshot-2025-02-0">![Screenshot 2025-02-02 at 12.41.43 PM.png](https://bookstack.kamuela.org/uploads/images/gallery/2026-09/GDxcp96DeCRGO37D-screenshot-2025-02-02-at-12-41-43-pm-i7hgqfp4.png)<figcaption>Screenshot 2025-02-02 at 12.41.43 PM.png</figcaption></figure>  
Type <span id="bkmrk-command-l" style="background-color:rgb(236,238,168);color:rgb(102,102,102);">command-L</span> to get to the launcher.<div id="bkmrk-let%27s-try-a-few-comm">Let's try a few commands:</div><div id="bkmrk-find-your-iphone-on-">Find your iPhone on the network:</div><div id="bkmrk-join-the-elab-networ">

1. join the elab network on your phone
2. open ipnm, and choose address scan
3. IP addresses are "leased" to users on the network 10.14.254.0/24
4. scan the network 10.14.254.0/24
5. on your phone, look at the connection information for the MAC address (MAC is not a mac thing, it is the identity of the hardware in your phone, it stands for machine access control)
6. see if you can find your phone on the network

<div>Here's what this means:</div><div>

- All IP addresses (for now) follow what is known as IPv4, where each address in the world has 4 pairs of numbers between 1-254 (this is from binary versions of 2^n)
- Inside IP addresses are "fake" meaning they don't show up on the internet
- Try the <span style="background-color:rgb(236,238,168);color:rgb(102,102,102);">DNSlookup</span> tool, for these:
- www.apple.com
- www.google.com
- elab.hpa.edu
- physics.hpa.edu
- Notice that the outside "real addresses" have various numbers, but those inside the elab all start with 10.14.x.y
- The IP address for your phone is borrowed for a short time while in the elab, so we can recycle the addresses.
- Every address in the elab starts with 10 (HPA) 14 (elab) then two more sets of numbers.
- Address scan these:
- 10.14.88.0/24
- 10.14.6.0/24
- 10.14.5.0/24

</div><div>  
</div><div>Ok, so what is the 24 all about?</div><div>

- Imagine you are in a hotel with 254 rooms all in one long hallway.
- Every time someone walks by, you hear them.
- If you could instead have more floors, and shorter hallways, your room would be quieter
- We "mask" the network to do this
- 255.255.255.0 means 254 computers on a network, we call this a /24 network
- 255.255.0.0 means 254x254 (65516) addresses
- Try this from the HPA wifi network and see what address you get

</div><div>  
</div><div>Now open the network settings on your computer and notice three things:</div><div>

- IPv4 address
- subnet mask
- router/gateway
- DNS servers

</div><div>  
</div><div>These are the absolute minimum needed to configure any internet device (computer, smartphone, camera, etc.) on a network</div><div>

- <span style="font-weight:bold;">IPv4 address:</span> the address of your machine, may be set to DHCP, meaning leased address (dynamic host configuration protocol)
- <span style="font-weight:bold;">subnet mask: </span>depends on the "scope" of your network
- <span style="font-weight:bold;">router</span>: the gateway to get out to the internet
- <span style="font-weight:bold;">DNS server:</span> where to go to lookup or translate names into IP addresses

</div><div>  
</div><div>Look for the same things on your phone...</div><div>what do you notice?</div><div>  
</div><div>Next, try the other tools on the launcher, like link rate and ping</div><div>You can use link rate to test your ethernet cables for speed...</div><div>  
</div><div><span style="font-weight:bold;">Hacker Challenges:</span></div><div><span style="font-weight:bold;">Find your phone: Address Scan</span></div><div>

1. Use the address scan to find your phone, by IP and MAC address
2. compare to what it says on your phone
3. enable "private address" on your phone and repeat
4. why is this useful?

<div><span style="font-weight:bold;">Bonjour scan</span></div></div><div>

1. use the bonjour scan to locate the "imac-a" machine
2. find all of the data about it
3. why do some machines have more than one address?

<div><span style="font-weight:bold;">Connections tool</span></div></div><div>

1. use the connections tool to monitor the connections your computer makes
2. open several web pages and notice the connections made
3. are these more than just the pages you want?
4. why is the internet so slow?

<div><span style="font-weight:bold;">DHCP lease tool</span></div><div>

1. use the DHCP lease tool to see your leased address
2. release and renew your address, note the server that gives out the addresses
3. is this the same as the router?

<div><span style="font-weight:bold;">DNS lookup tool</span></div></div><div>

1. use the DNS lookup tool to lookup addresses inside and outside our network
2. use the DNS query option to lookup elab.hpa.edu using our DNS server (look on board) and 8.8.8.8 (google DNS)
3. why are these different?

<div><span style="font-weight:bold;">interface info</span></div></div><div>

1. open interface info and update
2. what do you notice about inside and external address?
3. which would you use for a minecraft server inside our network?
4. what is your network speed?

<div><span style="font-weight:bold;">Link Rate</span></div></div><div>

1. test your link rate to other computers in our lab and outside
2. what do you notice about the speed?
3. if you like, test your ethernet cable for speed, linking to another computer, or a network switch

<div><span style="font-weight:bold;">Monitor</span></div></div><div>

1. monitor both your ethernet and your wireless network for traffic
2. is there any time when traffic is zero?
3. browse the web and watch

<div><span style="font-weight:bold;">Ping</span></div><div>

1. ping devices from your address scan above
2. note return time
3. ping from ethernet if available

<div><span style="font-weight:bold;">Port scan</span></div></div><div>

1. be careful with this, it is like a burglar checking unlocked doors
2. scan a device in our room for ports (1-900) notice open ports
3. test with one of our servers, note the ports
4. test on a pc, notice the ports open
5. ask about common ports, you will need these

<div><span style="font-weight:bold;">Service scan</span></div></div><div>

1. use service scan on your device and on a server (see board)
2. what can this tell you about a server?
3. why is this blocked by some servers?

<div><span style="font-weight:bold;">Subnet calculator</span></div></div><div>

1. pick a 10.14.x.y address
2. set prefix length to 16
3. notice the network address
4. repeat with a 192.168.1.2 address
5. what do you notice?

<div><span style="font-weight:bold;">TCPdump</span></div></div><div>

1. be careful with this tool: you can watch all traffic on the network and see passwords and logins
2. run with several options, browse the web and see if you can identify your traffic
3. why is some traffic not readable?

<div><span style="font-weight:bold;">TCP info</span></div></div><div>

1. this tool diagnoses internet connections
2. notice things like dropped packets and retransmits
3. ask about packets, we'll need to understand these

<div><span style="font-weight:bold;">Traceroute</span></div></div><div>

1. trace the route to inside and outside addresses
2. how could you use this to determine slow links?
3. test using UDP, TCP and ICMP
4. ask in class about what these mean

</div><div>  
</div></div></div><div><span style="font-weight:bold;">Network tools for raspberry pi:</span></div><div>We first have to make sure our pi is updated:</div><div><span style="background-color:rgb(236,238,168);color:rgb(102,102,102);">sudo apt update</span></div><div>Next try the commands ping, traceroute and nslookup (from before)</div><div>  
</div><div>Advanced commands: you may have to install these using <span style="background-color:rgb(236,238,168);color:rgb(102,102,102);">sudo apt install nmap</span> for example...</div><div>

- <span style="font-weight:bold;">wavemon</span>
- <span style="font-weight:bold;">speedtest-cli </span>(install)
- <span style="font-weight:bold;">nmap -sP 10.14.88.0/24</span>
- <span style="font-weight:bold;">sudo arp-scan 10.14.88.0/24</span>
- <span style="font-weight:bold;">sudo iftop</span>
- <span style="font-weight:bold;">ping</span>
- <span style="font-weight:bold;">nslookup</span>
- <span style="font-weight:bold;">traceroute</span>
- <span style="font-weight:bold;">netstat or ss</span>
- <span style="font-weight:bold;">cat /proc/cpuinfo</span>
- <span style="font-weight:bold;">hardinfo</span>
- <span style="font-weight:bold;">ifconfig </span>
- <span style="font-weight:bold;">ip addr show (note MAC address shows up)</span>

<div><span style="font-weight:bold;">tcpdump is a powerful tool for watching network traffic</span></div><div><span style="font-weight:bold;">unencrypted passwords and logins show up using this tool:</span></div>

- sudo tcpdump -i eth0 (capture all on interface ethernet0)
- sudo tcpdump -c 5 -i eth0 (capture 5)
- sudo tcpdump -A -i eth0 (ascii format)
- sudo tcpdump -D (show interfaces)
- sudo tcpdump -XX -i eth0 (hex and ascii)
- sudo tcpdump -w 0001.pcap -i eth0. (captures packets to a file for later cracking)
- sudo tcpdump -n -i eth0 (addresses)
- sudo tcpdump -i eth0 tcp  (only tcp packets)
- sudo tcpdump -i eth0 port 22 (only see ssh traffic)
- sudo tcpdump -i eth0 port 80 (only see web traffic)
- sudo tcpdump -i eth0 port 443 (only see secure web traffic)
- sudo tcpdump -i eth0 src 10.14.88.81 (only from one machine)
- sudo tcpdump -i eth0 dst 10.14.88.81 (only to one machine)

<div>  
</div><div><span style="font-weight:bold;">If you have permission, go back to the mac and try tcpdump to watch your web traffic...</span></div><div><span style="font-weight:bold;">  
</span></div><div><span style="font-weight:bold;">Nmap commands</span></div><div><span>[https://www.recordedfuture.com/threat-intelligence-101/tools-and-techniques/nmap-commands](https://www.recordedfuture.com/threat-intelligence-101/tools-and-techniques/nmap-commands)</span><span></span>  
</div>  
</div><div>  
</div><div>  
</div><div>  
  
</div></div>---

<small>Migrated from Apple Server Wiki. Original page ID: z585E0m</small>

# html challenge

By now you have been able to create a basic web page, upload to a server, and view either locally or on a remote server.

<span style="font-weight:bold;">Your challenges: </span>

<span style="font-weight:bold;">Part 1: creating a web page on a web server</span>

1. enable apache2 web server on one of our machines or your local machine (mac instructions below)
2. create an html file on this machine using something from w3schools.com or your own clever code, that you can view, remember to use all lowercase, and end in .html
3. ssh into the class web server (10.14.88.81) and create a folder in the server
4. upload a NICE web page there and confirm you can see it locally ([http://pi-alpha.hpa.edu](http://pi-alpha.hpa.edu))

<div id="bkmrk-part-2%3A-uploading-us"><span style="font-weight:bold;">Part 2: uploading using scp (secure copy)</span></div><div id="bkmrk-create-an-html-page-">

1. create an html page on your local computer named final.html
2. copy this file to the cs server using the following command: scp &lt;drag file here&gt;  pi@10.14.88.81:/var/www/html/final/name  where "name" is your first name: abiel, alex, christian, daniel, edel, grady, jiho, max, philipp, vasco
3. test your page by going to [http://pi-alpha.hpa.edu](http://pi-alpha.hpa.edu)/final/name/final.html
4. take a screenshot of this wonderful site, and email it to me

<div><span style="font-weight:bold;">Part 3: relative reference, absolute reference (href)</span></div><div>How-to: [https://www.w3schools.com/html/html\_links.asp](https://www.w3schools.com/html/html_links.asp)</div><div>

1. to create a link, use this format:

<div>&lt;a href="[https://www.w3schools.com/](https://www.w3schools.com/)"&gt;Visit W3Schools.com!&lt;/a&gt;  
</div></div><div>  
</div><div>For a local reference, use this format:</div><div>&lt;a href="/css/default.asp"&gt;CSS Tutorial&lt;/a&gt;  
</div><div>  
</div><div>where the folder path is what is linked, relative to where your page is</div><div>For example:</div><div>In your folder named /final/alex, you have an html file called dexter.png</div><div>Your link would be:</div><div>&lt;a href="dexter.png"&gt;cool photo of dexter&lt;/a&gt;</div><div>you can see the anchor tag &lt;a&gt; needs to start and end, a href is a special kind of anchor.</div><div>  
</div><div>If you had a subfolder named files, the link might look like this:</div><div>&lt;a href="/files/dexter.png"&gt;more dexter stuff&lt;/a&gt;</div><div>  
</div>  
</div>---

<small>Migrated from Apple Server Wiki. Original page ID: q9P1p9</small>

# Tools page

[Download TextMate.zip (application/zip, 21.4 MB)](https://bookstack.kamuela.org/attachments/269)

[Download IPNetMonitorX.zip (application/zip, 5.6 MB)](https://bookstack.kamuela.org/attachments/270)

[Download coconutBattery.zip (application/zip, 13.2 MB)](https://bookstack.kamuela.org/attachments/271)

[Download Network Utility.zip (application/zip, 3.4 MB)](https://bookstack.kamuela.org/attachments/272)

---

<small>Migrated from Apple Server Wiki. Original page ID: E5Q7u9</small>

# Telemetry basics

- Our elab is monitored and controlled using a language called xml, or extensible markup language.
- You recall html stood for hypertext markup language, well this is another "markup" language that holds data not text.
- You have also see this in your word documents (.docx) spreadsheets (.xlsx) and slide shows (.pptx), where "x" stands for xml, or a container for data.
- 

<span style="font-weight:bold;">Part 1: Reading xml data</span>

- Scan the elab network, looking for devices in the format 10.14.x.1
- On each webpage you will see data presented
- In the browser window, enter the ip address then /state.xml to see the data inside each container
- Telemetry is the reading of remote data.

  
<span id="bkmrk-part-2%3A-controlling-" style="font-weight:bold;">Part 2: Controlling devices with xml</span>  

Control can also be done using xml in the following format:

<span style="font-weight:bold;">Output State Control: </span><span style="font-weight:bold;">Command Description</span>

- state.xml?relay1State=0 Turn Output 1 <span style="font-style:italic;">OFF</span>
- state.xml?relay1State=1 Turn Output 1 <span style="font-style:italic;">ON</span>
- state.xml?relay2State=0 Turn Output 2 <span style="font-style:italic;">OFF</span>
- state.xml?relay2State=1 Turn Output 2 <span style="font-style:italic;">ON</span>

<span style="font-weight:bold;">Pulse Relay: </span><span style="font-weight:bold;">Command Description</span>

- state.xml?relay1State=2 Pulse Output 1 for the preset time (1.5 seconds).
- state.xml?relay1State=2&amp;pulseTime1=5 Pulse Output 1 for 5 seconds.
- state.xml?relay1State=2 Pulse Output 1 for the preset time (1.5 seconds).

You will setup a device for you to control, please only control devices with my permission, as some are mission critical to the elab.

Turning on lights and opening windows are fine, but nothing else for now

Try reading devices around the elab with the [http://ipaddress/state.xml](http://ipaddress/state.xml) web link

Try controlling these devices using the commands above:

- 10.14.17.1
- 10.14.18.1
- 10.14.19.1

<div id="bkmrk-part-3%3A-sensors"><span style="font-weight:bold;">Part 3: sensors</span></div><div id="bkmrk-we-will-begin-with-m">We will begin with measuring temperature.</div><div id="bkmrk-two-types-of-tempera">Two types of temperature sensors are most common:</div><div id="bkmrk-2-wire-sensor%3A-also-"><span style="font-weight:bold;">2 wire sensor:</span> also called a thermistor is a resistor that changes value (resistance) when temp changes. You will see these in some solar thermal controllers, or older pre-digital devices. </div><div id="bkmrk-3-wire-digital-senso"><span style="font-weight:bold;">3 wire digital sensor:</span> these have three wires:  power (+), ground (-) and data. Each sensor has a digital address. These are much more accurate than 2 wire sensors, but require more advanced circuits to use</div><div id="bkmrk--12">  
</div><div id="bkmrk-temp-sensor-setup%3A%C2%A0"><span style="font-weight:bold;">Temp sensor setup: </span></div><div id="bkmrk-get-a-control-by-web">

1. get a control by web temperature module, power supply (12V) and a digital temp sensor (metal case)
2. wire the power and sensor to the device, check to see if the power light is on (see below)
3. on a desktop computer, create a network connection for the 192.168.1.0/24 network
4. open a web page for 192.168.1.2, the address of CBW devices out of the box
5. go to 192.168.1.2/setup.html with the login admin/webrelay and change the IP address to the one given by me
6. restart the unit
7. go to the new address, and go to the temperature page
8. add the digital address for the three wire sensor
9. check the web page to see if it records the correct value (warm with your hands to see the change)
10. use xml to check the values: [http://ipaddress/state.xml](http://ipaddress/state.xml)
11. use xml to control the relays in the unit (see above for commands)
12. verify that you can control the unit by watching the web page change
13. expand your system by adding more digital sensors (note they all connect to the same terminals)

<div>Temperature module manual:</div></div><div id="bkmrk-download-temperature">[Download temperature\_um\_v1.6.pdf (application/pdf, 4.6 MB)](https://bookstack.kamuela.org/attachments/275)

</div><div id="bkmrk-advanced-next-steps%3A"><span style="font-weight:bold;">Advanced next steps:</span></div><div id="bkmrk-analog-module%3A-measu">

- Analog module: measure current and power
- X-320 module
- X-420 module
- 400 series modules (bus controlled)
- arduino temp sensors
- raspberry pi sensors
- Lorawan sensors (fire detection project)

<div><span style="font-weight:bold;">Lorawan sensors: Drone project and others...</span></div></div><div id="bkmrk-lorawan-stands-for-l">Lorawan stands for long range, wide area network.</div><div id="bkmrk-these-units-are-very">These units are very low power, very small data systems used for remote telemetry (data sensors and control).</div><div id="bkmrk-advantages%3A">Advantages:</div><div id="bkmrk-very-low-power%2C-some">

1. very low power, some run on batteries for several years, so no need to wire power supplies
2. radio linked using 900 mHz radio, so no need for network wiring
3. long range: can be used up to several miles away, depending on terrain
4. flexibility: move them around as you like, no need to reconfigure
5. location tracking: some have built in GPS

<div>We will be testing two types of sensors: SenseCap sensors and Dragino sensors.</div></div><div id="bkmrk-sensecap-sensors-con"><span style="font-weight:bold;">SenseCap </span>sensors connect to a dashboard provided by the company:</div><div id="bkmrk-https%3A%2F%2Fsensecap.see">[https://sensecap.seeed.cc/portal/#/dashboard](https://sensecap.seeed.cc/portal/#/dashboard)  
</div><div id="bkmrk-they-can-also-be-con">They can also be connected to non-sponsored systems like The Things Network (TTN) or Thingsboard</div><div id="bkmrk-dragino-sensors-are-">Dragino sensors are a bit cheaper, and can only be integrated into either TTN, Thingsboard or your own MQTT database server.</div><div id="bkmrk-mqtt-is-a-database-p">MQTT is a database protocol used by small devices, holding and transferring either messages (like in Meshtastic) or data.</div><div id="bkmrk-we-use-tools-like-mq">We use tools like MQTT explorer to check the data going in and out:</div><div id="bkmrk-https%3A%2F%2Fmqtt-explore">[https://mqtt-explorer.com/](https://mqtt-explorer.com/)  
</div><div id="bkmrk-temperature-data-is-">Temperature data is not usually encrypted (who cares?), but Meshtastic has an encryption option, so messages can be encrypted. </div><div id="bkmrk-fun-fact%3A-if-you-are">Fun fact: if you are a licensed radio operator, you can use higher power on Meshtastic, but you cannot use encryption, per the laws for radio operators.</div><div id="bkmrk-part-1%3A-sensecap"><span style="font-weight:bold;">Part 1: SenseCap</span></div><div id="bkmrk-login-to-the-senseca">

1. Login to the sensecap dashboard above and look at the data. You should see a weather station (3.27.25) and several sensors labeled alpha, beta and so on.
2. Check out the graphs available
3. Note the sensors, and possible data on location
4. Look at caltopo.com, this is were we need to add the location of the sensors

<div><span style="font-weight:bold;">Part 2: The Things Network (TTN)</span></div></div><div id="bkmrk-login-to-ttn-here%3A%C2%A0h">

1. Login to TTN here: [https://nam1.cloud.thethings.network/console/](https://nam1.cloud.thethings.network/console/)
2. Look for sensors and gateways
3. Look at traffic on the gateway, and the data stream
4. Adding a sensor is not easy, we will do this next

<div><span style="font-weight:bold;">Part 3: MQTT</span></div></div><div id="bkmrk-check-out-the-public">

1. Check out the public mqtt server here: [https://www.mqtt-dashboard.com/](https://www.mqtt-dashboard.com/)
2. Note the traffic
3. Using the mqtt explorer, see if you can watch data
4. Try watching Meshtastic messages using the server [mqtt.meshtastic.org](http://mqtt.meshtastic.org) login meshdev/large4cats

</div><div id="bkmrk-part-4%3A-mapping"><span style="font-weight:bold;">Part 4: Mapping</span></div><div id="bkmrk-login-to-caltopo-her">

1. Login to caltopo here: <span style="text-decoration:underline;">[https://caltopo.com/p/0NE7J](https://caltopo.com/p/0NE7J)</span>
2. Notice that the map can be shared.
3. Our goal is to create a single page dashboard for all of our sensors  
    <div>  
    </div>

</div>  
---

<small>Migrated from Apple Server Wiki. Original page ID: T8D7o8</small>

# Arduino

You will be using a kit from Vilros, with a manual that is linked below.

To start, make sure you are using the latest arduino IDE:

<span>[https://www.arduino.cc/en/software/](https://www.arduino.cc/en/software/)</span><span></span>

You can then download the examples:

[Download uskcode-master.zip (application/zip, 44.8 KB)](https://bookstack.kamuela.org/attachments/274)

  
The nice thing about the new Arduino IDE is you just click on the example in the folder you want to test, no need to add it to the samples page.<div id="bkmrk-test-out-the-example">Test out the examples, creating each circuit.</div><div id="bkmrk-here%27s-a-pdf-of-the-">Here's a pdf of the manual:</div><div id="bkmrk--1">  
</div><div id="bkmrk-https%3A%2F%2Felab.hpa.edu"><span>[https://elab.hpa.edu/cs/pdf/arduino%20manual.pdf](https://elab.hpa.edu/cs/pdf/arduino%20manual.pdf)</span><span></span>  
</div>---

<small>Migrated from Apple Server Wiki. Original page ID: h7j6t7</small>

# Telemetry advanced topics

If you have already created a temperature monitor and control module, your next project will be to create a power monitor, much like the ones we have at the elab.

You will be using a current transformer (CT) knowns as a Hawkeye 922 analog current sensor:

[https://www.energycontrol.com/Veris-Hawkeye-H922](https://www.energycontrol.com/Veris-Hawkeye-H922)

This device works with AC current on a single wire to convert AC current into a 0-5 Vdc voltage.

The Analog device you will use is one of these:

[Download analog\_um\_v1.3.pdf (application/pdf, 2.9 MB)](https://bookstack.kamuela.org/attachments/276)

  
Setup:<div id="bkmrk-follow-the-same-step">

1. follow the same steps you did with the temperature module to give your device an IP address (see the manual if you need help)
2. connect the current sensor to the device, with (+) going to A0 (analog input 0) and (-) going to Agnd (analog ground)
3. go to the web page for the device and notice that it should read 0 for the value of A0
4. unclip the current sensor and clamp it around the single wire provided (we will be splitting a "pig tail" and connecting it to a hot water maker)
5. turn on the hot water maker, and notice the value on the web page
6. change the settings on the CT to the lowest value (0-30A) and notice the change
7. in the manual, there are steps to calibrate the device, begin with the easy method: connect a Kill-a-Watt device to your little system and calibrate the analog device using the values you see there for power or current
8. repeat with the harder method, using calculations in the manual, e.g. slope
9. the reason we need to learn the harder method, is we may know voltage of a circuit that is too large or connected to measure current directly (unless we use sophisticated meters, next step)
10. using a clamp-on current meter, calibrate the analog unit
11. what do you notice about the similarity between the clamp on meter and the 922 unit?

</div>---

<small>Migrated from Apple Server Wiki. Original page ID: g8N7P4U7</small>

# Module 5: Cybersecurity

## Subsections

- Kali

- Network Security
    - Firewalls
    
    
    - VPNs
    
    
    - Wireshark

- Cryptography

- Malware

- Social Engineering

- The cloud

<span style="font-weight:bold;">Key terms:</span>

- Kali linux

- Pentesting

- Network security

- VPNs

- Firewalls

## Kali linux

<span style="font-weight:bold;">What is Kali and why do people use it?</span>

Kali Linux is a type of distribution of Linux that has a lot more tools for hacking/pentesting/info gathering. It comes installed with a bunch of tools such as:

- nmap

- whois

- netstat

- wireshark

imagine linux but fine-tuned for hacking

<figure id="bkmrk-image.png">![image.png](https://bookstack.kamuela.org/uploads/images/gallery/2026-09/ACF3xPTYvnGq9p36-image-5jboywd8.png)<figcaption>image.png</figcaption></figure>remember wireshark and nmap, these two are really popular and used by people in the industry

some examples of using these tools (don’t do these, they aren’t legal):

<span style="font-weight:bold;">I want to see all the traffic going through the network and what people are looking up</span>

Kali → Wireshark → sniff for packets being sent on the network → decode the packets and gather info

<span style="font-weight:bold;">I want to brute force my own password for testing purposes</span>

Kali → John the Ripper → get a dictionary full of words → run a brute force attack that tests every possible combination of words and letters against the password

<span style="font-weight:bold;">I want to see all the people that are connected to the same wifi as me</span>

Kali → nmap → network scan → look at all connected devices and their IP addresses

people who work in the industry are hired use these tools often, such as:

- working for a company using these tools to monitor their security and see any potential threats

- hired by companies to test their security and try to find vulnerabilities which they then report back to the company

## Pentesting

<span style="font-weight:bold;">What is pentesting?</span>

Penesting (aka penetration testing) is using tools like the ones listed above to simulate real-life attacks on computers, networks, databases, etc.

Remember earlier when I said people who work in industry are hired for this?

People are paid lots (and I mean lots) of money to simulate hacking into companies, as a hired expert finding a vulnerability is cheaper for a company than actually getting attacked by a group of hackers. These are also known as bug bounties, essentially looking for bugs or vulnerabilities within a company, finding them, then reporting back to the company and getting paid.

[https://immunefi.com/bug-bounty/](https://immunefi.com/bug-bounty/)

<span style="font-weight:bold;">What are some common methods of pentesting/hacking?</span>

- OSINT (Open source intelligence)
    - Looking for publicly available information about individuals to potentially find sensitive information as leverage to gain access to accounts or privileges.

- Dictionary attacks
    - Using a list of common passwords to guess login credentials

- Brute force attacks
    - Using every possible combination of characters until the correct one is found

- Phishing
    - Sending fake emails, messages, etc to pretend to be someone else and gain sensitive data

- Man in the middle attacks (MITM)
    - Intercepting online communication between two systems to gain information or steal data

- Social engineering
    - Tricking people into giving sensitive info, similar to phishing but more human-based and less technical

## Network Security

<span style="font-weight:bold;">What is a network?</span>

<figure id="bkmrk-image-2.png">![image-2.png](https://bookstack.kamuela.org/uploads/images/gallery/2026-09/e4Llk37Axw5SxDbq-image-2-1xwmbd9e.png)<figcaption>image-2.png</figcaption></figure>A network is a connection of two or more devices that send information to each other

As you know from previous modules, IP addresses are used by computers to send information to each other and create a network

Network Security involves protecting the connections between devices so that third parties cannot steal data or get info illegally

<span style="font-weight:bold;">Try running these commands on your computers:</span>

Mac:

```
lsof -i -n -P | grep LISTEN
```

Windows:

```
netstat -ano | findstr LISTENING
```

this tells you open ports, processes going on, and other info about what your computer is actively doing

Some people use <span style="font-weight:bold;">VPNs</span> (virtual private networks) to create secure connections between their computer and other devices to conceal their real IP and identity

<figure id="bkmrk-image-3.png">![image-3.png](https://bookstack.kamuela.org/uploads/images/gallery/2026-09/YEB9owiTIlY2luIg-image-3-wztvuopz.png)<figcaption>image-3.png</figcaption></figure>People also use <span style="font-weight:bold;">Firewalls</span> to protect their stuff, and your computer by default most likely has a basic firewall setup to prevent you from downloading and running malicious programs like viruses. Firewalls work by monitoring traffic on your computer and deciding what to allow or block.

Important to remember: Firewalls work by viewing packets, just like how wireshark is used to sniff packets being sent across the internet.

Firewalls exist for both hardware and software (both physical computers and applications) and are built into routers, pc parts, and common apps

<figure id="bkmrk-image-4.png">![image-4.png](https://bookstack.kamuela.org/uploads/images/gallery/2026-09/cA1sOFLgfj3yAXyR-image-4-qbc6plwh.png)<figcaption>image-4.png</figcaption></figure>Network security is of course much more complex than these short definitions, but it can all be boiled down to information being sent to and from computers, and how we protect that information.

## Wireshark

<span style="font-weight:bold;">Wireshark</span> is a tool that lets you view network traffic on both your computer and online networks.

the cool thing about a lot of these apps is that they’re open source, just like linux, and thus free to use and easy to understand how they’re built

lets try it out!

first, download wireshark from the website:

[https://www.wireshark.org/download.html](https://www.wireshark.org/download.html)

next, do these steps:

1. open wireshark
    1. you’ll see a list of available network interfaces, such as wifi, ethernet, etc

1. choose a network interface (i.e. wifi) and start a capture
    1. this will start capturing all the packets sent on the wifi in real time

1. visit a website online, such as [http://neverssl.com](http://neverssl.com/) (this link works well because it not encrypted)

1. filter the traffic
    1. in the filter bar, type “http” or “ip.addr == YOUR\_IP”
    
    
    1. you can find your own IP by typing this in terminal: “ipconfig getifaddr en0” or “ipconfig” for windows
    
    
    1. this narrows the traffic down to just your device

1. look inside one of the packets
    1. click on a packet (look for ones marked “GET”)
    
    
    1. expand and see all the info from the packet
    
    
    1. you can now see the website you visited, the size of the packet, the destination IP addresses, and more

once you’re done, just click the red stop button and it’ll stop

congrats, you just used wireshark for the first time :)

<span style="font-weight:bold;">Cybersecurity overall plan:</span>

- learn how to read networks using nmap and ipnetmonitor
- install wireshark and learn how to read packets
- learn about the dialog all machines use on the internet (DNS, ARP, ACK-SYN, ICMP)
- learn how to install a wireless router to create an isolated hacker network (hackz0rz)
- use this network to attack and defend using metasploit
- learn how to protect yourself

<span id="bkmrk-downloading-parrot-o" style="font-weight:bold;">Downloading parrot-os:</span><div id="bkmrk-https%3A%2F%2Fparrotsec.or">[https://parrotsec.org/docs/virtualization/utm-configuration/](https://parrotsec.org/docs/virtualization/utm-configuration/)</div><div id="bkmrk-downloading-kali-lin"><span style="font-weight:bold;">Downloading kali linux:</span>  
<div>[https://www.kali.org/docs/virtualization/install-utm-guest-vm/](https://www.kali.org/docs/virtualization/install-utm-guest-vm/)</div><div>  
</div><div><span style="font-weight:bold;">Local downloads:</span></div><div>

1. go to elab.hpa.edu
2. look for computer engineering lower folder (bottom of page)
3. look for installers folder
4. download UTM and parrot-os.utm images
5. install on your own laptop
6. go to wireshark.org and install the version that matches your computer (windows, mac, apple silicon)
7. open wireshark and begin your challenge

</div><div>  
</div><div><span style="font-weight:bold;">Wireshark challenge: Part 1: http</span></div><div>Your challenge is to view the login credentials of an insecure <span style="font-weight:bold;">http</span> request using wireshark</div><div>

1. start wireshark
2. choose an active network interface (look for the squiggly lines)
3. apply the http filter
4. go to the IP address posted on the board
5. start packet capture
6. refresh the page
7. login to the admin pages (see board for credentials)
8. stop the packet capture
9. look through the packets for a POST entry
10. find the login and password you used
11. repeat this with another host
12. repeat using the http.request filter

<div><span style="font-weight:bold;">Wireshark challenge: Part 2: arp and icmp</span>  
</div><div>

1. open terminal
2. run ping to another machine
3. start wireshark with the arp filter
4. repeat with the icmp filter
5. what is the MAC address of the sender and recipient?
6. what was the round trip time for each packet?

</div><div>  
</div><div>  
</div><div><span style="font-weight:bold;">Wireshark challenge: Part 3: ACK-SYN</span>  
</div><div>

1. open a browser and visit a non-https host
2. filter with tcp in wireshark
3. fine a tcp 3-way handshake
4. what does ARP do, and why did it appear before the ping?
5. what do ICMP messages tell us about connectivity?
6. how can this delay help identify potential network intrusions?

</div><div>Server challenge:</div></div><div>

1. setup an apache server on one of the raspberry pi units
2. password protect some part of the web server (look up how to do this, either .htaccess or another method)
3. share your IP address with another student (the "attacker")
4. have them watch using wireshark as you login
5. challenge them to gain your password
6. question: why do we gather packets for later use using pcap?

</div><div></div></div>---

<small>Migrated from Apple Server Wiki. Original page ID: z9H6x5i1</small>

# Meshtastic notes

<div id="bkmrk-5.26.25%3A-updates-to-">### 5.26.25: Updates to this page are now located at 

<div><span>[http://10.14.4.85:6875/books/elab/page/meshtastic](http://10.14.4.85:6875/books/elab/page/meshtastic)</span><span></span>  
</div><div>Or from the elab.hpa.edu main page</div>### Why would I use this:

</div><div id="bkmrk-hikers-or-back-count">

- Hikers or back country out of direct range to cellular or internet
- Emergency workers where infrastructure is damaged, overloaded or non-existent
- Remote neighborhoods cutoff from outside communication
- Casual users or events (e.g. marathons, conventions)

</div>### Background:

<div id="bkmrk-meshtastic-uses-low-">

- Meshtastic uses low power radios in a mesh configuration, meaning to communicate with another unit, one only needs to connect to any unit in the mesh.
- It links to your phone or computer using bluetooth, so there is no internet needed.
- To link to units beyond the mesh links, a messaging server (MQTT) on the internet can be linked to any mesh, either using your phone connection (cellular to internet) or other broadband internet connection (e.g. satellite or land internet).
- The radios use a frequency originally used by cordless phones (900 mHz) but with very low power, in a digital mode, using very small bandwidth-all meaning the range can be many miles for very small, very low power units.
- The wavelength of these units (900 mHz) is "bendy" meaning you may not have line of sight to another in the mesh, but still make a link, much more flexible than normal UHF or SHF radio.
- Meshtastic units use a free, unlicensed technology called LoRaWan, or LoRa for short, meaning long range, which has been used in the past for data like sensors on a wide area network (LoRaWan).
- Meshtastic is a free, unlicensed messaging solution that is text only, linked to phones or computers by bluetooth, with options to connect by wifi or usb connection.
- Meshtastic units are relatively inexpensive, as they are simply modified firmware running on existing small IoT devices, most for around $30
- Some kits include battery, screen and a case for around the same price
- Most small units have a battery life of 4-12 hours, with some units solar powered for remote "repeater" uses.
- Meshtastic units are programmed using bluetooth to a phone app (meshtastic app) or using a wired usb connection using chrome and the meshtastic web app from [meshtastic.org](https://meshtastic.org)
- To upgrade meshtastic units, a wired usb connection is easiest and necessary in most cases, using chrome and the web flasher app from meshtastic.org
- [Meshsense](https://affirmatech.com/meshsense) is an app from [affirmatech.com](https://affirmatech.com) that runs on computers to map out mesh networks, including those linked by the messaging server

</div>### Setup:

<div id="bkmrk-here-are-a-set-of-sc">Here are a set of screenshots from a typical mesh setup I have.  
The easiest device to use in my experience is the ESP32-S3, but the Lilygo T-beam S3 is also quite good.  
Both have a display, unlike the RAK unit, which is also easy to use, but has no display, but is much better on power, if that’s an issue.  
  
<span style="font-weight:bold;">My out of the box process:</span></div><div id="bkmrk-connect-antennas-if-">

1. connect antennas if present (critical: if you power up the device without, it can damage the RF chip)
2. connect via usb to computer running chrome (mac or pc, must be newer)-see below
3. update firmware using the app from meshtastic.org (include web server for ESP32 units)
4. remove from computer, power externally, join by bluetooth use app (iPhone, iPad, m1 mac, android)
5. set LoRa region (below)
6. if unit has a screen, go to bluetooth and change code to static (123456)
7. enable MQTT messaging in LoRa
8. enable MQTT under modules if you like

  
We’ll be using the meshtastic app on a mac (m1 "Apple siicon" or newer) computer, which looks the same on my iPhone. Don’t have access to android, but it is similar.</div><div id="bkmrk-we-will-be-using-the">We will be using the 2.6.x version of firmware (see below)  
You can also configure using chrome (web, bluetooth, serial) which I’ll cover next.</div><div id="bkmrk-download-the-meshtas">Download the meshtasic app, should see this:</div><div id="bkmrk--1"></div><figure id="bkmrk-screenshot-2025-04-1">![Screenshot 2025-04-14 at 5.22.48 PM.png](https://bookstack.kamuela.org/uploads/images/gallery/2026-09/ZjtHWuA3eipn7pKa-screenshot-2025-04-14-at-5-22-48-pm-buajwdqb.png)<figcaption>Screenshot 2025-04-14 at 5.22.48 PM.png</figcaption></figure>  
You may know the MAC (machine ID) for your device, if you have multiples, you can power them off, or wrap in foil (never disconnect antenna under power)<div id="bkmrk-%C2%A0click-the-device%2C-y"> Click the device, you should see this:</div><div id="bkmrk-screenshot-2025-04-1-1"><figure>![Screenshot 2025-04-14 at 5.24.21 PM.png](https://bookstack.kamuela.org/uploads/images/gallery/2026-09/Cy69Dssxxx3QJ0yB-screenshot-2025-04-14-at-5-24-21-pm-supug7lf.png)<figcaption>Screenshot 2025-04-14 at 5.24.21 PM.png</figcaption></figure>  
Upper left shows we are managing the device e72c</div><div id="bkmrk-big-main-page-follow">Big main page follows:</div><div id="bkmrk-screenshot-2025-04-1-2"><figure>![Screenshot 2025-04-14 at 5.25.25 PM.png](https://bookstack.kamuela.org/uploads/images/gallery/2026-09/8ALaEF6EhBo8yWBI-screenshot-2025-04-14-at-5-25-25-pm-lukpnqfi.png)<figcaption>Screenshot 2025-04-14 at 5.25.25 PM.png</figcaption></figure>  
start with LoRa: make sure the region is US:</div><div id="bkmrk-screenshot-2025-04-1-3"><figure>![Screenshot 2025-04-14 at 5.26.31 PM.png](https://bookstack.kamuela.org/uploads/images/gallery/2026-09/j8B0kn2rmL467BtP-screenshot-2025-04-14-at-5-26-31-pm-x07efawa.png)<figcaption>Screenshot 2025-04-14 at 5.26.31 PM.png</figcaption></figure>  
Even though the max power is 22 dBm, don't mess with the power setting unless you are using a station G2, in which case make this 19 dBm as feed for the PA (power amplifier)</div><div id="bkmrk-channels-is-next%2C-yo">Channels is next, you should see at least the primary channel, used for all MQTT and general messages. You can see I've added another channel, more on this later.</div><div id="bkmrk-click-on-primary%2C-yo">Click on Primary, you should see this:</div><div id="bkmrk-screenshot-2025-04-1-4"><figure>![Screenshot 2025-04-14 at 5.28.45 PM.png](https://bookstack.kamuela.org/uploads/images/gallery/2026-09/4biiUNywTh8iX0sj-screenshot-2025-04-14-at-5-28-45-pm-nu0avn5g.png)<figcaption>Screenshot 2025-04-14 at 5.28.45 PM.png</figcaption></figure>  
You can adjust the location accuracy if you like, but make sure uplink and downlink are enabled.</div><div id="bkmrk-security-is-not-some">Security is not something you need to mess with unless you want to enable remote admin of your device. Also don't enable legacy admin unless you want to remote admin. Enabling serial and debugging are nice when you use either meshsense or chrome to look at the serial traffic.</div><div id="bkmrk-screenshot-2025-04-1-5"><figure>![Screenshot 2025-04-14 at 5.31.11 PM.png](https://bookstack.kamuela.org/uploads/images/gallery/2026-09/QBAXnJMTpP1tWIAZ-screenshot-2025-04-14-at-5-31-11-pm-ijoanv0q.png)<figcaption>Screenshot 2025-04-14 at 5.31.11 PM.png</figcaption></figure>  
QR code is nice if you want to share the QR code for your channel, ignore otherwise.</div><div id="bkmrk-be-careful-sharing-t">Be careful sharing this, it includes the key for your channel.</div><div id="bkmrk-next-part-may-be-of-">  
Next part may be of interest to hams: if you WANT to have your callsign, you don't have to click licensed operator, but if you do, it does it for you. It also disables encryption as per FCC regs, and gives you the "license" to push power beyond 1 Watt (30 dBm) which is the limit for most small amplifiers to 10 Watts max.</div><div id="bkmrk--4">  
</div><div id="bkmrk-make-sure-the-next-o">Make sure the next one is changed to fixed, which will make the bluetooth code 123456. This way you won't have to look at the screen if it is away. For devices with no screen, the default code is 123456. If you change the code to random on a unit with no screen, the only way to rescue it is by the serial connection ("code suicide").</div><div id="bkmrk--5">  
</div><div id="bkmrk-screenshot-2025-04-1-6"><figure>![Screenshot 2025-04-14 at 5.45.31 PM.png](https://bookstack.kamuela.org/uploads/images/gallery/2026-09/fEgj1EdhiEuAgQfw-screenshot-2025-04-14-at-5-45-31-pm-rbyuk7qj.png)<figcaption>Screenshot 2025-04-14 at 5.45.31 PM.png</figcaption></figure>Device is next:</div><div id="bkmrk-screenshot-2025-04-1-7"><figure>![Screenshot 2025-04-14 at 5.52.41 PM.png](https://bookstack.kamuela.org/uploads/images/gallery/2026-09/OaFKUlCUht9LW4DV-screenshot-2025-04-14-at-5-52-41-pm-szpa6a4c.png)<figcaption>Screenshot 2025-04-14 at 5.52.41 PM.png</figcaption></figure>Unless you need to create a repeater, use client.</div><div id="bkmrk-simple.">Simple.</div><div id="bkmrk-make-sure-rebroadcas">Make sure rebroadcast all is enabled.</div><div id="bkmrk-note-the-lower-butto">Note the lower buttons for reset, this erases the node info.</div><div id="bkmrk-steer-clear-of-facto">Steer clear of factory reset unless you really need to start from scratch.</div><div id="bkmrk-reset-nodedb-is-usef">Reset NodeDB is useful if you want to clear the database of your nodes, e.g. you relocate and want only fresh contacts</div><div id="bkmrk--6">  
</div><div id="bkmrk-display-can-be-left-">Display can be left alone, unless you want to invert the screen for some screen models:</div><div id="bkmrk-screenshot-2025-04-1-8"><figure>![Screenshot 2025-04-14 at 5.48.15 PM.png](https://bookstack.kamuela.org/uploads/images/gallery/2026-09/MdGelNUWQ2v8JEyi-screenshot-2025-04-14-at-5-48-15-pm-s0zv4uwt.png)<figcaption>Screenshot 2025-04-14 at 5.48.15 PM.png</figcaption></figure>  
Network is only useful if you have an ESP32 or similar device with wifi (Lilygo T-beam):</div><div id="bkmrk-screenshot-2025-04-1-9"><figure>![Screenshot 2025-04-14 at 5.49.41 PM.png](https://bookstack.kamuela.org/uploads/images/gallery/2026-09/RtZIUnOoNG3hIrEo-screenshot-2025-04-14-at-5-49-41-pm-paxtkw1s.png)<figcaption>Screenshot 2025-04-14 at 5.49.41 PM.png</figcaption></figure>n.b. if you enable this, you will lose bluetooth access. </div><div id="bkmrk-if-you-lose-the-wifi">If you lose the wifi connection, you can regain access to the unit using the serial connection part of the Chrome process.</div><div id="bkmrk-this-can-be-useful-i">This can be useful if you have a device far away, but with internet access.</div><div id="bkmrk-it-is-also-the-only-">It is also the only way to get a csv file of range test information should you decide to do so.</div><div id="bkmrk--7">  
</div><div id="bkmrk-as-you-can-see-next%2C">As you can see next, this device has GPS. If it is present, enable it. If not, you can choose "not present" and the device will take the GPS coordinates from your phone where you are at that moment. Works well, especially for locating your devices on a map. (see also meshsense)</div><div id="bkmrk--8">  
</div><div id="bkmrk-screenshot-2025-04-1-10"><figure>![Screenshot 2025-04-14 at 6.00.54 PM.png](https://bookstack.kamuela.org/uploads/images/gallery/2026-09/BuIVUy2XUL0BnqL4-screenshot-2025-04-14-at-6-00-54-pm-uefxmohd.png)<figcaption>Screenshot 2025-04-14 at 6.00.54 PM.png</figcaption></figure><div>  
</div>Power config is only useful if you are on solar power or want the device to shutdown on power loss:</div><div id="bkmrk-screenshot-2025-04-1-11"><figure>![Screenshot 2025-04-14 at 6.01.18 PM.png](https://bookstack.kamuela.org/uploads/images/gallery/2026-09/qDem4FKeWRmp7yQi-screenshot-2025-04-14-at-6-01-18-pm-ydke8jo2.png)<figcaption>Screenshot 2025-04-14 at 6.01.18 PM.png</figcaption></figure>There are many modules, which I'll cover in detail later, but the two most important are MQTT and telemetry (only if you have a device with sensors included, like the T-beam):</div><div id="bkmrk-screenshot-2025-04-1-12"><figure>![Screenshot 2025-04-14 at 6.03.39 PM.png](https://bookstack.kamuela.org/uploads/images/gallery/2026-09/3jzB4xj1PLFybk8X-screenshot-2025-04-14-at-6-03-39-pm-1h4lvtou.png)<figcaption>Screenshot 2025-04-14 at 6.03.39 PM.png</figcaption></figure>  
From the top: enable MQTT so your traffic can use MQTT servers to share messages.</div><div id="bkmrk-make-sure-uplink-and">Make sure uplink and downlink are also enabled on the channels page, and OK MQTT is enabled under LoRa.</div><div id="bkmrk-proxy-uses-your-phon">Proxy uses your phone to connect to the MQTT server if you are not in range of any MQTT gateways-this works for solo users testing devices too.</div><div id="bkmrk-one-cool-use-for-thi">One cool use for this is imagine you are in a remote location with many mesh users, only one needs to be using their phone as a MQTT proxy to get EVERYONE onto the MQTT server network.</div><div id="bkmrk-encryption-off-enabl">Encryption off enables your traffic to be seen by others, but not a big deal, The impact is really to make your messages go through, change later if needed.</div><div id="bkmrk-json-is-only-for-hom">JSON is only for home automation, leave off.</div><div id="bkmrk-enable-the-map-and-l">Enable the map and location.</div><div id="bkmrk-root-topic-is-like-a">Root topic is like a filter: you don't need to communicate with the US mainland, so I use the smaller "scope" of the MQTT server you see on the image, e.g. msh/US/HI.</div><div id="bkmrk-you-can-also-join-ot">You can also join other MQTT servers, like those sponsored on the web, or even your own if you want privacy.</div><div id="bkmrk-if-you-want-to-see-t">If you want to see traffic, you can use many free MQTT explorer programs, just enter mqtt.meshtastic.org, user name meshdev, and password large4cats.</div><div id="bkmrk-cool-stuff%2C-you-can-">Cool stuff, you can see your own traffic.</div><div id="bkmrk-note-the-comment-at-">Note the comment at the bottom-none of this works without enabling uplink and downlink in Channels above.</div><div id="bkmrk--9">  
</div><div id="bkmrk-telemetry-is-only-fo">Telemetry is only for those with devices with sensor, but is really useful:</div><div id="bkmrk--10">  
</div><div id="bkmrk-screenshot-2025-04-1-13"><figure>![Screenshot 2025-04-14 at 6.08.20 PM.png](https://bookstack.kamuela.org/uploads/images/gallery/2026-09/jAFue2Mj9aMEvf1B-screenshot-2025-04-14-at-6-08-20-pm-d5sjfr2r.png)<figcaption>Screenshot 2025-04-14 at 6.08.20 PM.png</figcaption></figure>  
<span style="font-weight:bold;">Chrome setup: Serial connection</span></div><div id="bkmrk-we-will-be-using-a-u">We will be using a USB-C cable to connect a new ESP32-S3 unit to Chrome, on a mac. PC versions are similar, you may need help on the meshtastic site for drivers (ugh). You may also have a device with micro USB, cables vary on these.</div><div id="bkmrk-step-one%3A-open-chrom"><span style="font-weight:bold;">Step one: open Chrome:</span></div><div id="bkmrk-go-to-the-meshtastic">go to the meshtastic site, and download the flasher: [https://flasher.meshtastic.org/](https://flasher.meshtastic.org/)</div><div id="bkmrk-select-target-device">select target device (you can try auto, but it is not reliable):</div><div id="bkmrk-screenshot-2025-04-1-14"><figure>![Screenshot 2025-04-15 at 1.57.16 PM.png](https://bookstack.kamuela.org/uploads/images/gallery/2026-09/RKqDxc7RKVp9GdJG-screenshot-2025-04-15-at-1-57-16-pm-yulmqwpb.png)<figcaption>Screenshot 2025-04-15 at 1.57.16 PM.png</figcaption></figure></div><div id="bkmrk-you-can-see-i-chose-">You can see I chose the Heltec V3, which matches this unit. You can choose beta or alpha software, up to you. If you want web access, you have to include the web package as well (see below):</div><div id="bkmrk--11">  
</div><div id="bkmrk-screenshot-2025-04-1-15"><figure>![Screenshot 2025-04-15 at 1.58.45 PM.png](https://bookstack.kamuela.org/uploads/images/gallery/2026-09/xn2XYeaM98QlK4KI-screenshot-2025-04-15-at-1-58-45-pm-zrpaqdea.png)<figcaption>Screenshot 2025-04-15 at 1.58.45 PM.png</figcaption></figure></div><div id="bkmrk-some-devices-run-jus">Some devices run just like it says, others you have to play a "plug and connect" dance. </div><div id="bkmrk-in-some-cases-%28rak%29-">In some cases (RAK) the device shows up as a drive on your computer, where you drop the firmware file.</div><div id="bkmrk-either-way%2C-it-shoul">Either way, it should show up in the devices menu of your computer:</div><div id="bkmrk-screenshot-2025-04-1-16"><figure>![Screenshot 2025-04-15 at 1.59.53 PM.png](https://bookstack.kamuela.org/uploads/images/gallery/2026-09/X2RuV1bvxWbfet9r-screenshot-2025-04-15-at-1-59-53-pm-pvahzd5t.png)<figcaption>Screenshot 2025-04-15 at 1.59.53 PM.png</figcaption></figure>  
This may take a minute or so, when done it will say "leaving" in a petulant tone.</div><div id="bkmrk-screenshot-2025-04-1-17"><figure>![Screenshot 2025-04-15 at 2.04.28 PM.png](https://bookstack.kamuela.org/uploads/images/gallery/2026-09/fzQvtW27MWoVeNul-screenshot-2025-04-15-at-2-04-28-pm-myjbjmoi.png)<figcaption>Screenshot 2025-04-15 at 2.04.28 PM.png</figcaption></figure></div><div id="bkmrk-once-done%2C-go-to-cli">Once done, go to client.meshtastic.org on chrome...</div><div id="bkmrk-screenshot-2025-04-1-18"><figure>![Screenshot 2025-04-15 at 2.05.07 PM.png](https://bookstack.kamuela.org/uploads/images/gallery/2026-09/biMjYph7BGxVjFU0-screenshot-2025-04-15-at-2-05-07-pm-f7cqg7gv.png)<figcaption>Screenshot 2025-04-15 at 2.05.07 PM.png</figcaption></figure>  
choose serial, then a box should appear with devices, if not, search again:</div><div id="bkmrk-screenshot-2025-04-1-19"><figure>![Screenshot 2025-04-15 at 2.05.34 PM.png](https://bookstack.kamuela.org/uploads/images/gallery/2026-09/VB9aWZpWAbumnaJX-screenshot-2025-04-15-at-2-05-34-pm-2poebnho.png)<figcaption>Screenshot 2025-04-15 at 2.05.34 PM.png</figcaption></figure>One reason to connect by usb is if you have multiple units, you can then label each one with the 4 character code.  
Nice stuff here:</div><div id="bkmrk-screenshot-2025-04-1-20"><figure>![Screenshot 2025-04-15 at 2.06.25 PM.png](https://bookstack.kamuela.org/uploads/images/gallery/2026-09/T96XLqm3Ffz2XHGH-screenshot-2025-04-15-at-2-06-25-pm-awiqiybd.png)<figcaption>Screenshot 2025-04-15 at 2.06.25 PM.png</figcaption></figure>  

- Same setups as above, main difference is this method ALWAYS works, even if you have disabled bluetooth.
- This is the only "rescue" way to connect to a unit if wifi is enabled and you lose wifi access.
- You will also notice the map is much more detailed and includes some fun graphics:
- When you make changes, click the drive icon in the upper right.
- You may also notice that on some units, bluetooth does not work if you are connected by serial.
- If you use your computer to charge your unit, make sure chrome is off, this solves the issue.
- You may also notice the long wait between changes and reboots when using the meshtastic app over bluetooth is gone-serial is instant.

</div><div id="bkmrk-meshsense%3A"><span style="font-weight:bold;">Meshsense:</span></div><div id="bkmrk-meshsense-is-the-bes">Meshsense is the best tool for managing multiple units, as well as deep info into your own mesh unit.</div><div id="bkmrk-it-is-not-a-configur">It is NOT a configuration utility, though it can read config files for confirmation.</div><div id="bkmrk-it-is-an-excellent-d">It IS an excellent dashboard for multiple mesh units with links outlned:</div><div id="bkmrk-https%3A%2F%2Fmeshsense.af">[https://meshsense.affirmatech.com/](https://meshsense.affirmatech.com/)  
</div><div id="bkmrk-here-is-a-global-vie">Here is a global view of our interisland mesh network as of April 15, 2025:</div><div id="bkmrk-screenshot-2025-04-1-21"><figure>![Screenshot 2025-04-15 at 2.15.45 PM.png](https://bookstack.kamuela.org/uploads/images/gallery/2026-09/Vsj5Ge9r5Uk7zlIz-screenshot-2025-04-15-at-2-15-45-pm-lqsl06j3.png)<figcaption>Screenshot 2025-04-15 at 2.15.45 PM.png</figcaption></figure>  
And this is the level of detail available for devices (note, this one is miles away, connected by microwave backhaul):</div><div id="bkmrk-screenshot-2025-04-1-22"><figure>![Screenshot 2025-04-15 at 2.16.50 PM.png](https://bookstack.kamuela.org/uploads/images/gallery/2026-09/1kZsjJR2M6RBhJd8-screenshot-2025-04-15-at-2-16-50-pm-gymyhkct.png)<figcaption>Screenshot 2025-04-15 at 2.16.50 PM.png</figcaption></figure>  
If you are local to the device (not internet or bonjour) you can open settings on the upper right:</div><div id="bkmrk-screenshot-2025-04-1-23"><figure>![Screenshot 2025-04-15 at 2.18.47 PM.png](https://bookstack.kamuela.org/uploads/images/gallery/2026-09/536bJZMJVtfHm263-screenshot-2025-04-15-at-2-18-47-pm-fkwdri3t.png)<figcaption>Screenshot 2025-04-15 at 2.18.47 PM.png</figcaption></figure>  
Another wonderful thing about meshsense is that it creates its own web server that you can access anywhere on your network, or if you can port forward, you can see this info from anywhere-excellent if you are managing a repeater, router or dedicated client acting as a local gateway.</div><div id="bkmrk--12">  
</div><div id="bkmrk-future-topics%3A"><span style="font-weight:bold;">Future topics:</span></div><div id="bkmrk-remote-adminadding-c">

- remote admin
- adding channels
- encryption
- battery supplies
- antennas
- LoRa background-sensors?
- telemetry
- range maps

<div><span style="font-weight:bold;">Equipment:</span></div></div><div id="bkmrk-three-levels%3A-all-sh"><span style="font-weight:bold;">Three levels: all should be accessible via bluetooth at least</span></div><div id="bkmrk-consumer-no-tech-inv">

1. consumer-no tech involved: casual users, hikers etc.
2. hobbyist-some tech, more capabilities
3. explorer-expanding capacity

<div><span style="font-weight:bold;">Level 1: consumer</span></div></div><div id="bkmrk-sensecap-tracker%3A"><span style="font-weight:bold;">SenseCap tracker:</span></div><div id="bkmrk-screenshot-2025-04-1-24"><figure>![Screenshot 2025-04-19 at 8.30.01 AM.png](https://bookstack.kamuela.org/uploads/images/gallery/2026-09/DYnd8iZsu7mlrYwi-screenshot-2025-04-19-at-8-30-01-am-r7jmyc8g.png)<figcaption>Screenshot 2025-04-19 at 8.30.01 AM.png</figcaption></figure>  

- credit card format
- limited range (internal antenna)
- buzzer for alerts
- special charging cable
- cheap, easy to configure

<div><span style="font-weight:bold;">s5 trekker</span></div></div><div id="bkmrk-screenshot-2025-04-1-25"><figure>![Screenshot 2025-04-19 at 8.33.54 AM.png](https://bookstack.kamuela.org/uploads/images/gallery/2026-09/ZUUal3yh76OlybC7-screenshot-2025-04-19-at-8-33-54-am-pdz7eapt.png)<figcaption>Screenshot 2025-04-19 at 8.33.54 AM.png</figcaption></figure>  

- Good for hikers, backpackers
- GPS included
- screen useful
- better antenna
- excellent battery life (&gt;24 hours)
- rugged
- can be used with android ATAK system
- ESP32-S3 guts, can be set to wifi for range testing, etc.
- USB-micro charging

<div><span style="font-weight:bold;">LIlygo T-echo</span></div><div><figure>![Screenshot 2025-04-19 at 8.36.43 AM.png](https://bookstack.kamuela.org/uploads/images/gallery/2026-09/FhtKueYJUraIK47q-screenshot-2025-04-19-at-8-36-43-am-ouziwo7o.png)<figcaption>Screenshot 2025-04-19 at 8.36.43 AM.png</figcaption></figure></div><div>

- USB-C charging
- very portable
- better antenna (dipole)
- small screen
- based on NRF52840 chip-excellent battery life

<div><span style="font-weight:bold;">Lilygo T-deck</span></div></div></div><div id="bkmrk-screenshot-2025-04-1-26"><figure>![Screenshot 2025-04-19 at 8.39.17 AM.png](https://bookstack.kamuela.org/uploads/images/gallery/2026-09/vcQXzVWxb5Avlfof-screenshot-2025-04-19-at-8-39-17-am-kgjlkh2w.png)<figcaption>Screenshot 2025-04-19 at 8.39.17 AM.png</figcaption></figure>  

- ESP32-S3 chip, web page possible, wifi included
- touch screen
- keypad
- GPS included
- larger, less portable
- shorter battery life
- USB-C charging

<div><span style="font-weight:bold;">Level two: Hobbyist</span></div></div><div id="bkmrk-some-of-these-are-ki">Some of these are kits, some you can make your own case for (3d printed), all have more capacity than consumer level devices, depending on firmware</div><div id="bkmrk--13">  
</div><div id="bkmrk-lilygo-t-beam%C2%A0"><span style="font-weight:bold;">Lilygo T-Beam </span></div><div id="bkmrk-screenshot-2025-04-1-27"><figure>![Screenshot 2025-04-19 at 8.43.04 AM.png](https://bookstack.kamuela.org/uploads/images/gallery/2026-09/QphbQve3cYsrBRbp-screenshot-2025-04-19-at-8-43-04-am-xlj7z68p.png)<figcaption>Screenshot 2025-04-19 at 8.43.04 AM.png</figcaption></figure>  

- my go-to board for testing
- good antenna
- add battery to the back, excellent battery life
- ESP32-S3 chip, includes wifi and web page access
- internal sensors for temp, rh, air quality
- GPS included
- same guts as in the Trekker above, without the case

<div><span style="font-weight:bold;">RAK WisBlock board: RAK19007 base and RAK4631 LoRa module</span></div></div><div id="bkmrk-screenshot-2025-04-1-28"><figure>![Screenshot 2025-04-19 at 8.46.28 AM.png](https://bookstack.kamuela.org/uploads/images/gallery/2026-09/A0JgfOceOgIUmzg0-screenshot-2025-04-19-at-8-46-28-am-wnegipcv.png)<figcaption>Screenshot 2025-04-19 at 8.46.28 AM.png</figcaption></figure></div><div id="bkmrk-very-small%2C-good-on-">

- very small, good on power
- fun to play with, can attach sensors to board or with modules from RAK
- core of later repeater and router modules
- CAUTION: power connection is reverse of all known plugs
- includes solar charging plug
- can be adapted to external antennas

<div><span style="font-weight:bold;">ESP32 V3 board:</span></div></div><div id="bkmrk-screenshot-2025-04-1-29"><figure>![Screenshot 2025-04-19 at 8.49.06 AM.png](https://bookstack.kamuela.org/uploads/images/gallery/2026-09/XwX6uy1Arf3vx6Rc-screenshot-2025-04-19-at-8-49-06-am-3hyrj9l8.png)<figcaption>Screenshot 2025-04-19 at 8.49.06 AM.png</figcaption></figure>  

- my favorite board for portable use
- easy to put together, get the kit with the battery
- fun to give to friends
- includes screen
- when used without the case, can be a powerful repeater or router
- includes wifi antenna
- firmware supports web page, rangetest tracking

<div>  
</div></div><div id="bkmrk-level-three%3A-explore"><span style="font-weight:bold;">Level three: explorer</span></div><div id="bkmrk-station-g2%3A"><span style="font-weight:bold;">Station G2:</span></div><div id="bkmrk-screenshot-2025-04-1-30"><figure>![Screenshot 2025-04-19 at 8.51.38 AM.png](https://bookstack.kamuela.org/uploads/images/gallery/2026-09/SRmeCXsG6RUkJSno-screenshot-2025-04-19-at-8-51-38-am-izimseh0.png)<figcaption>Screenshot 2025-04-19 at 8.51.38 AM.png</figcaption></figure>  

- USB-C or wired power
- If external power or PD level USB-C can run power amplifier
- power amplifier to 4 Watts (vs. 0.164 W of others)
- if used as power amplifier, must set module power to 19 dB to not overload PA
- best for remote repeaters, routers, hilltop units
- extremely long range (e.g. Waikii on Big Island to Oahu)

<div><span style="font-weight:bold;">RAK solar repeater/router:</span></div></div><div id="bkmrk-screenshot-2025-04-1-31"><figure>![Screenshot 2025-04-19 at 8.54.53 AM.png](https://bookstack.kamuela.org/uploads/images/gallery/2026-09/wgnuzvH3IDogzMbX-screenshot-2025-04-19-at-8-54-53-am-klnea9ej.png)<figcaption>Screenshot 2025-04-19 at 8.54.53 AM.png</figcaption></figure>  

- setup and drop at remote locations (by drone?)
- essentially a RAK board with solar panel and 3000 mAh battery
- excellent dipole antenna (look for wire inside to tell)
- very long range (Waikii on Big Island to Oahu)
- configure via USB-C (rubber plug port on side)
- testing drone delivery of these...
- 400 grams total (drone folks)

<div><span style="font-weight:bold;">Antennas:</span></div></div><div id="bkmrk-there-are-essentiall">There are essentially 4 types of external antennas possible, beyond the internal ones on some devices:</div><div id="bkmrk-whip-%28stick%29-antenna">

- whip (stick) antenna: look for screw on with no internal wiring, needs ground plane
- whip dipole antenna: much better, needs no ground plane, often flexes 90°
- 8 dB omni antenna: various vendors, stay away from high dB claims, should be quite large, not cheap
- 13 dB yagi antenna: looks like a fish skeleton, very directional, only used for long haul links

</div><div id="bkmrk--14"></div><div id="bkmrk--15"></div>---

<small>Migrated from Apple Server Wiki. Original page ID: f2K4o8a</small>

# Wireshark

# Wireshark lab:

1. find your IP address: ipconfig or ip a on linux
2. open wireshark
3. find your interface-look for squiggly lines
4. double click on the interface to start
5. notice the flow of packets, everything you see

<div id="bkmrk-network-scanning-is-">Network scanning is a bit like burglary:</div><div id="bkmrk-who-lives-where%3A-arp">

1. who lives where: ARP
2. are they home? ICMP ping
3. what is their street address?
4. do they answer the door? ACK-SYN
5. what doors or windows are open? netcat

<div>One could also make the analogy with a "man on the inside": if inside your home is the same as your LAN (local area network), then being able to plant a spy inside defies all of your security (firewalls in a network).</div></div><div id="bkmrk-malware-is-like-send">Malware is like sending a letter to your house, someone opens it thinking it is safe, and it maps out where your valuables are, in some case throwing them out the window do be collected. </div>### part 1: ARP

- ARP stands for address resolution protocol
- It checks MAC hardware addresses against IP addresses “resolving” them
- run the same wireshark flow, but with the arp filter
- what do you see?
- hacker note: how could you “spoof” your MAC address?
- why would you want to?
- look up ARP poisoning-why would someone do this?

### part 2: Ping

- ping is what we use to see if a machine is active
- ping uses a protocol called ICMP or internet control messaging protocol
- ping a device you know if active on the network
- repeat the flow above with the icmp filter
- what did you see?
- look up what length and ttl mean
- hacker note: how could you hide your computer on a network?
- why would you do so?

### part 3: DNS

- you know that DNS is how we convert names into addresses on the internet
- DNS servers can be local like on a LAN for internal machines “point me to [elab.hpa.edu](http://elab.hpa.edu) inside the building” or external “point me to [google.com](http://google.com)”
- you can test this using the nslookup tool on your computer
- open terminal, use nslookup to lookup a local address like [elab.hpa.edu](http://elab.hpa.edu)
- repeat looking for an external address like [google.com](http://google.com)
- in the nslookup window, type server 8.8.8.8 and repeat the two steps
- what do you notice?
- try loading a web page
- hacker note: why would a hacker want to intercept your DNS query? (think of airports and Starbucks)
- type exit to leave the nslookup program

### part 4: ACK-SYN

- http and most web traffic uses a system called “ACK-SYN handshake” in the following order:

1. SYN is sent from the client to the web server, synchronizing the conversation and opening ports needed (like port 80)
2. ACK is sent from the server to the client, acknowledging the port is open
3. SYN-ACK is sent from the client saying “got it”
4. connection is open, data transferred
5. FIN is used to end the link

### example: web pages

1. open wireshark, start a capture
2. browse to a web page, capture packets
3. look for ACK
4. what type of packet is this?
5. repeat with the tcp filter (hit return after applying the filter)
6. repeat going to a machine serving xml
7. what do you see?
8. hacker note: how could you infect another computer using this?

### part 5: netcat

- netcat is a program that allows a user to establish a connection with another machine
- it can be used for a machine to machine chat without using the internet (e.g. we cannot see your conversation without wireshark)

1. open wireshark, in the filter window enter tcp.port == 1234
2. on a client machine, type netcat -l 1234 in a terminal window
3. on your machine, run netcat &lt;ip address of client&gt; 1234 then return
4. type some text
5. does it show up on the client machine?
6. look for the packets on wireshark
7. can you see the text in each packet?
8. try these flags:
    1. n is the ip address
    2. l means listen
    3. v means verbose
    4. p means port number
9. did you notice there was no password needed?
10. why would it be dangerous to leave nc -l open?
11. look up a reverse shell and explain how to do this
12. hacker note: how could malware open this, and what could it do then?

### part 6: netcat port scanning

- netcat can be used to scan for ports
- use the format nc -v -n &lt;ip address&gt; port-port end

1. open wireshark, start a capture
2. run the command nc -v -n 8.8.8.8 1-100
3. filter using this filter: ip.addr == 8.8.8.8
4. what do you see?
5. repeat with a local address (web server, device)
6. go to the device (e.g. port 80) and watch packets
7. hacker note: how can a hacker use this command to look for open ports?
8. how could you detect it happening if you are a white hat or sysadmin (system administrator)?
9. if you had access inside a network, how could this be useful?
10. if this were packaged into malware, how could it be useful?

---

<small>Migrated from Apple Server Wiki. Original page ID: u3F713S1d</small>

# zero days

<span style="font-weight:bold;">cybersecurity notes</span>

[https://elab.hpa.edu/cs/videos/zero%20days.mp4](https://elab.hpa.edu/cs/videos/zero%20days.mp4)

- 00-21:00 cyber background
- 21:00-38:00 what are centrifuges, how the code will be used
- 38:00- 57:00  cyber command, NSA, governments
- 57:00-  NSA hackers

<span style="font-weight:bold;">terms:</span>

- airgap
- C2
- SCADA
- PLC
- zero day exploit
- DLL

<span style="font-weight:bold;">questions:</span>

<span id="bkmrk-what-is-a-zero-day-e" style="font-size:13px;"></span>

1. <span style="font-size:13px;">what is a zero day exploit?</span>
2. <span style="font-size:13px;">how did they know the code was from a nation state not a hacker?</span>
3. <span style="font-size:13px;">what is a digital certificate?</span>
4. <span style="font-size:13px;">why is learning about PLCs so important? (Arduinos are PLCs)</span>
5. <span style="font-size:13px;">was there a C2 element in Stuxnet?</span>
6. <span style="font-size:13px;">why were gas centrifuges so important?</span>
7. <span style="font-size:13px;">did they just destroy these, or was it more complex?</span>
8. <span style="font-size:13px;">did the operators know what was going on?</span>
9. <span style="font-size:13px;">why was this important to the malware attack?</span>
10. <span style="font-size:13px;">what is yellowcake uranium?</span>
11. <span style="font-size:13px;">what is it turned into, and for what?</span>
12. <span style="font-size:13px;">if you have seen Top Gun: Maverick, what is similar?</span>
13. <span style="font-size:13px;">How did the PR film the Iranians made help to identify the code?</span>
14. <span style="font-size:13px;">Look at the “balloon code”-do you see anything like the arduino code?</span>
15. <span style="font-size:13px;">Why is it so scary to link code to “real world physical destruction”?</span>
16. <span style="font-size:13px;">What is a DLL in the windows operating system?</span>
17. <span style="font-size:13px;">What is the 4th dimension of warfare, according to the film?</span>
18. <span style="font-size:13px;">What is the NSA?</span>
19. <span style="font-size:13px;">What was buckshot yankee?</span>
20. <span style="font-size:13px;">Compare the NSA use of remote computers with botnets</span>


---

<small>Migrated from Apple Server Wiki. Original page ID: 69F4a2x</small>

# module 5.2: Cybersecurity

[Download Module 5 Pt 2.pdf (application/pdf, 435.2 KB)](https://bookstack.kamuela.org/attachments/280)


### Module 5: Cybersecurity Pt. 2

### Key Terms:

- Malware
- Types of malware
- C2 servers
- Examples
- Protocols
- Definition
- Common protocols
- DNS
- Cryptography
- Hashing
- Encryption
- Usages
- Malware
- Malware is a word most people know nowadays from tech stuff, movies, etc.
- Malware = Malicious Software

<figure id="bkmrk-screenshot-2025-04-2">![Screenshot 2025-04-24 at 8.37.55 AM.png](https://bookstack.kamuela.org/uploads/images/gallery/2026-09/uumWTAaopd4zRIgh-screenshot-2025-04-24-at-8-37-55-am-3weqko65.png)<figcaption>Screenshot 2025-04-24 at 8.37.55 AM.png</figcaption></figure>### Module 5: Cybersecurity Pt. 2 1

We’ve talked a bit about different types of hacking/pentesting in the first part of the module, so lets look at some real-life examples of malware used for hacking:

- <span style="font-size:13px;">Virus</span>  
    
    - <span style="font-size:13px;">Malware that inserts itself into legitimate programs to look real</span>
- <span style="font-size:13px;">Worm</span>  
    
    - <span style="font-size:13px;">Self-replicating malware that spreads itself to as many computers as possible</span>
- <span style="font-size:13px;">Trojan</span>  
    
    - <span style="font-size:13px;">Malware that disguises itself as “real” software</span>
- <span style="font-size:13px;">Ransomware</span>  
    
    - <span style="font-size:13px;">Malware that encrypts user files/data and locks it until the user pays money</span>
- <span style="font-size:13px;">Keylogger</span>  
    
    - <span style="font-size:13px;">Malware that records what the user types and sends it back to the hacker</span>

In all of these cases, the main purpose of malware is to gain access into networks so that the hackers can leverage authentication to steal money, data, info, etc  

### Module 5: Cybersecurity Pt. 2 2

In the cybersecurity field, we don’t really use the word hacker ever, instead we call them threat actors.

What is a C2 server?

A Command and Control (C2) server is like the mission control center for any malware. It is where all the stolen data is sent to from malware once it is successfully put on a users computer/network.

<span style="font-weight:bold;">How it works:</span>

<span style="font-size:13px;">1. A threat actor will put malware onto a persons computer successfully and compromise it</span>  
<span style="font-size:13px;">2. The malware will try to connect back to the attacker’s C2 server (which is typically hidden)</span>  
<span style="font-size:13px;">3. The C2 server will then send commands, receive stolen data, and remotely update/change the malware itself.</span>

<span style="font-weight:bold;">Common Protocols Used:</span>

- HTTP/HTTPS (blends in with normal traffic)
- DNS (used for covert tunneling)
- IRC (older botnets)
- Custom encrypted protocols over TCP

<figure id="bkmrk-screenshot-2025-04-2-1">![Screenshot 2025-04-24 at 8.38.35 AM.png](https://bookstack.kamuela.org/uploads/images/gallery/2026-09/MGIINhpp9BnxuaDI-screenshot-2025-04-24-at-8-38-35-am-vqzvoecq.png)<figcaption>Screenshot 2025-04-24 at 8.38.35 AM.png</figcaption></figure>### Module 5: Cybersecurity Pt. 2 3

Malware isn’t only used by individual people, but governments are also known for using malware to spy on each other and in some cases cause physical damage,

such as:

<span style="font-weight:bold;">Stuxnet (2009-2010)</span>

One of the most famous pieces of malware ever written of all time, designed by the United States government as a cyberweapon to sabotage Iran’s nuclear enrichment facilities.

The malware would slowly over time make their physical centrifuges run faster and faster until they actually broke down into pieces.

[https://en.wikipedia.org/wiki/Stuxnet](https://en.wikipedia.org/wiki/Stuxnet)

<span style="font-weight:bold;">WannaCry (2017)</span>

Ransomware that was spread globally to over 300,000 machines, demanding bitcoin from the users in order for their data to be decrypted

Caused a lot of money in damages and messing up computers all over the world

[https://en.wikipedia.org/wiki/WannaCry\_ransomware\_attack](https://en.wikipedia.org/wiki/WannaCry_ransomware_attack)

### Module 5: Cybersecurity Pt. 2.4

watch this video on stuxnet, insane stuff:

[https://www.youtube.com/watch?v=WyBlh8Tq6\_Q](https://www.youtube.com/watch?v=WyBlh8Tq6_Q)

<span style="font-weight:bold;">Protocols</span>

What are protocols?

<figure id="bkmrk-screenshot-2025-04-2-2">![Screenshot 2025-04-24 at 8.38.57 AM.png](https://bookstack.kamuela.org/uploads/images/gallery/2026-09/XEeFrqeiMK2HrN0f-screenshot-2025-04-24-at-8-38-57-am-qjpolpyw.png)<figcaption>Screenshot 2025-04-24 at 8.38.57 AM.png</figcaption></figure>Protocols are basically a set of rules of how computers talk to each other.

Every time you do something on a computer like opening a website, sending a text, or streaming a video, your computer is using multiple protocols to make sure that everything is sent, received, and understood properly.

<span style="font-weight:bold;">Common Protocols:</span>

TCP

- Used when accuracy matters (ex: loading a website or sending an email)
- Slower, but reliable — makes sure every packet is received
- HTTP example

### Module 5: Cybersecurity Pt. 2 5

- UDP
- Used when speed matters more than reliability (ex: video calls, games)
- Packets might get dropped or arrive out of order
- No handshake
- Used by websites to send data like HTML, images, and scripts
- Works on port 80
- Doesn’t encrypt anything — all data is sent in plain text
- ARP
- Used by your computer to determine the MAC address of devices locally before sending or receiving data
- Essentially helps your computer determine where to send packets/info

ICMP

- Used to send error messages, tests (such as pings), and status updates
- Helps determine and diagnose smaller problems
- This will be on the next quiz, so remember this example very specifically
- (essentially a free point if you’re reading the modules):

When you visit a website:

- HTTP sends the webpage
- ICMP says “This device is online” or “The page isn’t loading because the network isn’t responding”

Recap on stuff you learned earlier:

DNS (Domain Name System)

### Module 5: Cybersecurity Pt. 2 6

- DNS converts names like google.com into IP addresses like 142.250.190.78
- Happens every time you visit a site

<span style="font-weight:bold;">Real Examples:</span>

You connect to a website:

1\. DNS resolves domain  
2\. TCP handshake starts  
3\. HTTP or HTTPS request is sent

You join a game:

1\. UDP is used to send quick game state updates

Hashing, Cryptography, and Encryption

<figure id="bkmrk-screenshot-2025-04-2-3">![Screenshot 2025-04-24 at 8.39.30 AM.png](https://bookstack.kamuela.org/uploads/images/gallery/2026-09/aTcYdYvB5Z8lTNhi-screenshot-2025-04-24-at-8-39-30-am-bb17l23i.png)<figcaption>Screenshot 2025-04-24 at 8.39.30 AM.png</figcaption></figure>### Module 5: Cybersecurity Pt. 2 7

So what do we even do if there’s a million ways for viruses to steal our info?

When we talk about network security, we’re really just talking about protecting information and making sure it doesn’t get stolen, changed, or seen by anyone we don’t know.

Think of it like this:

Hashing = locking something in a box and throwing away the key

Encryption = locking something in a box with a key, so only the right person can open it

<span style="font-weight:bold;">Hashing:</span>

A hash takes any input and turns it into a long sequence of letters and numbers.

example:

"mypassword" → ef92b778bafe771e89245b89ecbc08a44a4e166c06659911881f

Why do we use it?

To store passwords safely

To check file integrity (if a file changes at all, the hash will completely change)

An example is SHA256, try it out:

[https://emn178.github.io/online-tools/sha256.html](https://emn178.github.io/online-tools/sha256.html)

type in your name or anything you want, then change just one letter and see what happens

### Module 5: Cybersecurity Pt. 2 8

<span style="font-weight:bold;">Encryption</span>:

Encryption takes an input and gives you the encrypted version along with a specific key to decrypt it.

Types of Encryption:

1\. Symmetric Encryption (One key)

a. The same key is used to encrypt and decrypt (lock and unlock)  
b. Fast and easy to use  
c. Since there is only one key, sharing the key with people has to be done  
safely

2\. Asymmetric Encryption (Two keys)

a. You have a public key and a private key  
b. Anyone can use your public key to lock a message for you  
c. Only your private key can unlock it

Some examples of people/businesses that use encryption are:

- Messaging apps (WhatsApp, iMessage, Signal)
- Banking websites (Chase, Wells Fargo, etc)
- Cloud services (AWS, Azure, GCP)

If you’ve gotten to the end of this, make sure you know these for the upcoming quiz:

<span style="font-weight:bold;">Malware and types of malware</span>

### Module 5: Cybersecurity Pt. 2 9

- C2 servers
- Stuxnet
- HTTP and ICMP (look at the example I put above)
- Hashing and Encryption

Module 5: Cybersecurity Pt. 2 10


---

<small>Migrated from Apple Server Wiki. Original page ID: i4R0n8Y</small>

# arduino notes

[Download comp-eng arduino module.pdf (application/pdf, 3.9 MB)](https://bookstack.kamuela.org/attachments/283)

<span style="font-weight:bold;">comp-eng arduino module</span>

We will be creating two foundational devices in comp-eng: the arduino and the raspberry pi.

What is the difference?

<span style="font-weight:bold;">Arduino</span> is what is known as a PLC or programmable logic controller. If you load a program into it (usually by a cable connected to a computer) it will do one thing over and over. These are great for simple sensors, or in some robotics applications. Many automated things in your life are actually PLCs.

<span style="font-weight:bold;">Raspberry pi </span>is a complete computer running a version of linux OS called Raspian, a raspberry pi version of the most popular linux distribution called Debian, developed by a guy named Ian, named after his wife, Deb.

Arduinos are great tools for learning about the process of writing code, compiling code (making it into a language hardware can comprehend) and uploading to the device, which do simple things like blinking lights, or could measure the temperature of this room, or to run a motor based on some sensor, like in robotics.

Pi is great for learning about computers, the internet, cybersecurity, web pages and much more, so we’ll be using them next.

<span style="font-weight:bold;">Arduino part:</span>

Look at this:

<figure id="bkmrk-arduino.png">![ARDUINO.png](https://bookstack.kamuela.org/uploads/images/gallery/2026-09/PFwrgcKrHq9Zud6x-arduino-lv44q7cx.png)<figcaption>ARDUINO.png</figcaption></figure>

1. On the left, you see a USB connection, which connects to a computer to load the programs.
2. On the lower left is a power socket, if you need to power things like motors
3. On the bottom are sockets for analog inputs, e.g. values like voltage or resistance that have a range of many values
4. On the top are the digital inputs and outputs, which match what you have learned about 1 and 0, T and F, and all of those concepts, usually 0 or 5 Volts DC.
5. PWM is a fancy way of using digital signals (1 and 0) in fast repeats to simulate an analog signal output. If you want to show off this is called Pulse Wave Modulation, and it is how many digital devices in your life work.

You will be using this book for this project: [arduino.pdf](https://elab.hpa.edu/cs/arduino.pdf)

[https://elab.hpa.edu/cs/arduino.pdf](https://elab.hpa.edu/cs/arduino.pdf)

(see below as well)

The format of the book is setup at the beginning (read carefully) then projects with diagrams of the components and how they are wired to the breadboard (white part)

1. connect your arduino to a computer and load the first program, which makes the arduino flash at a certain rate
2. compile the program, then upload: you will see flashing lights as the program loads into the arduino
3. the light should flash at a certain rate
4. go back to the program and change some of the values from 1000 to 500 or 2000. re-compile, re-load and see how you have changed the system
5. continue with the other modules, which involve wiring the components according to the diagrams
6. you are now an official computer programmer!

<div class="sandbox" id="bkmrk--11"><div id="bkmrk--12"><div id="bkmrk--13"><div><div class="container"><div class="frontside"><div class="iframe"></div></div></div></div></div></div></div><div id="bkmrk--14">  
</div>  
Arduino steps:

1\. Open Arduino app (green icon)

2\. Tools-&gt;arduino uno, connect Uno

3\. Port-&gt;usbmodem (when plugged in)

4\. File-&gt;examples-&gt;USK guide code

5\. open circuit 01

6\. Sketch-&gt;verify/Compile

7.  Sketch-&gt;upload

8\. Modify code, repeat


---

<small>Migrated from Apple Server Wiki. Original page ID: U9P3z4D0</small>

# VOM meter notes

[Download comp-eng meter unit.pdf (application/pdf, 2.4 MB)](https://bookstack.kamuela.org/attachments/281)


<span style="font-weight:bold;">comp-eng meter unit</span>

<span style="font-weight:bold;">VOM/DVM</span>

<span style="font-weight:bold;">Fluke 114:</span>

<span style="font-weight:bold;"></span>

<figure id="bkmrk---0009..png">![- 0009..png](https://bookstack.kamuela.org/uploads/images/gallery/2026-09/buKEBEY7ercJdBsJ-0009-yn979p12.png)<figcaption>- 0009..png</figcaption></figure><span style="font-weight:bold;">Fluke 101:</span>

<span style="font-weight:bold;"></span>

<figure id="bkmrk-fluke-101-moy-cater.">![FLUKE 101 MOY CATER.png](https://bookstack.kamuela.org/uploads/images/gallery/2026-09/FyhzRmNUMX2fVEeq-fluke-101-moy-cater-8fgm9pqg.png)<figcaption>FLUKE 101 MOY CATER.png</figcaption></figure>V~ means AC voltage

V-- means DC voltage (red +, black -)

mV means millivolts (caution with this one)

Ω means ohms

\|\|\| means sound for continuity (114)

-\|\|- means capacitor check (101)

Hz means frequency (101)

1. test DC voltage with batteries
2. how can larger batteries have the same voltage?
3. test AC voltage with outlet (instructor must be present)
4. test also between each AC plug side side and ground (instructor must be present)
5. which is “hot”? what color is this behind the wall? (look this up, either black or white)
6. test continuity with the sound tester
7. what makes good conductors/insulators?
8. test Ω across your body
9. test across several of your friends holding hands
10. why does this change?
11. measure mV across your body, why does this change?
12. how would it be different for a person having a heart attack?
13. if available, test the voltage of the battery in a car (instructor must be present)
14. start the engine, what does this tell you?
15. turn on the headlights, what happens?
16. test various electrical devices: lightbulbs, hot water heaters, diodes (both directions), resistors, capacitors (both directions)

<div id="bkmrk-download-arduino-par">[Download arduino parts.pdf (application/pdf, 102.9 KB)](https://bookstack.kamuela.org/attachments/282)

</div>

1. when measuring resistance (Ohms)make sure to hold each component separate from your hands, which you found conduct current a bit
2. start with the resistors, see if they match the resistance marked on the color code on each one
3. move on to the photoresistor: measure in light, then cover it-why would this be useful?
4. try with the LEDs, but your meter may not have the needed current to push the LED into flow, try reversing the wires
5. the potentiometer is a fancy name for a volume control. measure from the middle pin to either end and turn the volume up and down
6. investigate the push button with resistance, then with the beep (continuity) function if your meter has one (it will beep)
7. switch to DC volts and connect to the DC motor. spin the motor in one direction, what do you see? reverse and what do you see?
8. 


---

<small>Migrated from Apple Server Wiki. Original page ID: e335v3</small>

# 1.1 Fun with terminal

<span style="font-weight:bold;">comp-eng terminal fun</span>

<span style="font-weight:bold;">setup:</span>

1. raspberry pi 400 units running raspian 12 (trixie)
2. one victim machine running raspian
3. student laptops with terminal running, homebrew if mac, WSL if PC

<div id="bkmrk-important%3A"><span style="font-weight:bold;"><span style="color:rgb(255,0,0);font-weight:bold;">IMPORTANT:</span></span></div>

1. NEVER share your login info with others: your passwords are like your underwear: nobody should see it, change it often, and don’t leave it on your desk
2. take notes on every step for future quiz

<span style="font-weight:bold;"><span style="color:rgb(255,0,0);font-weight:bold;">IMPORTANT</span></span>:

With great power comes great responsibility: the tools you learn today are powerful, and if used correctly can make you a computer ninja. Abusing them can get you in trouble with HPA or in the outside world, with greater consequences. Attacking or invading another computer without permission is grounds for dismissal at HPA, according to the student handbook and acceptable use policy at HPA.

What we do in the elab, stays in the elab.

First notes:

<span style="font-weight:bold;">Why do we mess with terminal?</span>

1. it is seen everywhere
2. it can be done remotely
3. it give you god-like powers
4. it looks cool

<div id="bkmrk-i-really-want-you-to">I <span style="font-weight:bold;">really</span> want you to learn to play with these commands, they give you total control of any computer, anywhere in the internet...</div><div id="bkmrk-stopping-stuff%3Actrl-">Stopping stuff:

- <span style="font-weight:bold;">ctrl-c</span> means cancel
- <span style="font-weight:bold;">ctrl-z</span> means halt (stop everything, not gracefully)

</div><span style="font-weight:bold;">Part one: internet tools: ping, traceroute, nslookup, dns</span>

<span style="font-weight:bold;">ping: </span>

- what is it?
- sends a data packet to a computer and records the time it takes to echo back to your computer:

<div id="bkmrk-screenshot-2026-03-2"><figure>![Screenshot 2026-03-25 at 5.39.42 AM.png](https://bookstack.kamuela.org/uploads/images/gallery/2026-09/nZGFvuIYyRDonb4o-screenshot-2026-03-25-at-5-39-42-am-xxpv2f13.png)<figcaption>Screenshot 2026-03-25 at 5.39.42 AM.png</figcaption></figure>  

- Note that it repeats, sending a packet 64 bytes in size to the computer at 10.14.84.12, taking about 1.85 ms (milliseconds) to return.
- 1000 milliseconds =1 second 1 second, so this computer is likely on your network, wired and responsive

</div><div id="bkmrk--5">  
</div><div id="bkmrk-try-this%3A"><span style="font-weight:bold;">Try this:</span></div>

1. open terminal on your computer
2. ping 8.8.8.8 and notice the return time
3. use control-z to stop this
4. ping 10.14.1.4 and notice return time-why are they different?
5. try ping to your neighbors, their IP addresses may be listed on the board
6. how can you tell if someone is connected by wire or by wireless from their ping?
7. why are gamers interested in ping?
8. look up a ping flood attack-who might use this and why?
9. how many bits make up a byte?

<div id="bkmrk-traceroute%3A"><span style="font-weight:bold;">traceroute</span>:</div><div id="bkmrk-what-is-it%3F%C2%A0traces-t">

- what is it?
- traces the path to a computer, listing the time each packet spends at each node:

<div><figure>![Screenshot 2026-03-25 at 5.43.21 AM.png](https://bookstack.kamuela.org/uploads/images/gallery/2026-09/glU9243ANfY4RPIL-screenshot-2026-03-25-at-5-43-21-am-k9vrb9wb.png)<figcaption>Screenshot 2026-03-25 at 5.43.21 AM.png</figcaption></figure>  

- Notice that each of these has a name attached to it.
- In the internet, each number is an address, and a domain name server (dns) converts these from names to numbers and reverse.
- Notice that each name has a number in parentheses after it
- Notice also that there are times listed after each one-this is the time spent at each node between your computer and www.apple.com

</div></div>

1. what is the IP address of the www.apple.com server?
2. what is the name of the server at 10.14.1.4?
3. which node is in Honolulu?
4. traceroute to [www.apple.com](http://www.apple.com)
5. ctrl-z to stop
6. notice all of the steps between, and the times for each step
7. traceroute to a local IP address, like 10.14.4.1
8. now try the same thing to elab.hpa.edu-how are they different?
9. traceroute to a site of your choice, note the paths to that machine
10. why would gamers like to have short paths?

<div id="bkmrk-nslookup%3A"><span style="font-weight:bold;">nslookup</span>:</div><div id="bkmrk-what-is-it%3Flooks-up-">

- what is it?
- looks up and translates names into numbers, using DNS servers, either the one setup on your computer, or others you can choose, so you can see what IP address a name represents from what DNS server (internal or external)

<div><figure>![Screenshot 2026-03-25 at 5.48.24 AM.png](https://bookstack.kamuela.org/uploads/images/gallery/2026-09/vHO86OJ01nojGRoV-screenshot-2026-03-25-at-5-48-24-am-rnq7oqbo.png)<figcaption>Screenshot 2026-03-25 at 5.48.24 AM.png</figcaption></figure>  

- Ok, lots going on here: first you see 10.14.1.4, which is the DNS server in the elab, which translates names  like www.apple.com into numbers like 23.2.84.211
- Do you see the same number in the traceroute test?
- There are other more complex addresses like 2600:141a:8000:18d::1aca, which is something called IPv6
- Why?
- We are running out of original IP addresses on the internet in the form of 255.255.255.255, so we use "fake" IP addresses inside homes, schools, and businesses, in the form 192.168.1.x or 10.14.x.y
- you can query (ask) either internal name servers like ours at 10.14.1.4, or you can ask outside name servers
- why are they different?
- look below:

</div></div>

1. type nslookup, wait for the weird &lt; character
2. type server 10.14.1.4
3. then enter [www.apple.com](http://www.apple.com)
4. enter [elab.hpa.edu](http://elab.hpa.edu)
5. now type: server 8.8.8.8   (this is the google DNS)
6. enter [elab.hpa.edu](http://elab.hpa.edu)   why is this different?
7. open a browser and enter [http://10.14.4.1](http://10.14.4.1)
8. type <span style="font-weight:bold;">exit</span> to exit
9. look up your name using the internal dns
10. look up your address using the same tool in reverse

<span style="font-weight:bold;">Part two: secure shell (ssh)</span>

- what is it?
- a secure connection in terminal between your computer and another computer

<div id="bkmrk-screenshot-2026-03-2-1"><figure>![Screenshot 2026-03-25 at 5.59.10 AM.png](https://bookstack.kamuela.org/uploads/images/gallery/2026-09/hbIESFKNZGodS4tV-screenshot-2026-03-25-at-5-59-10-am-ja8as1mh.png)<figcaption>Screenshot 2026-03-25 at 5.59.10 AM.png</figcaption></figure>

- Ok, first thing I did here was ssh into 10.14.84.2 as pi
- notice the format: ssh who@IPADDRESS
- it then asks me if I'm ok trading secure keys with this maching
- you say "yes" then the key is added to both machines in a hidden file (ask about this if you are curious)
- it permanently adds 10.14.84.2 to the list of "known hosts"
- what is not obvious is that the green bit at the bottom is actually INSIDE the second computer
- you are now inside the second computer and can run commands-from anywhere in the world

</div>

1. look on the whiteboard for the IP address of the victim computer
2. make sure your laptop (yours or ours) is on the elab wifi network
3. ping the IP address for the victim
4. traceroute to the victim
5. nslookup for the IP address of the victim
6. ssh into the victim machine: ssh admin@IPADDRESS, login info on the board
7. what do you see?
8. where “are” you?
9. type: say “hello guys”
10. if you can ssh into a mac, play with different voices using say -v “hello”
11. look up the say command on osx and learn how to say different voices

<span style="font-weight:bold;">Part three: secure shell commands</span>

- <span style="font-weight:bold;">who</span> also <span style="font-weight:bold;">whoami</span>
- <span style="font-weight:bold;">last</span> your last command, also the up arrow
- <span style="font-weight:bold;">top</span> lists all processes, useful with kill (see later), looks very cool if you are POS
- <span style="font-weight:bold;">history</span>: shows recent commands like this, useful for retracing your steps or seeing who might have been in your machine

1. login to the victim as above
2. type <span style="font-weight:bold;">who</span>, it should say who you are
3. repeat with the <span style="font-weight:bold;">whoami</span> command. what is the difference?
4. type <span style="font-weight:bold;">last</span>, it should show you who last logged in, and from where
5. why is this useful in determining if your computer has been hacked?
6. WITH PERMISSION: type <span style="font-weight:bold;">sudo shutdown -r now</span>
7. this is an example of a linux and unix command: 
    1. <span style="font-weight:bold;">sudo</span> means treat me like the admin for the machine (superuser do)
    2. <span style="font-weight:bold;">shutdown</span> says shutdown the machine
    3. <span style="font-weight:bold;">-r </span>is called a “flag” it modifies the previous command, meaning in this case “reboot after shutdown”
    4. if you did this command without the -r, the machine would stay off
8. try the <span style="font-weight:bold;">top</span> command, this shows what is going on in the machine
9. try the <span style="font-weight:bold;">history</span> command, this is a list of past commands, very useful if you are working on a project, as you can copy this to your other work or records

<span style="font-weight:bold;">Part four: where the heck am i?</span>

New commands:

- <span style="font-weight:bold;">ls </span>means "list files here"
- <span style="font-weight:bold;">pwd</span> means print working directory, or "where am I?"
- <span style="font-weight:bold;">cd</span> means "change directory"
- <span style="font-weight:bold;">cd .. </span>means "go up a floor"

<div id="bkmrk-screenshot-2026-03-2-2"><figure>![Screenshot 2026-03-25 at 6.07.42 AM.png](https://bookstack.kamuela.org/uploads/images/gallery/2026-09/8GN9ZVh078Vk09G7-screenshot-2026-03-25-at-6-07-42-am-kieigqas.png)<figcaption>Screenshot 2026-03-25 at 6.07.42 AM.png</figcaption></figure><figure>![Screenshot 2026-03-25 at 6.07.59 AM.png](https://bookstack.kamuela.org/uploads/images/gallery/2026-09/tW8LFhxxZPcxn2so-screenshot-2026-03-25-at-6-07-59-am-sshj5pkv.png)<figcaption>Screenshot 2026-03-25 at 6.07.59 AM.png</figcaption></figure><figure>![Screenshot 2026-03-25 at 6.08.25 AM.png](https://bookstack.kamuela.org/uploads/images/gallery/2026-09/al28cxAJRnQTG02r-screenshot-2026-03-25-at-6-08-25-am-g8ks0d1e.png)<figcaption>Screenshot 2026-03-25 at 6.08.25 AM.png</figcaption></figure>  

- in the first frame, notice the folders with capital letters like Desktop or Documents
- note the red one, this is an app to be installed
- rpdiags.txt is a text file
- in the second frame, we are in the directory /home/pi
- the ~ character means your home directory, you can use this on your mac as well to do cool stuff
- in the third frame, I changed from /home/pi to /home/pi/Desktop
- to change back, I could use <span style="font-weight:bold;">cd ..</span>

</div>

1. ssh into the victim machine
2. type <span style="font-weight:bold;">ls</span> (list files), this shows the listing of files where you are in that machine
3. type <span style="font-weight:bold;">pwd</span> (print working directory), this shows what “floor” you are on in a building
4. type <span style="font-weight:bold;">cd /home/pi </span>to "change directory" to your home directory
5. type <span style="font-weight:bold;">cd .. </span> (change directory up one) and repeat pwd, what do you see?
6. repeat these steps in a new terminal window on your own computer, and verify by looking in your own home directory
7. open the file browser (yellow icon at the top) and see if what is there matches what you see in terminal
8. question: if there is a nice GUI (graphical user interface) like file browser, why do I need to learn terminal?
9. cd to your desktop and use <span style="font-weight:bold;">ls</span> list the files there-what do you see?

<span style="font-weight:bold;">Part five: creating files</span>

New commands:

- nano is a text editor in the terminal
- less means "show me what is in a file"
- more means the same thing, just more detailed

<div id="bkmrk-screenshot-2026-03-2-3"><figure>![Screenshot 2026-03-25 at 6.14.59 AM.png](https://bookstack.kamuela.org/uploads/images/gallery/2026-09/Zeaft9rCPAeKQxst-screenshot-2026-03-25-at-6-14-59-am-iixaf7rn.png)<figcaption>Screenshot 2026-03-25 at 6.14.59 AM.png</figcaption></figure></div>

1. on your raspberry pi, use terminal to navigate to your home directory: <span style="font-weight:bold;">cd /home/pi</span>
2. type sudo nano <span style="font-weight:bold;">test</span>
3. in the open window, type some wise words
4. type ctrl-o (overwrite) and return
5. exit using ctrl-x
6. on your pi, navigate to your home directory using the file browser and see if there is a new text file there, and open it
7. using the terminal, navigate to your home directory, and type<span style="font-weight:bold;"> less test</span>, you should see the same document
8. this also works with the more command

<span style="font-weight:bold;">Part six: creating directories (folders)</span>

New commands:

- mkdir means"make a new directory" which is a folder with that name on it

<div id="bkmrk-screenshot-2026-03-2-4">  
  
<figure>![Screenshot 2026-03-25 at 6.21.28 AM.png](https://bookstack.kamuela.org/uploads/images/gallery/2026-09/1sedGFWl3BZ8LgPN-screenshot-2026-03-25-at-6-21-28-am-hwyzj4p1.png)<figcaption>Screenshot 2026-03-25 at 6.21.28 AM.png</figcaption></figure>  
<span style="font-weight:bold;"><span style="color:rgb(255,0,0);font-weight:bold;">Challenge: Linux folder challenge</span></span></div>

1. navigate to your home directory:<span style="font-weight:bold;"> cd /home/pi</span>
2. change directory to your desktop: <span style="font-weight:bold;">cd Desktop</span>
3. use <span style="font-weight:bold;">ls</span> to list what is there-does it match what you see on your desktop?
4. type <span style="font-weight:bold;">sudo mkdir awesome</span> (make a directory called awesome)
5. change into this directory using the <span style="font-weight:bold;">cd</span> command
6. create a new text file using the <span style="font-weight:bold;">nano</span> command inside that folder with your name
7. confirm the new folder and text file show up in the GUI (graphical user interface=your desktop)
8. <span style="color:rgb(255,0,0);font-weight:bold;">checklist: awesome folder with text file inside in your name</span>

<div id="bkmrk-part-seven%3A-put-it-a"><span style="font-weight:bold;">Part seven: put it all together!</span></div><div id="bkmrk-challenge%3A-ssh-and-f"><span style="font-weight:bold;"><span style="color:rgb(255,0,0);font-weight:bold;">Challenge: ssh and folders</span></span></div><div id="bkmrk-we-will-be-working-i">

1. we will be working in pairs for this part ASK PERMISSION FIRST
2. ssh into your neighbor's computer and look at the who command to see who is logged in and from where:
    1. ssh pi@10.14.84.x  or ssh pi@name.hpa.edu
    2. password
    3. who
    4. last
3. navigate to their desktop and create a file there called "payload"
    1. cd /home/pi/Desktop
    2. sudo nano payload
    3. type a note to them, make it nice!
    4. ctrl-o, return, ctrl-x
4. have them verify that you sent them a little message with their file browser
5. create a folder on their computer called "stuff"
    1. cd /home/pi/Desktop
    2. pwd
    3. ls
    4. mkdir stuff
    5. cd stuff
    6. pwd
    7. ls
    8. sudo nano herobrine
    9. type your name in the message
    10. ctrl-o, return, ctrl-x
6. Have them look in the new folder and open the herobrine document
7. shutdown their computer using the shutdown - r now command
8. thank them for letting them invade their computer
9. <span style="color:rgb(255,0,0);font-weight:bold;">checklist: payload folder on another computer, herobrine text file inside with a message</span>

<div><span style="font-weight:bold;"><span style="color:rgb(255,0,0);font-weight:bold;">Challenge: Find Herobrine</span></span></div></div><div id="bkmrk-login-to-victim.hpa.">

1. login to victim.hpa.edu (login info on the board)
2. locate the herobrine file
3. write a note in the same folder with your name on it
4. <span style="color:rgb(255,0,0);font-weight:bold;">checklist: in the victim.hpa.edu computer a note with your name on it in the same folder as the herobrine file</span>

</div><span id="bkmrk-checklist%3A-at-this-p" style="font-weight:bold;">Checklist: at this point you should know how to use each of these:</span><div id="bkmrk-ping%C2%A0traceroutensloo">

- ping
- traceroute
- nslookup
- ctrl-c
- ctrl-z
- network icon
- sudo shutdown -r now
- ifconfig
- who
- top
- history
- ls
- pwd
- cd
- cd ..
- sudo nano
- mkdir
- sudo apt update -y
- sudo apt upgrade -y
- ssh pi@10.14.84.20
- IP address, netmask, gateway, dns

  
</div>---

<small>Migrated from Apple Server Wiki. Original page ID: u4a1W5r8D</small>

# Ethernet cables

- If you want to learn about driving, you first have to understand what a road is.
- In this case, network "roads" are cables, but can also be fiber optics or wireless networks
- We need to understand how to create one of these "roads" from scratch
- We will be using either category 5 "cat5" or category 6 "cat6" cables
- cat5 has a max speed of 1 gb/s, especially if it is labeled "cat5e", or "cat5 extended, cat5e"
- cat6 has a max speed of 10 gb/s
- The RJ-45 cable ends for these are not interchangeable, as one wire is a bit thinner than the other (cat5 is 24AWG while cat6 is 23AWG, a bit thicker)
- The ends are called RJ45 and have 8 slots, with the flat side facing you, and the hole at the bottom, see below.
- When viewed with the flat side towards you, these are the colors:

<figure id="bkmrk-screenshot-2026-01-3">![Screenshot 2026-01-30 at 12.50.35 PM.png](https://bookstack.kamuela.org/uploads/images/gallery/2026-09/aToiqmGamRZrfcpG-screenshot-2026-01-30-at-12-50-35-pm-r3z696fy.png)<figcaption>Screenshot 2026-01-30 at 12.50.35 PM.png</figcaption></figure>

- This is NOT random
- The first two orange pairs (1 and 2) are for data transmit
- The green pairs (3 and 6) are for data receive
- The blue pair is for power over ethernet (POE) plus (+)
- The brown pair is for POE negative (-)
- This color is different from 8 conductor (4 pair) telephone cables which may look exactly alike
- Reason? Phone cables start with 4-5 as line one, then 3-6 as line two, 2-7 as line three and 1-8 as line four
- Each of these has up to 90 volts on each pair (when a telephone rings) so we separate our color code for computers
- Reason? Plugging a computer into a phone outlet will not burn out the network card on the computer this way

<div id="bkmrk-creating-an-ethernet"><span style="font-weight:bold;">Creating an ethernet cable:</span></div><div id="bkmrk-we-will-be-using-pas">We will be using pass-through connectors for our cables, along with cat5e cable</div><div id="bkmrk-parts%3A">Parts:</div><div id="bkmrk-rj-45-cat5e-pass-thr">

- RJ-45 cat5e pass-through cable connectors (make sure these are the correct size for cat5e)
- at least 1 meter long length of cat5e cable (cat6 uses different RJ-45 ends)
- cable strippers (optional if you use the Klein tool below)
- Klein combo cable crimper tool (yellow)

<div>

1. strip one end of the cable about 3cm from the end
2. cut off the tension thread (this prevents stretching when pulling cable)
3. arrange the wires according to the ATT 568B pattern with orange-white on the left side
4. cut the arranged wires flat using the Klein tool or wire clippers about 2 cm from the cable sheath
5. holding the RJ-45 cable end with the flat side facing you, and the open bit facing down, thread the wires into the connector
6. check the order to make sure it matches the image above
7. crimp with the crimping tool
8. repeat with the other end of the cable
9. test with the continuity tester
10. if available, test with the speed tester

</div></div>---

<small>Migrated from Apple Server Wiki. Original page ID: V7K8W3X3</small>

# AI unit 2026

Let in January-February 2026 by Jonathan Grayson:

[Download AI Unit homeworks.pdf (application/pdf, 95.7 KB)](https://bookstack.kamuela.org/attachments/285)


[Download Binary Arithmetic.pptx (text/html, 389.6 KB)](https://bookstack.kamuela.org/attachments/286)

[Download Boolean Logic.pptx (text/html, 488.7 KB)](https://bookstack.kamuela.org/attachments/287)

[Download AI Unit\_Session 1.pptx (text/html, 364.1 KB)](https://bookstack.kamuela.org/attachments/288)

[Download AI Unit\_Session 2.pptx (text/html, 355.9 KB)](https://bookstack.kamuela.org/attachments/289)

[Download AI Unit\_Session 3.pptx (text/html, 370.6 KB)](https://bookstack.kamuela.org/attachments/290)

[Download AI Unit\_Session 4.pptx (text/html, 341.3 KB)](https://bookstack.kamuela.org/attachments/291)

[Download AI Unit\_Session 5.pptx (text/html, 353.7 KB)](https://bookstack.kamuela.org/attachments/292)

[Download AI Unit\_Session 6.pptx (text/html, 545.4 KB)](https://bookstack.kamuela.org/attachments/293)

  
articles:<div id="bkmrk-download-si-unit-con">[Download SI unit conversion revision.pdf (application/pdf, 102.1 KB)](https://bookstack.kamuela.org/attachments/294)

[Download Why We’re Not Using AI in This Course, Despite Its Obvious Benefits.pdf (application/pdf, 236.3 KB)](https://bookstack.kamuela.org/attachments/295)

[Download AI as conspiracy.pdf (application/pdf, 2.0 MB)](https://bookstack.kamuela.org/attachments/296)

</div>---

<small>Migrated from Apple Server Wiki. Original page ID: 979219K1r</small>

# Arduino unit 2026

These were led by Jonathan Grayson January 2026

[Download comp-eng arduino module.pdf (application/pdf, 3.9 MB)](https://bookstack.kamuela.org/attachments/297)

[Download comp-eng arduino module 2.pdf (application/pdf, 3.9 MB)](https://bookstack.kamuela.org/attachments/298)

[Download comp-eng arduino module 3.pdf (application/pdf, 3.9 MB)](https://bookstack.kamuela.org/attachments/299)

[Download arduino.pdf (application/pdf, 6.4 MB)](https://bookstack.kamuela.org/attachments/300)

[Download arduino parts.pdf (application/pdf, 102.9 KB)](https://bookstack.kamuela.org/attachments/301)

[Download comp-eng arduino module-markup.zip (application/zip, 7.4 MB)](https://bookstack.kamuela.org/attachments/302)

---

<small>Migrated from Apple Server Wiki. Original page ID: n4n2K4p8</small>

# Internet unit 2026


[Download CE\_ Internet Structure part 2.pptx (text/html, 344.0 KB)](https://bookstack.kamuela.org/attachments/303)

---

<small>Migrated from Apple Server Wiki. Original page ID: 0271T846m</small>

# Meter unit 2026

[Download comp-eng meter unit.pdf (application/pdf, 2.4 MB)](https://bookstack.kamuela.org/attachments/304)


[Download FLUKE 114 TREM.pdf (application/pdf, 149.3 KB)](https://bookstack.kamuela.org/attachments/306)

---

<small>Migrated from Apple Server Wiki. Original page ID: Y1S367</small>

# 1.0 Linux intro-Pi400

Question: what is the most powerful and dangerous thing you know?

In the computer world, this is linux, which you will be learning on the pink Raspberry pi 400.

<span style="font-weight:bold;">What is a pi400?</span>

<figure id="bkmrk-screenshot-2026-03-1">![Screenshot 2026-03-12 at 8.04.05 AM.png](https://bookstack.kamuela.org/uploads/images/gallery/2026-09/AUqClWHiacvSSWtI-screenshot-2026-03-12-at-8-04-05-am-pw9cr0g4.png)<figcaption>Screenshot 2026-03-12 at 8.04.05 AM.png</figcaption></figure>Keyboard and computer in one box

- attach mouse (white port)
- attach monitor (HDMI port)
- attach power (usb-c port)
- attach your ethernet cable (ethernet port)

<div id="bkmrk-download-beginnersgu">[Download BEGINNERSGUIDE-4THED-ENG\_V2.pdf (application/pdf, 34.3 MB)](https://bookstack.kamuela.org/attachments/307)

</div><div id="bkmrk-look-up-the-parts-ab">Look up the parts about pi400, chapter 3</div><div id="bkmrk--1">  
</div><div id="bkmrk-first-steps%3A">First steps:</div><div id="bkmrk-turn-the-unit-on-wit">

1. turn the unit on with the power switch on the cord
2. you should see a desktop show up, (make sure the monitor is on)
3. you will notice that experienced users do two things first: 
    1. open terminal (black icon in the menu bar)
    2. ping 4.4.4.4
4. what is going on here?

<div>Terminal is where most of our work on linux will take place</div><div>Ping is a universal command sending a "ping" or packet to a server</div><div>This is useful in several ways:</div><div>

1. it shows that the terminal, keyboard and everything is working
2. it shows that your pi400 is connected to the internet
3. it shows that you can reach a DNS (name to number) server on the internet

<div><span style="font-weight:bold;">Pi400 specifics:</span></div><div>This is your home screen:</div><div><figure>![home screen.png](https://bookstack.kamuela.org/uploads/images/gallery/2026-09/NGvcq0E3BFrmEVbZ-home-screen-aqyr3wfh.png)<figcaption>home screen.png</figcaption></figure>network settings: hover over the wifi icon:</div><div><figure>![network.png](https://bookstack.kamuela.org/uploads/images/gallery/2026-09/JaLubQeqHcyJMFBy-network-r3n7fax2.png)<figcaption>network.png</figcaption></figure>Terminal window:</div><div><figure>![terminal window.png](https://bookstack.kamuela.org/uploads/images/gallery/2026-09/O9SIvryDnFLJfppg-terminal-window-zoriv1ry.png)<figcaption>terminal window.png</figcaption></figure></div><div>system controls:</div><div><figure>![system controls.png](https://bookstack.kamuela.org/uploads/images/gallery/2026-09/hdSUKjffAoH0wTHU-system-controls-jruwkd6r.png)<figcaption>system controls.png</figcaption></figure></div><div></div><div>set browser choice:</div><div><figure>![browser choice.png](https://bookstack.kamuela.org/uploads/images/gallery/2026-09/6xDmjDMJ4IvPluIp-browser-choice-2lgtouj6.png)<figcaption>browser choice.png</figcaption></figure></div><div>Chromium settings:</div><div><figure>![chromium settings.png](https://bookstack.kamuela.org/uploads/images/gallery/2026-09/b6YOVhEIb59ml8Gq-chromium-settings-5seyglv3.png)<figcaption>chromium settings.png</figcaption></figure></div><div>File browser: home directory </div><div><figure>![file browser home directory.png](https://bookstack.kamuela.org/uploads/images/gallery/2026-09/ev4VbNVCCRHzyc27-file-browser-home-directory-gzme1xxe.png)<figcaption>file browser home directory.png</figcaption></figure></div><div>  
</div><div><span style="font-weight:bold;">Unix-&gt;linux-&gt;debian-&gt;raspian (debian on a raspberry pi)</span></div><div>In 2026, we will be using a version of linux called debian, named after the programmer's wife (Deb) and written by the programmer (Ian).</div></div><div>Debian is just one of the flavors of linux you could use, and since ours is running on a raspberry pi, the version is called "raspian"</div><div>Our 2026 version of raspian is called version 12 or Trixie.</div><div>See if you can find why these are named this way: [https://en.wikipedia.org/wiki/Raspberry\_Pi\_OS](https://en.wikipedia.org/wiki/Raspberry_Pi_OS)</div><div>You might also hear about another popular linux "distro" called Ubuntu, which is popular as a desktop computer alternative.</div><div>  
</div><div><span style="font-weight:bold;">About linux:</span></div><div>

- The short story is that most computers on the internet use linux, which was developed from an older program called UNIX, developed at the University of California Berkeley (Go Bears) in 1980.
- Linus Torvalds wanted a smaller, free version of this program and developed Linux, or "Linus version of Unix"
- Unix later became OSX which is what runs on your mac.

</div><div><span style="font-weight:bold;">Who cares?</span></div><div>You may find that the terminal on your mac runs many of the same commands as your Pi400.</div><div>For your mac to run ALL linux commands, we install a program called Homebrew, which you can find here:</div><div>[https://docs.brew.sh/Installation](https://docs.brew.sh/Installation)  
</div><div>  
</div><div><span style="font-weight:bold;">So what can you do with linux?</span></div><div>

- We will learn how to setup networks, web servers, web pages, and anything you can imagine happens with computers on the internet.
- Oh, and we'll be using your Pi400 as a "victim" you will attack from your mac laptops when we learn cybersecurity.
- Huh?
- We don't want to use your personal computer for anything that might compromise your personal data or ability to use your computer for your work.
- Attacking a Pi is fun, and if something goes wrong, we just replace the hard drive...

</div><div><span style="font-weight:bold;">What hard drive?</span></div><div>The SD card on the back of your pi is the drive your computer uses. Take it out and your Pi400 becomes useless.</div><div>  
</div><div><span style="font-weight:bold;">Possible Pi projects: short list</span></div><div>

- web server
- media server
- programming python, java, and others
- robotics
- AI server, AI bot
- home automation
- cybersecurity host or attacker

<div>So, why is it called a "pi"?</div></div><div>  
</div><div><span style="font-weight:bold;">The terminal</span></div><div>

- Just like an airline terminal, it is the end of a trip, or a place where you can change flights, arrive or depart.
- The terminal in our case is named after computer terminals that were at the end of a long line to a mainframe server, often in another location.
- You may see the abbreviation "tty" around some terminals, this means "teletype" or a typewriter attached to a computer.
- Dr. Bill first learned on one of these, which punched little holes in green paper tape.
- Every 8 holes (a "bit") was a character (a "byte")-good for you to remember this...

</div><div>Have you seen the terminal? </div><div>Sure! </div><div>Any hacking movie has terminal screenshots, most of them fake, except for a few (look these up) Mr. Robot is one...</div><div>  
</div><div><span style="font-weight:bold;">Root</span></div><div>Ok, who is this person "root"?</div><div>

- Imagine the computer as a tree upside down-the branches are the file systems, and "root" is the superuser that has access to all files.
- We will sometimes use root, but more often we will use "superuser" or "su" in this format:
- sudo apt update -y

This means:  

- Treat me like the superuser ("superuser-do"), open the free place to update files on the web (apt), and update my computer (update).

What is the -y about?  

- Any command followed by a space then a - character is a "flag"
- In this case -y means "say yes to anything you ask me"

</div><div><span style="font-weight:bold;">Looking around at the pi desktop: </span>

<figure>![home screen.png](https://bookstack.kamuela.org/uploads/images/gallery/2026-09/EL85zbrOdKn0uYPy-home-screen-5ehhsoyc.png)<figcaption>home screen.png</figcaption></figure><span style="font-weight:bold;">find these:</span>

- apps drawer: upper left corner fruit icon
- menu bar: top
- network settings: hover over the wifi icon
- updates (may show as a pair of arrows)
- bluetooth
- pi connect (you can access your pi over the internet)
- terminal app (black box)
- file browser (yellow folder)
- internet browser (globe icon)
- globe=internet browser (choose below using raspi-config)

<div><span style="font-weight:bold;">customize your pi: in your terminal app, type this:</span></div><div>sudo raspi-config</div>

- setting up with raspi-config
- pick your browser
- give your pi a name on the network (this may not work with latest versions)
- enable ssh (for later)
- enable VNC (for remote access)

<div>who is sudo?</div><div>"superuser do"</div>

- use terminal to reboot: sudo shutdown -r now
- examine that command: shutdown, restart flag, when?

  
</div><div>  
</div><div>  
</div><div>  
</div><div>  
</div>  
</div>---

<small>Migrated from Apple Server Wiki. Original page ID: U3V4y5b4</small>

# 1.2 Linux advanced strand

<span style="font-weight:bold;">Advanced strand: </span> from <span style="font-style:italic;">“running commands”</span> → <span style="font-style:italic;">“thinking like a system admin / engineer”</span>

1. internal vs. global dns
2. NAT outbound and inbound port forwarding
3. private addresses
4. look in known\_hosts file, repairs
5. why MTM warnings matter
6. mulit-hop remote access (cuckoo’s egg situation)
7. scp
8. processes, kill -9
9. ps aux \| grep blah. (pipes)
10. absolute vs. relative paths
11. wildcards
12. file permissions, ownership
13. chmod
14. ls -la
15. editing config files
16. reading logs
17. shell scripts
18. making scripts executable
19. crontab -e
20. updating, upgrading, dpkg
21. systemctl start, stop, status
22. ufw status

<div id="bkmrk--1">  
</div><div id="bkmrk-private-addresses%3Aan"><div><div><span style="font-weight:bold;">Private addresses:</span></div></div><div>

- any machine on the internal network likely has a "fake" address in the form of 192.168.x.y, or 10.x.y.x, or in some rare cases 172.16.x.y (nobody uses this believe me)
- why? look this up
- compare the IP4 address for the elab-wiki server (see below) to the IP6 address
- many machines can also be reached by elab.local for example, with no DNS involved
- challege: look up the default network configuration for several commercial routers: what do you notice?

</div></div><span id="bkmrk-internal-vs.-global--1" style="font-weight:bold;">Internal vs. global DNS</span><div id="bkmrk-for-internal-network">

- for internal network users, you can run an internal DNS that resolves names to numbers
- test this by using NSLOOKUP to look up the elab.hpa.edu server
- change the DNS lookup server by typing <span style="font-weight:bold;">server 8.8.8.8 </span>
- repeat the command and compare
- challenge: repeat this process for elab-wiki.hpa.edu and xserve.hpa.edu

<div><span style="font-weight:bold;">NAT outbound</span></div></div><div id="bkmrk-when-you-browse-the-">

- when you browse the internet, there must be a way to convert your 192.168.x.y address into something else that the web servers can recognize
- this is done through network address translation or NAT outbound, where your address is translated into the address of your router on the way out
- this router is what the servers see
- this process is reversed on the way back in, sending the web page back to your protected internal machine

<div><span style="font-weight:bold;">Inbound port mapping-firewalls</span></div>

- the reverse of this is inbound port mapping, where an outside user contacts your router and is pointed to your internal machine, usually on a defined port, for example to run a game or host a web page
- challenge: look at the page below and describe how outside users might see the elab-wiki server:

<div><figure>![Screenshot 2026-03-31 at 1.01.03 PM.png](https://bookstack.kamuela.org/uploads/images/gallery/2026-09/mYABUNeXTQBu7j6S-screenshot-2026-03-31-at-1-01-03-pm-uxh9jrih.png)<figcaption>Screenshot 2026-03-31 at 1.01.03 PM.png</figcaption></figure>  
<span style="font-weight:bold;">SSH issues:</span></div></div><div id="bkmrk-when-you-establish-a">

- when you establish a secure shell connection, two things are added: one to your machine, the other to the host machine.
- in your machine, a host file is where these are stored, listing the IP address of the host and a key that the host has shared with you
- if the IP address of the host changes, you will be faced with a serious message in the terminal that such a host cannot be trusted
- to solve this, you must find the .known\_hosts file on your computer, open the file with nano, and delete the previous IP address + key line
- in practice, you could just erase the entire file, but any connection you have setup before this will have to be re-established
- challenge: find the .known\_hosts file on your mac and copy a line from it
- challenge: do the same with the pi

<div><span style="font-weight:bold;">Man in the middle attack (MTM):</span></div></div><div id="bkmrk-it-is-possible-for-a">

- it is possible for a hacker or bot to watch the network you are on, and masquerade as the host you are sharing a key with
- first they watch the keys being transferred, and copy these
- they then kick the host off the network (usually a wireless attack)
- they then use the key to interact with your computer, posing as the host
- MTM warnings check the .known\_hosts file and if the IP address does not match, it refuses to connect
- challenge: ssh into the control computer, then change the IP on the computer and repeat
- explain why an MTM warning matters

<div><span style="font-weight:bold;">Multi-hop remote access:</span></div></div><div id="bkmrk-ssh-into-one-of-the-">

- ssh into one of the pi units in the lab
- from that machine, login to another machine
- create a text file in this machine, on the Desktop
- enter some text and ctrl-o, return, then ctrl-x
- look up "the cuckoo's nest" by Cliff Stoll
- explain how the hacker was tracked and what was the resolution

<div><span style="font-weight:bold;">Secure copy: </span></div></div><div id="bkmrk-on-your-pi%2C-create-a">

- on your pi, create a text file called "payload" in your home directory: /home/pi using nano
- secure copy this file over to another computer using this command: scp /home/pi/payload pi@10.14.84.20:/home/pi
- go to that machine via ssh and verify that the file has been transferred
- verify from the GUI as well

<div><span style="font-weight:bold;">processes, kill -9</span></div></div><div id="bkmrk-type-ps--aux-to-see-">

- type ps -aux to see a list of processes
- open some app on your pi
- look again at the ps command result
- kill the process by using the kill -9 &lt;process ID&gt;
- n.b. be careful with kill -9 it is like an assassination: it kills with no warning, and no mercy

<div><span style="font-weight:bold;">processes, pipes</span></div></div><div id="bkmrk-let%27s-say-you-are-lo">

- let's say you are looking for a process, but can't find it
- piping means sending the result of one command to another like this: <span style="font-weight:bold;">ps aux \| grep blah</span>
- this means: "show me all processes and when you get that list grep (search) for the process called blah"
- try this out with the example above

<div><span style="font-weight:bold;">files, wildcards</span></div></div><div id="bkmrk-let%27s-say-i-want-to-">

- let's say I want to edit the file awesome in the home directory
- I could type sudo nano awesome
- or, since I am almost as lazy (faul) as a mathematician, I use: sudo nano awe\*
- this only works if there are no other files in that directory starting with awe, so use this with caution

<div><span style="font-weight:bold;">files, listing files</span></div></div><div id="bkmrk-the-ls-command-for-l">

- the ls command for list is something you will use constantly
- it is a summary, to see more, use the ls -la flag:
- l means long form, or all of the data
- a means all of the files, even the hidden ones
- challenge: use the ls -la command on your directory, what do you see?
- sudo nano .herobrine in your /home/pi directory
- enter some text and ctrl-o, return, then ctrl-x
- use ls on your directory
- look in the GUI for the file, where is it?
- repeat with ls -la
- create a hidden file on a remote machine then challenge the user to find the file

<div>files, who owns what?</div></div><div id="bkmrk-in-your-%2Fhome%2Fpi-dir">

- in your /home/pi directory, using ls -la you notice lots of other stuff like this:

<div><figure>![Screenshot 2026-03-31 at 1.36.13 PM.png](https://bookstack.kamuela.org/uploads/images/gallery/2026-09/TfB5hWx4vbbVrEgm-screenshot-2026-03-31-at-1-36-13-pm-cwrnfjhl.png)<figcaption>Screenshot 2026-03-31 at 1.36.13 PM.png</figcaption></figure></div></div><div id="bkmrk-what-does-all-this-m">what does all this mean?</div><div id="bkmrk-d-means-directory-or">

- d means directory or folder
- there are then three sets of three letters: r means read, w means write, x means execute
- these are for three levels of ownership: owner, user, everyone
- read counts at 1, write counts as 2 and execute counts as 4 (notice how these are all base 2 numbers)
- we could say a file you could read, write and run as a program was rwx or we could add these to make 7 (1+2+4)
- chmod is how we change the permissions on a file, so <span style="font-weight:bold;">chmod 777 </span>is the same as <span style="font-weight:bold;">chmod rwx</span>
- this would be dangerous, as you have made the file read write and execute for owner, user and everyone
- you may create a python program you want to run, so you would enter <span style="font-weight:bold;">chmod +x program.py</span>
- this makes the file a program that can be executed
- challenge: create a text file and notice the permissions
- <span style="font-weight:bold;">cd /var/www/html </span>and notice the permissions on index.html, the home page for your computer
- on the browser, go to 127.0.0.1 (me myself and I in computer language)
- sudo nano the index.html file and add some words after "It works"
- <span style="font-weight:bold;">ctrl-o, return, ctrl-x</span>
- re-visit the home page
- how could you do this as a remote user?

<div><span style="font-weight:bold;">files, installing packages</span></div></div><div id="bkmrk-while-most-apps-can-">

- while most apps can be installed using sudo apt get &lt;program name&gt; there are others that download into your computer, usually in the /home/pi/Downloads folder
- to open these, use this command: dpkg -i &lt;filename&gt;
- you might also look at pi-apps, which is an alternate file download project
- to update your computer, use <span style="font-weight:bold;">sudo apt upgrade</span>
- to upgrade, always add the -y flag: <span style="font-weight:bold;">sudo apt upgrade -y</span>

</div>---

<small>Migrated from Apple Server Wiki. Original page ID: T557x3</small>

# 1.3 html and web servers

<span style="font-weight:bold;">Module 4: web server and web pages (html)</span>

<span style="font-weight:bold;">see also </span>[https://elab.hpa.edu/cs/TC/TC%205.0%20HTML.pdf](https://elab.hpa.edu/cs/TC/TC%205.0%20HTML.pdf)

<span style="font-weight:bold;">Background:</span>

- html stands for hypertext markup language
- it is a markup language, not really programming like python or C
- it manages how information is presented ("marked up") for viewers
- others include xml and xhtml, both managing data as well as format (more on this soon)

<span style="font-weight:bold;">Installing a web server:</span>

1. On the raspberry pi, run the following commands:
2. <span style="font-weight:bold;">sudo apt-get update</span> (this updates your computer)
3. <span style="font-weight:bold;">sudo apt-get install apache2 -y</span> (this installs apache web server on your computer, answering yes to all prompts)
4. Go your browser and enter 127.0.0.1 (which means "me" on the internet)
5. Now type <span style="font-weight:bold;">ifconfig</span> in your terminal and look for your internet address, which should start with 10.14.x.y
6. Look at this address using your browser

<span style="font-weight:bold;">Setup your web folder, edit a page:</span>

- <span style="font-weight:bold;">changing the home page, which is always index.html on any web server:</span>

1. On the terminal, navigate to the following directory:
2. <span style="font-weight:bold;">cd /var/www/html/</span>
3. run the <span style="font-weight:bold;">ls</span> command, you should see a file called index.html
4. You can edit this, either by using the nano command (cooler) or later using text editor (simpler)
5. <span style="background-color:rgb(236,238,168);color:rgb(102,102,102);">sudo nano /var/www/html/index.html</span>
6. This is a complex bit of html, so just look for something you recognize from the 127.0.0.1 test and change it, like the line "It works!"
7. nano is a text editor, so ctrl-o means overwrite, then return to save, and ctrl-x means exit
8. If you are using a GUI text editor, it might not let you save.

- <span style="font-weight:bold;">Next we have to fix the permissions:</span>

1. the directory where all of your web pages are stored is /var/www/html
2. we need to "open" the directory so you can play in it, and not have to be sudo to change stuff (for now)
3. to change the permissions on a file, we use chmod, short for "change the mode"
4. permissions are in sets of three: read (4), write (2), execute (1) (to run a program)
5. add them all up to get 7 to do everything
6. so chmod 777 means read this file, write to this file and execute it
7. you might also see these in ls -la as rwx for read, write, execute for owner, group, everyone
8. so 777 would look like rwx, rwx, rwx (look with ls -la)
9. type <span style="font-weight:bold;"><span style="background-color:rgb(236,238,168);color:rgb(102,102,102);">chmod 755 -R /var/www/html</span></span>
10. this makes everything in the html directory read and writable to you and anyone can read
11. the index.html page is the default that every web browser looks for FIRST
12. you can specify other names in your browser to look around
13. listing the files in a directory is very useful, but also dangerous for hackers

<div id="bkmrk-more-on-permissions%3A"><span style="font-weight:bold;">More on permissions:</span></div><div id="bkmrk-755%3A%C2%A0owner-%28rwx%29%2C-gr">

- <span style="font-weight:bold;">755:</span> Owner (rwx), Group (r-x), Others (r-x) - Standard for scripts/folders.
- <span style="font-weight:bold;">644:</span> Owner (rw-), Group (r--), Others (r--) - Standard for files.
- <span style="font-weight:bold;">777:</span> Owner (rwx), Group (rwx), Others (rwx) - Public
- -R means recursive, or all folders and files below this point

</div><span style="font-weight:bold;"><span style="color:rgb(255,0,0);font-weight:bold;">HTML Challenge: Part 1: Making a new web page:</span></span>

1. cd to the /var/www/html directory and look around <span style="background-color:rgb(236,238,168);color:rgb(102,102,102);">(ls -la)</span>
2. Using either nano create a new page:
3. <span style="background-color:rgb(236,238,168);color:rgb(102,102,102);">sudo nano test.html</span>
4. You'll notice this is blank.
5. Add the following to your new web page:

```
<span style="background-color:rgb(236,238,168);color:rgb(102,102,102);"><html></span><br></br><span style="background-color:rgb(236,238,168);color:rgb(102,102,102);"><head></span><br></br><span style="background-color:rgb(236,238,168);color:rgb(102,102,102);">test</span><br></br><span style="background-color:rgb(236,238,168);color:rgb(102,102,102);"></head></span><br></br><span style="background-color:rgb(236,238,168);color:rgb(102,102,102);"><body></span><br></br><span style="background-color:rgb(236,238,168);color:rgb(102,102,102);">Wow, this is really easy,I am now a true webmaster!Beware my awesome computer skills!</span><br></br><span style="background-color:rgb(236,238,168);color:rgb(102,102,102);"></body></span><br></br><span style="background-color:rgb(236,238,168);color:rgb(102,102,102);"></html></span>
```

1. remember to overwrite (ctrl-o), return to save,  and exit (ctrl-x)
2. Now go to your browser and enter [http://127.0.0.1/test.html](http://127.0.0.1/test.html)
3. What do you see?
4. Create your own pages in your html folder and test
5. <span style="font-weight:bold;"><span style="color:rgb(255,0,0);font-weight:bold;">checklist: test.html with your text in it seen from the browser at your web address: </span></span>[http://victim.hpa.edu](http://victim.hpa.edu)<span style="font-weight:bold;"><span style="color:rgb(255,0,0);font-weight:bold;"> for example</span></span>

<div id="bkmrk-html-challenge%3A-part-1"><span style="font-weight:bold;"><span style="color:rgb(255,0,0);font-weight:bold;">HTML Challenge: Part 2: </span></span><span style="font-weight:bold;">Create folders so you can browse your files:</span></div><div id="bkmrk-cd-to-the-%2Fvar%2Fwww%2Fh-1">

1. cd to the /var/www/html directory and look around <span style="background-color:rgb(236,238,168);color:rgb(102,102,102);">(ls -la)</span>
2. make a new folder using mkdir mystuff
3. cd into that folder and use sudo nano to create a new file called secret.txt
4. go back to your browser and go to [http://127.0.0.1/mystuff/](http://127.0.0.1/mystuff/)
5. look for the secret.txt file and open it with your browser
6. cool! you can now download photos, images, screenshots, any file you like into your web server!
7. <span style="font-weight:bold;"><span style="color:rgb(255,0,0);font-weight:bold;">checklist: folder inside your website</span></span>

</div><div id="bkmrk-html-challenge%3A-part-2"><span style="font-weight:bold;"><span style="color:rgb(255,0,0);font-weight:bold;">HTML Challenge: Part 3: </span></span><span style="font-weight:bold;">Using a text editor to edit and create pages: (may need permissions changed to 777 see above)</span></div><div id="bkmrk-use-the-folder-brows">

1. use the folder browser to navigate to the /var/www/html folder
2. open a text editor and create a page called test2.html
3. add code as you did with the nano editor
4. save and test
5. create a new folder on your web server
6. create a document there with secret content
7. challenge your friends to find this page
8. <span style="font-weight:bold;"><span style="color:rgb(255,0,0);font-weight:bold;">checklist: show me the hidden folder in any browser</span></span>

</div><div id="bkmrk-html-challenge%3A-part-3"><span style="font-weight:bold;"><span style="color:rgb(255,0,0);font-weight:bold;">HTML Challenge: Part 4: </span></span><span style="font-weight:bold;">Remote web page creation:</span></div><div id="bkmrk-ssh-into-10.14.84.20">

1. ssh into 10.14.84.20 or victim.hpa.edu
2. navigate to the /var/www/html folder
3. create a folder with your name (short version all lowercase, no spaces)
4. create a document in html inside the folder
5. browse from your station to verify your new web site!
6. challenge your friends to read your secret message
7. <span style="font-weight:bold;"><span style="color:rgb(255,0,0);font-weight:bold;">checklist: a folder on the </span></span>[http://victim.hpa.edu](http://victim.hpa.edu)<span style="font-weight:bold;"><span style="color:rgb(255,0,0);font-weight:bold;"> website in your name, with an html document inside</span></span>

</div><div id="bkmrk--12">  
</div><div id="bkmrk-next-steps%3A%C2%A0https%3A%2F%2F"><span style="font-weight:bold;">Next steps: </span>[https://www.w3schools.com/](https://www.w3schools.com/)</div><div id="bkmrk--13">  
</div><div id="bkmrk-html-and-w3schools-c"><span style="font-weight:bold;"><span style="color:rgb(255,0,0);font-weight:bold;">HTML and w3schools challenge</span></span></div><div id="bkmrk-https%3A%2F%2Fwww.w3school">[https://www.w3schools.com/html/default.asp](https://www.w3schools.com/html/default.asp)  
</div><div id="bkmrk-create-some-pages-us">

1. create some pages using the w3schools tutorials: must include:
    1. headings
    2. paragraphs
    3. links
    4. images
    5. list format
2. copy this code into your local web server, test
3. copy this code into the victim.hpa.edu server, test
4. <span style="font-weight:bold;"><span style="color:rgb(255,0,0);font-weight:bold;">checklist: seeing your code on the </span></span>[http://victim.hpa.edu](http://victim.hpa.edu)<span style="font-weight:bold;"><span style="color:rgb(255,0,0);font-weight:bold;"> website</span></span>
5. external access: <span style="background-color:rgb(236,238,168);color:rgb(102,102,102);">[http://sensor.hpa.edu:8090](http://sensor.hpa.edu:8090)</span>

<div><span style="font-weight:bold;"><span style="color:rgb(255,0,0);font-weight:bold;">Examples: copy these html codes into your computer using nano and separate name and check the pages with your browser:</span></span></div></div><div id="bkmrk-%28to-find-your-hard-d"><span style="font-weight:bold;">(to find your hard drive on the mac, click on the desktop, hold command-comma and select hard drive and connected servers)</span></div><div id="bkmrk--14">  
</div><div id="bkmrk-from-leo%3A-leo.html"><span style="font-weight:bold;">From Leo: leo.html</span></div><div id="bkmrk--15">  
</div><div id="bkmrk-%3C%21doctype-html%3E%3Chtml">&lt;!DOCTYPE html&gt;  
&lt;html&gt;  
&lt;body&gt;  
&lt;h1&gt; Hello World &lt;/h1&gt;  
&lt;/body&gt;  
&lt;/html&gt;  
</div><div id="bkmrk--16">  
</div><div id="bkmrk-from-ana-sofia%3A-ana."><span style="font-weight:bold;">From Ana Sofia: ana.html</span></div><div id="bkmrk--17">  
</div><div id="bkmrk-%3C%21doctype-html%3E%3Chtml-1">&lt;!DOCTYPE html&gt;  
&lt;html&gt;  
&lt;head&gt;  
&lt;title&gt; This is my homework!! &lt;/title&gt;  
&lt;/head&gt;  
&lt;body&gt;  
&lt;h1&gt;This is the first heading of my homework :p&lt;/h1&gt;  
&lt;p&gt;And this is the first paragraph, helloo Dr. Bill&lt;/p&gt;  
&lt;/body&gt;  
&lt;/html&gt;  
</div><div id="bkmrk--18">  
</div><div id="bkmrk-from-dominik%3A-domini"><span style="font-weight:bold;">From Dominik: dominik.html</span></div><div id="bkmrk--19">  
</div><div id="bkmrk-%3C%21doctype-html%3E%3Chtml-2">&lt;!DOCTYPE html&gt;  
&lt;html&gt;  
&lt;head&gt;  
&lt;title&gt;Dominik's Page&lt;/title&gt;  
&lt;/head&gt;  
&lt;body&gt;  
&lt;h1&gt;Welcome to my webpage&lt;/h1&gt;  
&lt;p&gt;Hey, I am Dominik, and I have a dachshund named Luna&lt;/p&gt;  
&lt;/body&gt;  
&lt;/html&gt;  
</div><div id="bkmrk--20">  
</div><div id="bkmrk-here%27s-one-that-does"><span style="font-weight:bold;"><span style="color:rgb(255,0,0);font-weight:bold;">here's one that does not work: find out why and repair this cool page:</span></span></div><div id="bkmrk-from-rella%3A-rella.ht"><span style="font-weight:bold;">From Rella: rella.html</span></div><div id="bkmrk--21">  
</div><div id="bkmrk-%3C%21doctype-html%3E%3Chtml-3"><div>&lt;!DOCTYPE html&gt;  
&lt;html&gt;  
&lt;head&gt;  
&lt;title&gt; Rella’s wed page/ title&gt;  
&lt;/head&gt;  
&lt;body&gt;  
&lt;h1&gt;Welcome to Rella’s web page&lt;/h1&gt;  
&lt;p&gt;I am a student at Hawaii Preparatory Academy.&lt;/p&gt;  
&lt;h2&gt;About Me&lt;/h2&gt;  
&lt;p&gt;I like cheerleading and listening music.&lt;/p&gt;  
&lt;h2&gt;My Favorite Things&lt;/h2&gt;  
&lt;ul&gt;I’m  
      &lt;li&gt;Cheerleading&lt;/li&gt;  
      &lt;li&gt;Music&lt;/li&gt;  
      &lt;li&gt; Spending time with my family&lt;/li&gt;  
&lt;/ul&gt;  
&lt;p&gt;This is my first HTML page!&lt;/p&gt;  
&lt;/body&gt;  
&lt;/html&gt;</div><div>  
</div>  
</div>  
---

<small>Migrated from Apple Server Wiki. Original page ID: M9n9\_4y</small>

</body></html>

# 1.4 networks

<span style="font-weight:bold;">Module 3: Internet</span>

- Your computer needs 4 things to be able to get onto the internet:
- IP address, example 10.14.8.4
- Subnet mask, example 255.255.0.0
- Gateway/router, example 10.14.0.1
- Domain name server (DNS), example 10.9.250.13

Here's what each one does:

<span style="font-weight:bold;">IP address:</span>

All traffic on the internet or local area network (LAN) is in the form of packets of information, like mail envelopes with a letter inside. Each letter you mail has two important things: the address you want it to go to, and the message inside the envelope.

- TCP/IP is the format of these, which stands for Transmission control protocol and internet protocol.
- The TCP part is the message, and the IP part is the envelope, with an IP address on it.
- Check the IP address of your machine:
- From the GUI: open system preferences, network
- From the terminal: type<span style="background-color:rgb(236,238,168);color:rgb(102,102,102);"> ifconfig</span>

<span style="font-weight:bold;">Subnet mask:</span>

- Imagine you want to stay in one of two large 254 room hotels. One has long hallways, and very few floors, the other has many floors, but short hallways.
- If you want to sleep, you don't want many people walking down the hall in front of your room. You want many floors with fewer rooms per floors.
- This is what subnet masking does on a network. Each of the four segments can hold 254 addresses.
- At home, you probably have a network that looks like this:
- IP: 192.168.1.49
- mask: 255.255.255.0
- router: 192.168.1.1
- dns: 192.168.1.1

This means that the last zero can hold up to 254 addresses (from 192.168.1.1 to 192.168.1.254)

- HPA has this sort of mask:
- 255.255.0.0
- which means that
- 10.14.0.0
- is the elab, which can have 254 x 254 addresses
- It makes for a quieter network, also providing some security as others cannot see you easily.

<span style="font-weight:bold;">Router/gateway:</span>

This is the gateway for all of your traffic, usually the access point at your home. The technical difference between these words is that a router routes traffic between two networks of the same type (like ethernet), while a gateway is between different types of networks (like a cable modem or DSL gateway)

<span style="font-weight:bold;">Domain name server:</span>

- This is the computer on your network or outside that translates names into numbers, like a digital phone book.
- Try this in terminal:

nslookup physics.hpa.edu

1. when you get the address, write it down
2. open a browser
3. go to physics.hpa.edu
4. now go to the numbers you wrote down.
5. Try this with another name, either on campus or off

<span style="font-weight:bold;">Ping and traceroute:</span>

- Imagine you want to find out if a machine is responding (you can block this by using "stealth mode")
- In terminal ping one of the IP addresses in your class
- ping an address out on the internet
- what is the difference?

now try this:

<span style="background-color:rgb(236,238,168);color:rgb(102,102,102);">traceroute www.apple.com</span>

- It should give you a trace of the path your connection took.
- Try this with other addresses on and off campus.

<span style="font-weight:bold;">NSLOOKUP:</span>

- Say you want to find out the name of something, or the IP address from the name.
- try this:
- nslookup
- (you will get a funny &gt; sign)
- type:
- server 10.9.250.13
- type:
- physics.hpa.edu
- what do you get?
- where is this machine?
- Try again using 8.8.8.8 as the server

The best use of this is to find out what OTHER people might call a machine.

- We have several DNS servers at the elab, the main one is at 10.14.1.5
- Others to try:
- 4.4.4.4
- 8.8.8.8
- 10.14.1.2

- you can get out by typing
- exit
- or control-z (halt)
- 


---

<small>Migrated from Apple Server Wiki. Original page ID: 72g7j5j8</small>

# 1.5 routers and firewalls

As a computer engineer, you will doubtless be asked to setup a home router for your home or one of your friends (you could even make a job of it).

<span style="font-weight:bold;">Definition of terms:</span>

- <span style="font-weight:bold;">Router</span>: anything that converts one physical form of data transmission like a cable modem or fiber to a wired ethernet network
- <span style="font-weight:bold;">Access point:</span> a wifi station that broadcasts your INTERNAL network for users in your home
- <span style="font-weight:bold;">Switch</span>: anything that connects parts of a wired network to another part, like a hub, only smarter, some routers have a few ports built in, which you can see below
- <span style="font-weight:bold;">Firewall</span>: a special part of most routers that blocks invaders but can also be seen as a "bouncer" at a bar, letting in some people and not others
- <span style="font-weight:bold;">WAN</span> is the wide area network, or the internet in our case
- <span style="font-weight:bold;">LAN</span> is the local area network, your home network that we need to keep safe

<div id="bkmrk-some-terms-to-review">Some terms to review first:</div><span style="font-weight:bold;">Internet terms:</span>

- Your computer needs 4 things to be able to get onto the internet:
- <span style="font-weight:bold;">IP address</span>, example 10.14.88.83
- <span style="font-weight:bold;">Subnet mask</span>, example 255.255.0.0
- <span style="font-weight:bold;">Gateway/router,</span> example 10.14.1.3
- <span style="font-weight:bold;">Domain name serve</span>r (DNS), example 10.14.1.4

<div id="bkmrk-look-up-your-network">Look up your network settings on whatever device you are on, you should see all of these</div><div id="bkmrk-mac%3A-look-under-syst">Mac: look under system preferences, network:</div><div id="bkmrk-screenshot-2026-04-2"><figure>![Screenshot 2026-04-22 at 3.31.30 PM.png](https://bookstack.kamuela.org/uploads/images/gallery/2026-09/Ut1kg7DBD4eMPNcO-screenshot-2026-04-22-at-3-31-30-pm-5ynzec9s.png)<figcaption>Screenshot 2026-04-22 at 3.31.30 PM.png</figcaption></figure></div><div id="bkmrk-pi%3A-look-for-up-and-">Pi: look for up and down arrows on the upper right, select "advanced options" and "connection information"</div><div id="bkmrk-screenshot-2026-04-2-1"><figure>![Screenshot 2026-04-22 at 3.31.03 PM.png](https://bookstack.kamuela.org/uploads/images/gallery/2026-09/wSMWjEmRrhTv03FM-screenshot-2026-04-22-at-3-31-03-pm-zecgzyqo.png)<figcaption>Screenshot 2026-04-22 at 3.31.03 PM.png</figcaption></figure></div>Here's what each one does:

<span style="font-weight:bold;">IP address:</span>

All traffic on the internet or local area network (LAN) is in the form of packets of information, like mail envelopes with a letter inside. Each letter you mail has two important things: the address you want it to go to, and the message inside the envelope.

- TCP/IP is the format of these, which stands for Transmission control protocol and internet protocol.
- The TCP part is the message, and the IP part is the envelope, with an IP address on it.
- Check the IP address of your machine:
- From the GUI: open system preferences, network
- From the terminal: type<span style="background-color:rgb(236,238,168);color:rgb(102,102,102);"> ifconfig</span>
- Your computer may have an address in the form 10.14.253.x, this means you are "leasing" an address from the system (more below)

<span style="font-weight:bold;">Subnet mask:</span>

- Imagine you want to stay in one of two large 254 room hotels. One has long hallways, and very few floors, the other has many floors, but short hallways.
- If you want to sleep, you don't want many people walking down the hall in front of your room. You want many floors with fewer rooms per floors.
- This is what subnet masking does on a network. Each of the four segments can hold 254 addresses.
- At home, you probably have a network that looks like this:
- IP: 192.168.1.49
- mask: 255.255.255.0
- router: 192.168.1.1
- dns: 192.168.1.1

This means that the last zero can hold up to 254 addresses (from 192.168.1.1 to 192.168.1.254)

- HPA has this sort of mask:
- 255.255.0.0
- which means that
- 10.14.0.0
- is the elab, which can have 254 x 254 addresses
- It makes for a quieter network, also providing some security as others cannot see you easily.

<span style="font-weight:bold;">Router/gateway:</span>

This is the gateway for all of your traffic, usually the access point at your home. The technical difference between these words is that a router routes traffic between two networks of the same type (like ethernet), while a gateway is between different types of networks (like a cable modem or DSL gateway).

A firewall is just a gateway that has an outside part and an inside part.

Your gateway may also distribute IP addresses inside your network. At home this will likely look like 192.168.1.x, where at the elab, our network leases addresses in the form 10.14.253.x.

To scan these addresses here, you can use nmap 10.14.253.0/24

<span style="font-weight:bold;">Domain name server:</span>

- This is the computer on your network or outside that translates names into numbers, like a digital phone book.
- Try this in terminal:

nslookup elab.hpa.edu

1. when you get the address, write it down
2. open a browser
3. go to elab.hpa.edu
4. now go to the numbers you wrote down.
5. Try this with another name, either on campus or off
6. you are asking our domain name server (DNS) to resolve the name into a number
7. this also works in reverse, from numbers to names
8. using ARIN.net you can find the location of IP addresses outside your network

<div id="bkmrk-----tools-to-use-to-">----tools to use to check your network configuration, or fix a broken one-------</div><span style="font-weight:bold;">NSLOOKUP:</span>

- Say you want to find out the name of something, or the IP address from the name.
- try this:
- nslookup
- (you will get a funny &gt; sign)
- type:
- server 10.14.1.4
- type:
- elab.hpa.edu
- what do you get?
- where is this machine?
- Try again using 8.8.8.8 as the server (this may be blocked by our system)

The best use of this is to find out what OTHER people might call a machine.

- We have several DNS servers at the elab, the main one is at 10.14.1.4
- Others to try:
- 4.4.4.4
- 8.8.8.8 (google)

- you can get out by typing
- exit
- or control-z (halt)

<div id="bkmrk-ping-and-traceroute%3A"><span style="font-weight:bold;">Ping and traceroute:</span>

- Imagine you want to find out if a machine is responding (you can block this by using "stealth mode")
- In terminal ping one of the IP addresses in your class
- ping an address out on the internet
- what is the difference?

now try this:

<span style="background-color:rgb(236,238,168);color:rgb(102,102,102);">traceroute www.apple.com</span>

- It should give you a trace of the path your connection took.
- Try this with other addresses on and off campus.

-----------------------</div><div id="bkmrk--21">  
</div><div id="bkmrk-a%C2%A0router%C2%A0is-a-device">A <span style="font-weight:bold;">router</span> is a device that physically separates two networks. If the router can also filter traffic in and out of your network, it is also a <span style="font-weight:bold;">firewall</span></div><div id="bkmrk-you-will-setup-a-fir">You will setup a firewall here, and your friends will try to "break in".  
Thinking of a selective club or restaurant: there would be the bouncer (usually a very big person guarding the door) who lets some traffic (people) in.</div><div id="bkmrk-the-bouncer-can-also">The bouncer can also get messages out of the restaurant to the outside, and when the message returns, they can pass it back inside.  
  
<span style="font-weight:bold;">Router setup:</span>  
We will first be using the TP-Link Archer C9 home router/access point for your network.   
Why? </div><div id="bkmrk-it-should-be-similar">It should be similar to most home routers you will setup for yourself or your friends.  
Industrial ones for colleges and such may have more options, but the fundamentals are the same.</div><div id="bkmrk-we-have-others-for-y">We have others for you to learn on as well, so you will be able to make many $$$ if you want to charge folks...  
  
  
Here's what it looks like:</div><div class="sandbox" id="bkmrk--22"><div id="bkmrk--23"><div id="bkmrk--24"><div><div class="container"><div class="frontside"><div class="iframe">![Xa3312W0EWNWbfs6-screenshot-2025-09-03-at-4-37-41-pm-tbxt0dxg.png](https://bookstack.kamuela.org/uploads/images/gallery/2026-09/Xa3312W0EWNWbfs6-screenshot-2025-09-03-at-4-37-41-pm-tbxt0dxg.png)</div></div></div></div></div></div></div>

- start with the ports: blue is the WAN (wide area network) you connect to the internet
- yellow are the LAN (local area network) ports for your network.
- the usb port is for external storage
- note the antennas, most routers will have many of these, or they may be built in

<div id="bkmrk-setup%3A"><span style="font-weight:bold;">Setup:</span></div><div id="bkmrk-the-wan-for-your-rou">

- the WAN for your router will be the HPA elab network, in the form 10.14.254.x, connected to the blue port
- your router will borrow an address from the elab for the day, which is called DHCP, just as your laptop, iPad or phone borrows an address when you come into the elab
- the LAN side of the router (yellow ports, pick one) should be in the format 192.168.1.x and will usually be the first in this subnet or 192.168.1.1.
- the domain name server is usually baked into the router, so same address
- the router will also give out DHCP address to the LAN side, so you will connect your pi to the LAN side with a wire, and your laptop to the router using the wifi network of the router/access point
- make sure the router is completely erased, and start from scratch, connecting as above and see what addresses you have
- go to the admin page and change the wifi network name and password (keep these secret)

<div>Inbound port mapping:</div></div><div id="bkmrk-suppose-you-want-to-">Suppose you want to have a web server in your home, but you don't want everyone in the world to get into your computer.</div><div id="bkmrk-a-firewall-can-be-se">A firewall can be setup to pass inbound traffic on certain ports, in our case port 80 (web) and port 443 (secure web).</div><div id="bkmrk-we-want-to-be-very-s">We want to be very safe with your computer so first of all, create a temporary web server on your laptop. Enter the following in terminal on your laptop:</div><div id="bkmrk--25">  
</div><div id="bkmrk-python--m-http.serve">python -m http.server 8000  
</div><div id="bkmrk--26">  
</div><div id="bkmrk-now-go-to-your-brows">Now go to your browser and type in [http://localhost:8000](http://localhost:8000)</div><div id="bkmrk-what-do-you-see%3F">What do you see?</div><div id="bkmrk-repeat-using-http%3A%2F%2F">Repeat using [http://127.0.0.1:8000](http://127.0.0.1:8000)</div><div id="bkmrk-what-now%3F">What now?</div><div id="bkmrk--27">  
</div><div id="bkmrk-we-want-to-pass-inbo">We want to pass inbound visitors (the bouncer again) to your inside web server.</div><div id="bkmrk-locate-the-pages-tha">Locate the pages that say inbound port mapping.</div><div id="bkmrk-enter-the-port-8000-">Enter the port 8000 and the IP address your laptop now has from the router wifi</div><div id="bkmrk-apply-and-save">apply and save</div><div id="bkmrk--28">  
</div><div id="bkmrk-from-a-computer-else">From a computer elsewhere in the elab, go to the outside address of your router on a browser, using the same port:</div><div id="bkmrk-10.14.254.x%3A8000">10.14.254.x:8000</div><div id="bkmrk--29">  
</div><div id="bkmrk-see%3F">See?</div><div id="bkmrk-wow%21-you-just-setup-">Wow! you just setup a network with a server at your house!</div><div id="bkmrk-could-this-work-for-">Could this work for hosting a minecraft server? </div><div id="bkmrk--30">  
</div><div id="bkmrk-next%3A-only-letting-y">Next: only letting your friends into your wifi, even if someone gives them your secret password!</div><div id="bkmrk--31">  
</div><div id="bkmrk-challenges%3A"><span style="font-weight:bold;"><span style="color:rgb(255,0,0);font-weight:bold;">Challenges:</span></span></div><div id="bkmrk-connect-a-router-to-">

1. connect a router to the internet (WAN) and a wired computer (LAN) including power and admin user
2. setup a basic wifi network with password
3. show how to monitor who is using your wifi network
4. setup restrictions on your network using MAC addresses (like they do in the dorms)
5. setup port forwarding from the WAN side to your pi web page (port 80)
6. setup port forwarding from the WAN side to your pi port 8000 running python3: python3 -m http.server

</div><div id="bkmrk--32">  
</div><div id="bkmrk--33">  
</div><div id="bkmrk-homework%3A-4.27.26"><span style="font-weight:bold;">Homework: 4.27.26</span></div><div id="bkmrk-looking-at-this-diag">

1. Looking at this diagram, where do you connect the internet?<figure>![Screenshot 2025-09-03 at 4.37.41 PM.png](https://bookstack.kamuela.org/uploads/images/gallery/2026-09/Bq0qLvxD3qId8zkH-screenshot-2025-09-03-at-4-37-41-pm-913fzstw.png)<figcaption>Screenshot 2025-09-03 at 4.37.41 PM.png</figcaption></figure>
2. What is the outside address for this router?

<figure>![Screenshot 2026-04-27 at 3.16.59 PM.png](https://bookstack.kamuela.org/uploads/images/gallery/2026-09/wb02oxJtmewDBFOa-screenshot-2026-04-27-at-3-16-59-pm-lj96of3i.png)<figcaption>Screenshot 2026-04-27 at 3.16.59 PM.png</figcaption></figure>  
3. what is the MAC address for the computer that is not a PI? <figure>![Screenshot 2026-04-27 at 3.15.02 PM.png](https://bookstack.kamuela.org/uploads/images/gallery/2026-09/0pKfJFFtHTQ6EV7Q-screenshot-2026-04-27-at-3-15-02-pm-fv1m0ntc.png)<figcaption>Screenshot 2026-04-27 at 3.15.02 PM.png</figcaption></figure>  
4. If you were a hacker, how would you know that #1 and #3 are Pi-400 from their MAC address? (hint: copy the MAC address into [https://www.wireshark.org/tools/oui-lookup.html](https://www.wireshark.org/tools/oui-lookup.html))  
<div>  
</div></div><div id="bkmrk--34">  
</div>  
---

<small>Migrated from Apple Server Wiki. Original page ID: x6e0d8v3\_</small>

# 1.6 wireless networks

Let's start with your wifi connection:

On your mac, find the wifi icon on the upper right:

<figure id="bkmrk-screenshot-2026-04-2">![Screenshot 2026-04-29 at 7.43.13 AM.png](https://bookstack.kamuela.org/uploads/images/gallery/2026-09/rIDrG6GZGbvkGWDT-screenshot-2026-04-29-at-7-43-13-am-dayjcysd.png)<figcaption>Screenshot 2026-04-29 at 7.43.13 AM.png</figcaption></figure>Hold option and click on the icon, you should see this:

<figure id="bkmrk-screenshot-2026-04-2-1">![Screenshot 2026-04-29 at 7.21.17 AM.png](https://bookstack.kamuela.org/uploads/images/gallery/2026-09/ZIVEdOCMxNxR7mww-screenshot-2026-04-29-at-7-21-17-am-i5xn4gyk.png)<figcaption>Screenshot 2026-04-29 at 7.21.17 AM.png</figcaption></figure>  
Let's decode this a bit:

- <span style="font-weight:bold;">IP address:</span> your address on the wireless network (this may also show up as a client on your router project)
- <span style="font-weight:bold;">Router</span>: usually the IP address of your home router (the one you were creating in the last lab)
- <span style="font-weight:bold;">MAC address: </span>the MAC hardware address of your computer, again something you saw in the router lab
- <span style="font-weight:bold;">Security</span>: encoding scheme, WPA3 is the latest one, WPA means wireless protected access
- <span style="font-weight:bold;">BSSID</span>: the base station ID MAC address, important to know if you are being attacked, or to see if you are connected to the closest access point (AP)
- <span style="font-weight:bold;">Channel</span>: there are two or three frequency bands: 2.4 gHz, 5.8 gHz and lately 6 gHz, each with "channels"
- <span style="font-weight:bold;">Country code:</span> each country has specific channels that are allowed, e.g. in the US, 2.4 gHz has 1-11, but in Japan they have 1-13, so some students use Japanese APs with Japanese computers to get around HPA wifi
- <span style="font-weight:bold;">RSSI</span>: Received Signal Strength Indicator, or how strong your computer "hears" the access point, note it is a negative number, so -69 is better than -89 dBm (decibels above a milliwatt)
- <span style="font-weight:bold;">Noise</span>: this is how noisy your wifi environment is. the lowest I've ever seen is -110 dBm in the middle of the desert near Mauna Loa. subtract the noise from the signal to get the amount your computer can actually use. if you try to talk to someone in the shower, they can't hear you (high noise) but you can hear them (low noise). same reason you can whisper in the library (low noise, low signal)
- <span style="font-weight:bold;">TX rate:</span> transmission rate, or how fast your computer can talk to the access point. if this is low, you are likely seeing it as slow emails, slow web, or impossible streaming. on newer macs, you may see this go slow when you are not using the internet, and then jump very high when you are browsing-try it.
- <span style="font-weight:bold;">PHY mode:</span> the type of encoding your wifi hardware is using, all based on standards set by the IEEE, so 802.11 means wifi, 802.11a or b were the first, we are now at 802.11ax or even 802.11be, which can be faster than ethernet
- <span style="font-weight:bold;">MCS</span>: modulation and coding scheme: a combination of factors between 1-31, with 31 being best connection
- <span style="font-weight:bold;">NSS</span>: number of spatial streams: essentially the number of antennas active on your device, usually 1-3, with more antennas meaning faster connections. my computer above has two antennas working, try your newer macs, they may have 3 or more.

<div id="bkmrk-questions-%231%3A%C2%A0"><span style="font-weight:bold;">Questions #1</span>: </div><div id="bkmrk-why-are-these-usuall">

1. why are these usually hidden from "normal casual" users?
2. what superpower does this information give you as a user?
3. how can you use this information to diagnose wifi issues for your friends?
4. if you were running your router at home, how could you tell if users were having issues?

</div>Next try wifi explorer: (installed on the elab macs, you can download free versions)<div id="bkmrk-wifi-explorer-mac-in">Wifi explorer mac installer (7 day trial): [ WiFi Explorer.zip](https://elab.hpa.edu/cs/installers/WiFi%20Explorer.zip)  
<div></div><div><figure>![Screenshot 2026-04-29 at 8.05.54 AM.png](https://bookstack.kamuela.org/uploads/images/gallery/2026-09/xoUrqSORODYRTZTr-screenshot-2026-04-29-at-8-05-54-am-renqia1c.png)<figcaption>Screenshot 2026-04-29 at 8.05.54 AM.png</figcaption></figure></div><div><span style="font-weight:bold;">Let's decode this image:</span></div><div>

- look first at the lower image: notice the overlapping networks and the channels-this is bad
- look at the table: note the BSSID for each client, and which network they are attached to
- note the networks with no name: "hidden network". how could you set this up on your home router?
- the cute little lock icon means secured network. where would you see a wifi network without this?
- the vendor at this location is ubiquiti, yours might be TPLINK or Synology
- signal is how strong each client sees THEIR access point, useful if you are helping a friend with wifi issues
- channels are same as the lower image, you can click on the top header to organize these by number
- channel width is like the lanes on a highway: more lanes means more traffic, but is also means if you are in a tiny car (one lane, small bandwidth) a big truck taking up several lanes will wipe you out. these vary from 20 gHz wide to 160 gHz wide and even 320 or 640 on some new wifi7 devices which only the latest laptops can use.
- band is 2.4, 5.8 or 6 for now
- generation is the version of 802.11 the client is using, you might hear about wifi6 or wifi7, most of your laptops are using wifi4 or 5, but "stupid" devices like cameras might still use wifi 2 or 3, slowing down the entire network, one reason we segment them to a "slow" network
- security, as above is the level of security used, which you might see as usually WPA3, but cameras might still be using WPA (no number, just WPA one) which can be cracked on your laptop in about 2 minutes
- max rate: look at the fastest rate for this computer: 5764 mb/s, which is 5x the speed of your ethernet cable. this does not mean wifi is always faster than wired networks. wired networks can transmit (talk) and receive (listen) at the same time, while wifi networks can only do one or the other (for now). also, wired networks are inherently more secure, as they are physically separated from hackers.

</div><div>Try joining a wireless network then use some of the scanning tools we have on the elab macs:  

- IP net monitor
- network radar
- iNet scanner
- IP scanner
- network kit

<span style="font-weight:bold;">Some technical details to review:</span>  
Wifi uses one of three radio bands:   

- 2.4 gHz: long range, lower data rates, stopped by water, wet leaves, humans
- 5.8 gHz: shorter range, higher data rates, goes through water better
- 6 gHz: very short range, humongous data rates, no issues with water

Signal and noise:  

- As mentioned above, try talking with someone who is in the shower: you can hear them, they can't hear you-why?
- Same signal (speech) but your noise level is lower (high signal to noise ratio or SNR).
- Shower person has high noise (shower), same signal (speech), low signal to noise ratio.
- This is crucial....

<div><div>MIMO: </div><div>

- Multiple in, multiple out and other ways access points "steer" radio beams
- You may have noticed several antennas on your routers, these are used for aiming the wifi beam at users
- If many people are on the same access point, the AP has to keep steering beams to everyone, overloading it.
- If some users are at the limit of range (fringe users) this slows the entire network slows down: "can you hear me now?"

</div><div>Improving your wifi network:  

- look at the spectrum diagram
- notice any overlaps
- change the channel on your AP so that it is not overlapping
- re-check your signal levels

<div><div>cybersecurity bits:</div><div>

- As a hacker, what do you have here that you don't have before?
- After setting up your own wifi, what do you see here that you can do to improve the security of yours?
- How could you use this tool and the OUI lookup tool online to get into a network?
- Is there a site that lists all of the default passwords for access points?
- Find it and lookup a few from your scans...

</div></div><span style="font-weight:bold;">Questions #2:</span>  

1. How will this enable you to improve the wifi at home?
2. What did you learn doing this that can improve your user experience?
3. How many "illegal" wireless networks did you find on campus?
4. Please email screenshots of what you find

<div><span style="font-weight:bold;">Next: netspot wifi mapping</span></div><div>  
</div><div><span style="font-weight:bold;">Top Homebrew WiFi Utilities</span>  

- airport (CLI): A powerful command-line tool to scan, manage, and display WiFi network information on macOS.  
    
    - Install: brew tap xwmx/taps &amp;&amp; brew install airport
- WiFiman Desktop (GUI): A comprehensive tool for monitoring and troubleshooting network performance.  
    
    - Install: brew install --cask wifiman
- Neo Network Utility (GUI): A tool providing detailed network information and diagnostics.  
    
    - Install: brew install --cask neo-network-utility
- [tiny-wifi-analyzer](https://github.com/nolze/tiny-wifi-analyzer) (GUI): A community-driven tool for real-time Wi-Fi network visualization.  
    
    - Install: brew install --cask tiny-wifi-analyzer
- [wifi-password](https://github.com/kjagiello/homebrew-wifi) (CLI): A simple tool to display the password of your current WiFi network.  
    
    - Install: brew install wifi-password
- Bettercap (CLI/Web UI): A framework for testing wireless networks and network security.  
    
    - Install: brew install bettercap
- Wifite2 (CLI): A tool to automate auditing encrypted wireless networks.
    - Install: brew install wifite
    - Install: brew install wifitui

Network Diagnostic Tools (Brew Formulae)   

- Wireshark (GUI): Captures and analyzes network packets in real-time.  
    
    - Install: brew install --cask wireshark
- nmap (CLI): Network discovery and security auditing.  
    
    - Install: brew install nmap
- tcpdump (CLI): Command-line packet analyzer for network troubleshooting.  
    
    - Install: brew install tcpdump
- brew install wifi-password bettercap nmap tcpdump
- <div>brew install --cask wireshark  
    brew install --cask wifi-explorer  
    brew install --cask netspot</div>

</div><div>  
</div><div class="block-placeholder">cba3ef6a-a55e-a55e-5df6-1aa14395f164</div><div><div></div></div>  
</div></div></div></div>---

<small>Migrated from Apple Server Wiki. Original page ID: 81N9Z7Y1</small>

# 1.7 Final project: Capture the flag

<span style="font-weight:bold;">Capture the flag challenge:</span>

You will hide an encrypted message in each of your pi400 computers connected wirelessly to the router you setup with a hidden wifi network.

The challenge is for your hacker friends to do the following:

1. find your wifi network (it may be hidden)
2. identify your wifi router by MAC address
3. access the "home" wifi network, using social engineering clues
4. scan your internal "home" network to find both of your pi400 units
5. get into each pi400 unit
6. find the hidden encrypted file
7. decode the file
8. leave an encrypted message in the same folder

<div id="bkmrk-points-will-be-given">Points will be given for each successful step!</div><div id="bkmrk--1">  
</div><div id="bkmrk-your-%22home%22-setup%3A"><span style="font-weight:bold;">Your "home" setup:</span></div><div id="bkmrk-reset-%28erase%29-your-r">

1. reset (erase) your router
2. setup your router with a hidden wifi network, and a password that the hackers can find about your team
3. connect each of your pi400 to the wifi network you have created and the wired connection to the router
4. on each of your pi400s, create a hidden folder
5. inside the folder, create a "hashed" SHA256 message using this:

<div><span>[https://docsallover.com/tools/sha256-encrypt-decrypt/](https://docsallover.com/tools/sha256-encrypt-decrypt/)</span><span></span>  
</div>

1. example: the word "secret" hashes into <span style="background-color:rgb(236,238,168);color:rgb(102,102,102);">2bb80d537b1da3e38bd30361aa855686bde0eacd7162fef6a25fe97bf527a25b</span>  which is how your passwords are actually stored (test this to confirm)

<div><span style="font-weight:bold;">Hacker tools:</span></div></div><div id="bkmrk-wifi-explorer">[Wifi explorer](https://elab.hpa.edu/cs/installers/WiFi%20Explorer.zip)  
</div><div id="bkmrk-ipnetmonitor">[IPnetmonitor](https://elab.hpa.edu/cs/installers/IPNetMonitorX.zip)  
</div><div id="bkmrk-nmap-%28terminal-comma">nmap (terminal command)</div><div id="bkmrk-password-hash-encode">[password hash encoder decoder](https://emn178.github.io/online-tools/sha256.html)  
</div><div id="bkmrk--2">  
</div><div id="bkmrk--3">  
</div>---

<small>Migrated from Apple Server Wiki. Original page ID: H8A544</small>