
arduino notes
Unmigrated media: comp-eng arduino module.pdf (application/pdf, 3.9 MB)
comp-eng arduino module
We will be creating two foundational devices in comp-eng: the arduino and the raspberry pi.
What is the difference?
Arduino is what is known as a PLC or programmable logic controller. If you load a program into it (usually by a cable connected to a computer) it will do one thing over and over. These are great for simple sensors, or in some robotics applications. Many automated things in your life are actually PLCs.
Raspberry pi is a complete computer running a version of linux OS called Raspian, a raspberry pi version of the most popular linux distribution called Debian, developed by a guy named Ian, named after his wife, Deb.
Arduinos are great tools for learning about the process of writing code, compiling code (making it into a language hardware can comprehend) and uploading to the device, which do simple things like blinking lights, or could measure the temperature of this room, or to run a motor based on some sensor, like in robotics.
Pi is great for learning about computers, the internet, cybersecurity, web pages and much more, so we’ll be using them next.
Arduino part:
Look at this:
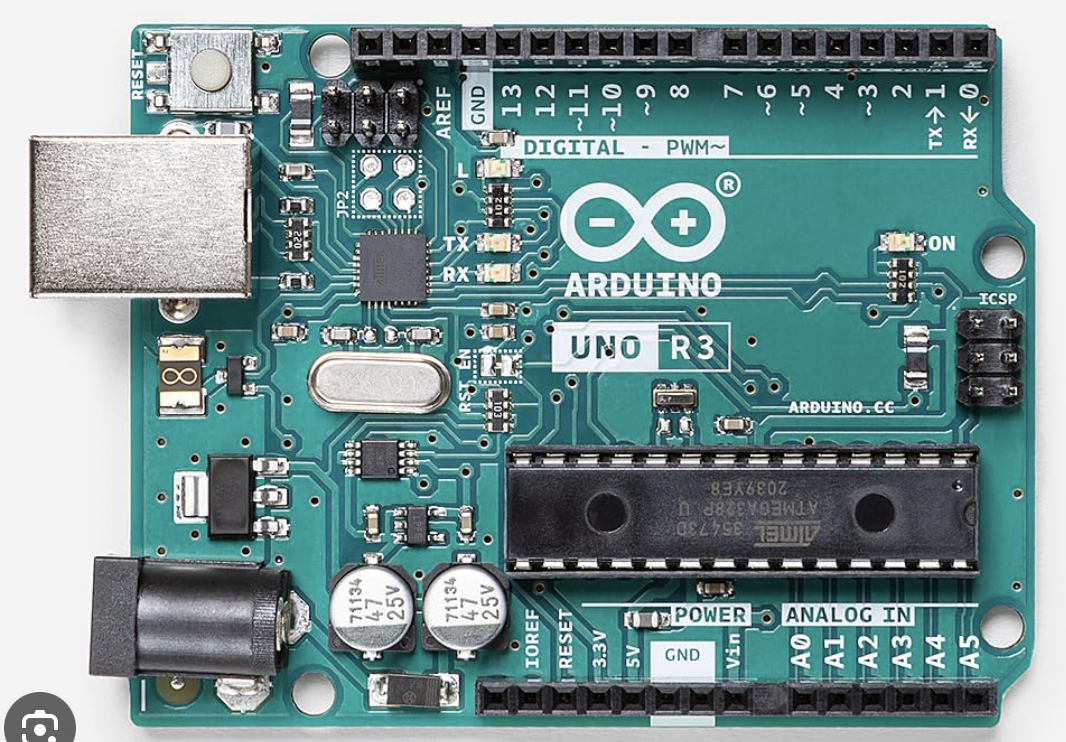
- On the left, you see a USB connection, which connects to a computer to load the programs.
- On the lower left is a power socket, if you need to power things like motors
- On the bottom are sockets for analog inputs, e.g. values like voltage or resistance that have a range of many values
- On the top are the digital inputs and outputs, which match what you have learned about 1 and 0, T and F, and all of those concepts, usually 0 or 5 Volts DC.
- PWM is a fancy way of using digital signals (1 and 0) in fast repeats to simulate an analog signal output. If you want to show off this is called Pulse Wave Modulation, and it is how many digital devices in your life work.
You will be using this book for this project: arduino.pdf
https://elab.hpa.edu/cs/arduino.pdf
(see below as well)
The format of the book is setup at the beginning (read carefully) then projects with diagrams of the components and how they are wired to the breadboard (white part)
- connect your arduino to a computer and load the first program, which makes the arduino flash at a certain rate
- compile the program, then upload: you will see flashing lights as the program loads into the arduino
- the light should flash at a certain rate
- go back to the program and change some of the values from 1000 to 500 or 2000. re-compile, re-load and see how you have changed the system
- continue with the other modules, which involve wiring the components according to the diagrams
- you are now an official computer programmer!
Arduino steps:
1. Open Arduino app (green icon)
2. Tools->arduino uno, connect Uno
3. Port->usbmodem (when plugged in)
4. File->examples->USK guide code
5. open circuit 01
6. Sketch->verify/Compile
7. Sketch->upload
8. Modify code, repeat
Migrated from Apple Server Wiki. Original page ID: U9P3z4D0