
Ethernet cables
Migration
- If
inyouprogresswant to learn about driving, you first have to understand what a road is. - In this case, network "roads" are cables, but can also be fiber optics or wireless networks
- We need to understand how to create one of these "roads" from scratch
- We will be using either category 5 "cat5" or category 6 "cat6" cables
- cat5 has a max speed of 1 gb/s, especially if it is labeled "cat5e", or "cat5 extended, cat5e"
- cat6 has a max speed of 10 gb/s
- The RJ-45 cable ends for these are not interchangeable, as one wire is a bit thinner than the other (cat5 is 24AWG while cat6 is 23AWG, a bit thicker)
- The ends are called RJ45 and have 8 slots, with the flat side facing you, and the hole at the bottom, see below.
- When viewed with the flat side towards you, these are the colors:
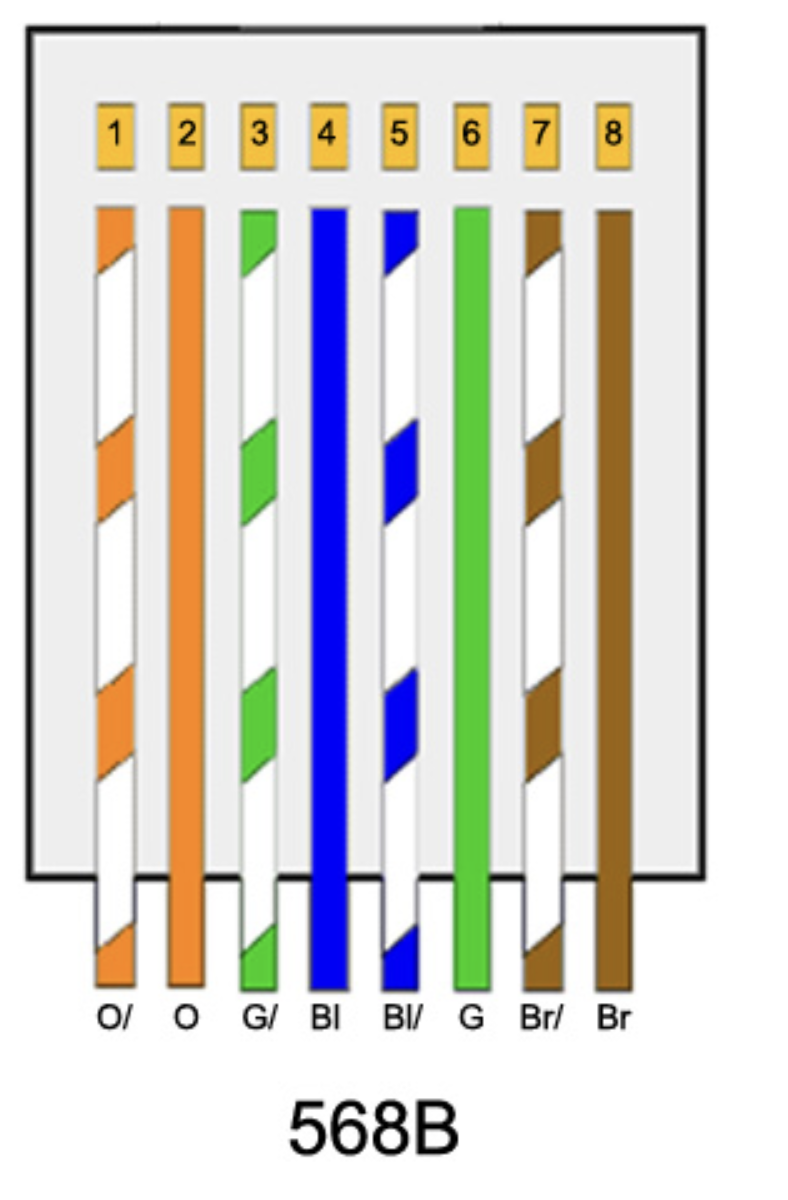
- This is NOT random
- The first two orange pairs (1 and 2) are for data transmit
- The green pairs (3 and 6) are for data receive
- The blue pair is for power over ethernet (POE) plus (+)
- The brown pair is for POE negative (-)
- This color is different from 8 conductor (4 pair) telephone cables which may look exactly alike
- Reason? Phone cables start with 4-5 as line one, then 3-6 as line two, 2-7 as line three and 1-8 as line four
- Each of these has up to 90 volts on each pair (when a telephone rings) so we separate our color code for computers
- Reason? Plugging a computer into a phone outlet will not burn out the network card on the computer this way
Creating an ethernet cable:
We will be using pass-through connectors for our cables, along with cat5e cable
Parts:
- RJ-45 cat5e pass-through cable connectors (make sure these are the correct size for cat5e)
- at least 1 meter long length of cat5e cable (cat6 uses different RJ-45 ends)
- cable strippers (optional if you use the Klein tool below)
- Klein combo cable crimper tool (yellow)
- strip one end of the cable about 3cm from the end
- cut off the tension thread (this prevents stretching when pulling cable)
- arrange the wires according to the ATT 568B pattern with orange-white on the left side
- cut the arranged wires flat using the Klein tool or wire clippers about 2 cm from the cable sheath
- holding the RJ-45 cable end with the flat side facing you, and the open bit facing down, thread the wires into the connector
- check the order to make sure it matches the image above
- crimp with the crimping tool
- repeat with the other end of the cable
- test with the continuity tester
- if available, test with the speed tester
Migrated from Apple WikiServer Wiki. Original page V7K8W3X3.ID: V7K8W3X3